EFS in AWS EKS
Setting up EFS support in your EKS cluster
This section describe how you can achieve EFS support in your EKS cluster. EFS persistent volume claims go across availability zones and support RWX modes. You don't need to follow this document if you have used the onboarding CLI to create your EKS cluster.
Pre-requisites
- Authenticate to aws cli.
- Set these values before running the below commands
export CLUSTER_NAME=""
export AWS_REGION=""
export AWS_ACCOUNT_ID=$(aws sts get-caller-identity --query "Account" --output text)
export OIDC_ENDPOINT=$(aws eks describe-cluster --name ${CLUSTER_NAME} \
    --query "cluster.identity.oidc.issuer" --output text)
export VPC_ID=$(aws eks describe-cluster \
    --name "${CLUSTER_NAME}" \
    --query "cluster.resourcesVpcConfig.vpcId" \
    --region "${AWS_REGION}" \
    --output text)
export VPC_CIDR_RANGE=$(aws ec2 describe-vpcs \
    --vpc-ids "${VPC_ID}" \
    --query "Vpcs[].CidrBlock" \
    --output text \
    --region "${AWS_REGION}")
export CLUSTER_SUBNET_LIST=$(aws eks describe-cluster \
    --name "${CLUSTER_NAME}" \
    --query 'cluster.resourcesVpcConfig.subnetIds' \
    --output text)
Setting up IAM policy and roles
-
Create the IAM role
cat > efs-assume-role-policy.json <<EOF { "Version": "2012-10-17", "Statement": [ { "Effect": "Allow", "Principal": { "Federated": "arn:aws:iam::${AWS_ACCOUNT_ID}:oidc-provider/${OIDC_ENDPOINT#*//}" }, "Action": "sts:AssumeRoleWithWebIdentity", "Condition": { "StringEquals": { "${OIDC_ENDPOINT#*//}:sub": "system:serviceaccount:aws-efs-csi-driver:efs-csi-controller-sa" } } } ] } EOF export EFS_ROLE_ARN=$(aws iam create-role \ --role-name "${CLUSTER_NAME}-csi-efs" \ --assume-role-policy-document file://"efs-assume-role-policy.json" \ --query 'Role.Arn' --output text) -
Attach the policy to IAM role
aws iam attach-role-policy \
  --policy-arn "arn:aws:iam::aws:policy/service-role/AmazonEFSCSIDriverPolicy" \
  --role-name "${CLUSTER_NAME}-csi-efs"
Creating AWS EFS and its mount targets
-
Creating a security group to allow 2049 port access from VPC.
# create a security group SECURITY_GROUP_ID=$(aws ec2 create-security-group \ --group-name TfyEfsSecurityGroup \ --description "Truefoundry EFS security group" \ --vpc-id "${VPC_ID}" \ --region "${AWS_REGION}" \ --output text) # authorize the security group to connect from VPC CIDR. It can be customized to be connected from subnets # IDs of the security group aws ec2 authorize-security-group-ingress \ --group-id $SECURITY_GROUP_ID \ --protocol tcp \ --port 2049 \ --region "${AWS_REGION}" \ --cidr "${VPC_CIDR_RANGE}" -
Create the file system and mount them to cluster subnets
FILE_SYSTEM_ID=$(aws efs create-file-system \
    --region "${AWS_REGION}" \
    --performance-mode generalPurpose \
    --encrypted \
    --throughput-mode elastic \
    --tags Key=Name,Value="${CLUSTER_NAME}-efs" Key=Created-By,Value=Truefoundry Key=cluster-name,Value=$CLUSTER_NAME \
    --query 'FileSystemId' \
    --output text)

for subnet_id in ${CLUSTER_SUBNET_LIST[@]}; do
	aws efs create-mount-target \
  --file-system-id "${FILE_SYSTEM_ID}" \
  --subnet-id $subnet_id \
  --security-groups "${SECURITY_GROUP_ID}" \
  --region "${AWS_REGION}"
done
Installing AWS EFS CSI Driver
-
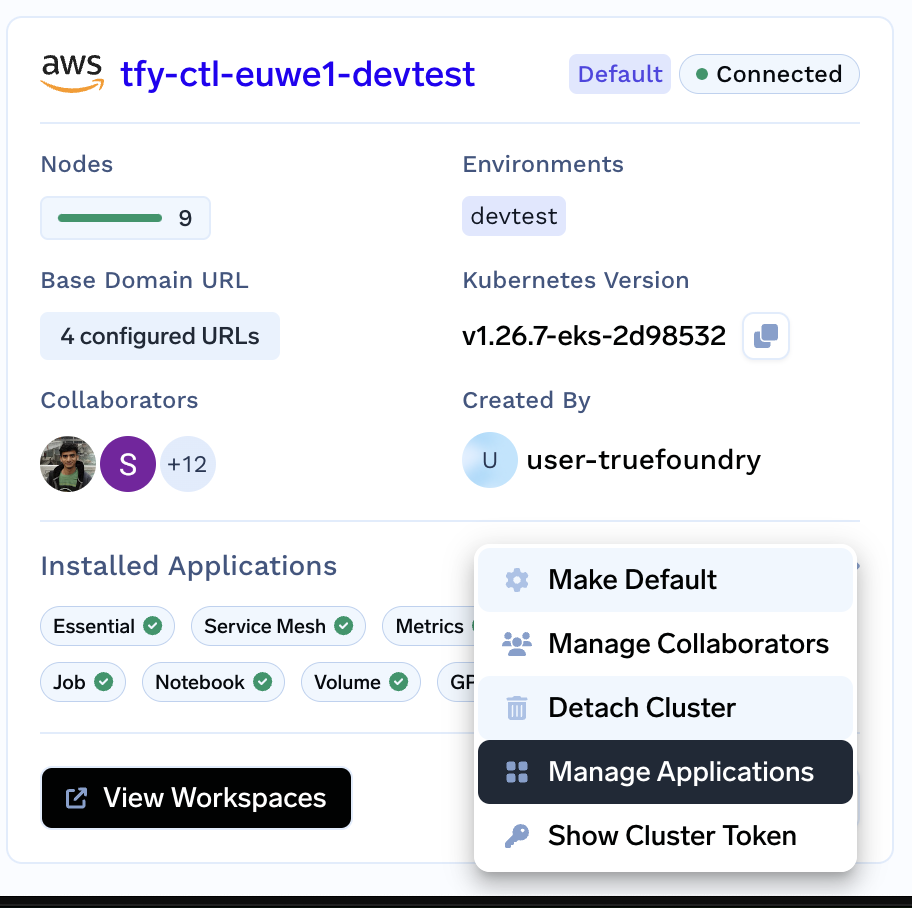
Head over to the platform and connect the cluster if you haven't connected it to the TrueFoundry's platform.
-
From the left panel go to the Integrations tab and click on Manage Applications from the the three dots in the right bottom corner of the cluster card.
-
Go to the Volumes Section and click on
+InstallagainstAws Efs Csi Driver
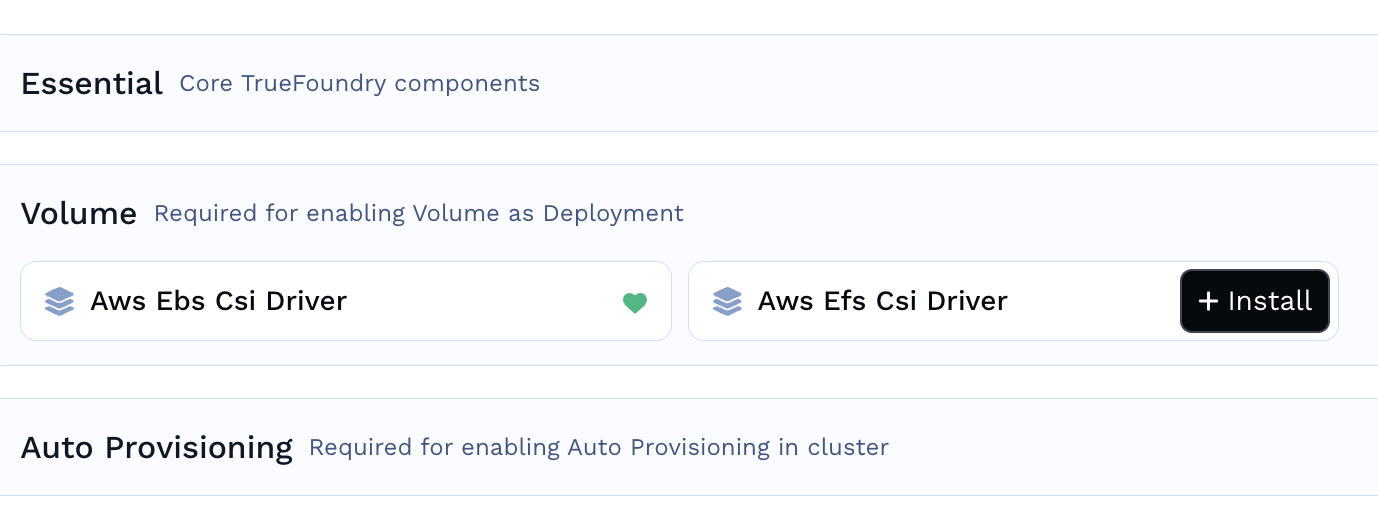
-
Click on
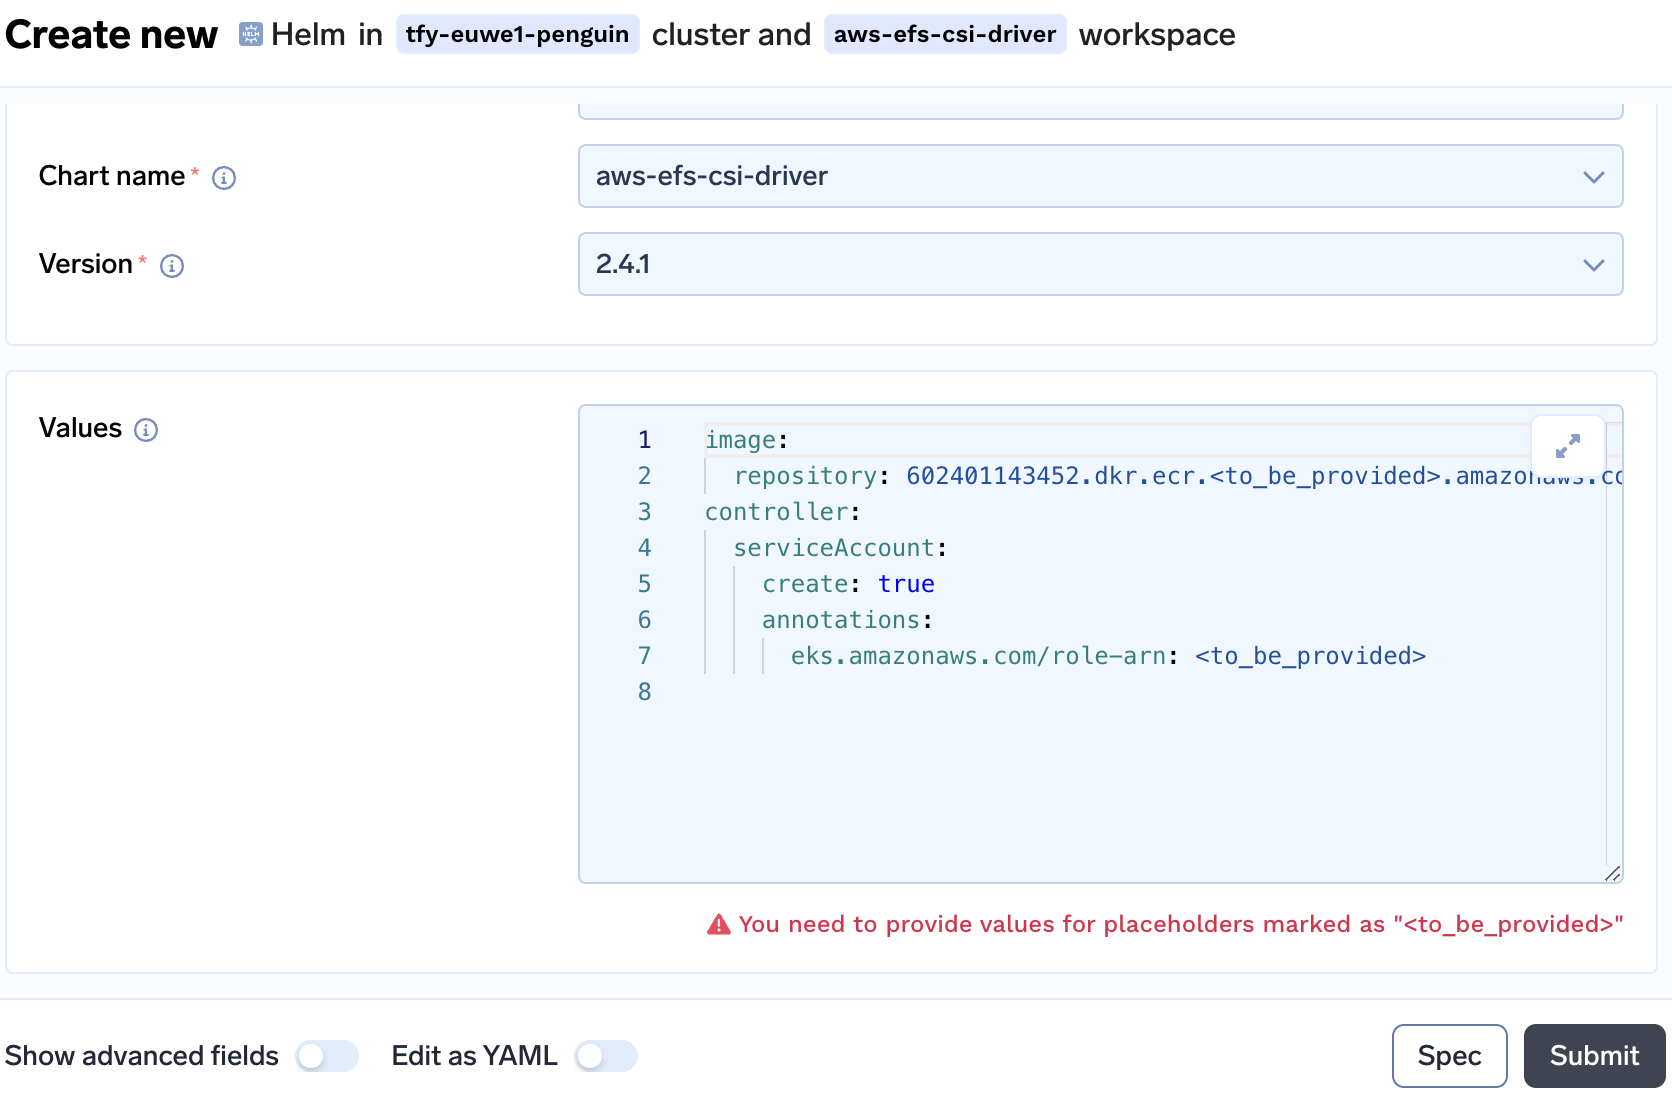
Create Workspaceon the next screen followed byCreateto leave the settings of the workspaceaws-efs-csi-driveras default. -
Replace the
<to_be_provided>in line 2 with theAWS_REGIONand at line 7 with theEFS_ROLE_ARN.
-
An example of this is
image:
  repository: 602401143452.dkr.ecr.REGION.amazonaws.com/eks/aws-efs-csi-driver
controller:
  serviceAccount:
    create: true
    annotations:
      eks.amazonaws.com/role-arn: arn:aws:iam::xxxxxxxx:role/CLUSTER-NAME-csi-efs
Installing a storage class and testing EFS volumes
- Once the applications is installed a storage class needs to be created for persistent volume to use. Create a storage with the
FILE_SYSTEM_IDthat we createdkubectl apply -f -<<EOF kind: StorageClass apiVersion: storage.k8s.io/v1 metadata: name: efs-sc provisioner: efs.csi.aws.com parameters: provisioningMode: efs-ap fileSystemId: "${FILE_SYSTEM_ID}" directoryPerms: "700" gidRangeStart: "1000" # optional gidRangeEnd: "2000" # optional basePath: "/truefoundry" EOF - Check if the storage class is created by the name
efs-sckubectl get sc NAME PROVISIONER RECLAIMPOLICY VOLUMEBINDINGMODE ALLOWVOLUMEEXPANSION AGE efs-sc efs.csi.aws.com Delete Immediate false 20s gp2 (default) kubernetes.io/aws-ebs Delete WaitForFirstConsumer false 99d - Deploy a sample pod which will create a pvc and pod using that pvc. If pod comes up successfully then EFS is working fine
kubectl apply -f https://raw.githubusercontent.com/kubernetes-sigs/aws-efs-csi-driver/master/examples/kubernetes/dynamic_provisioning/specs/pod.yaml
References
Updated 4 months ago