Autoscaling in EKS: Karpenter
How to autoscale in EKS
Cluster autoscaling is a crucial feature of Kubernetes that allows clusters to dynamically adjust their size based on resource demands. This means that as workloads increase, more nodes can be added to the cluster, and as demand decreases, nodes can be removed. This feature helps to optimize resource utilization and minimize costs, as clusters are scaled up only when necessary, and scaled down when resources are no longer needed.
Cluster autoscaling is particularly important in Kubernetes clusters that handle variable workloads, such as those associated with web applications or data processing tasks. It enables clusters to automatically adapt to changes in demand, ensuring that resources are allocated efficiently and effectively. Additionally, by automating the scaling process, cluster autoscaling reduces the need for manual intervention, thereby improving the overall reliability and performance of the cluster.
Karpenter is a Kubernetes-based solution for cluster autoscaling that aims to simplify and automate the process of scaling worker nodes in a cluster. It provides a set of custom controllers that leverage the Kubernetes Custom Resource Definitions (CRDs) to manage the lifecycle of worker nodes in a cluster
Overview: Karpenter
When it comes to scaling applications in Kubernetes, there are many different options available. Two popular choices are Karpenter and Cluster Autoscaler. While both tools are designed to scale Kubernetes clusters dynamically, there are some important differences to consider.
As a platform which supports wide variety of application deployments which includes running jobs, workflows, helm charts, argoCD applications and service deployments on CPUs and GPUs, it becomes difficult to provision nodes which can satisfy all these requirements. Native cluster autoscaler in Kubernetes does support and can satisfy the requirements but maintaining it with varying node pool configurations becomes difficult.
Karpenter doesn't use node pool configurations and rather rely directly on EC2 instances making it more dynamic in selecting the right instance types with right configurations.
Below is the basic difference between karpenter and cluster autoscaler
| Features | Cluster Autoscaler | Karpenter |
|---|---|---|
| Upscaling | Scaling is based on the node pool configuration making it very limited to the size of nodes | fine-tuned scaling according to requirement, directly connect with different EC2 types. |
| Downscaling | Will check remaining nodes can handle pods and then de-provision | Will optimize the nodes and will schedule smaller nodes if needed. |
| Scheduling configuration | Will only scale nodes according to node pool. Uses kube-scheduler to schedule node making it slower as image pull happens when node comes up | Will scale nodes based on very fine granular configurations. Directly schedules pending pods on new nodes making it very fast as image pull happens before node comes up. |
| Unschedulable pods | Will not schedule pods if node pool configuration doesn’t support it for huge request pods | Will schedule pods (anyways) as it doesn’t use any specific node pool config. karpenter by default selects the right size instance type. |
| Limiting node types | Limited to instance types of node pools | Can explicitly limit instance types we don’t want to use. |
| Support features | General purpose autoscaler | K8s native autoscaler for AWS EKS |
| Cost | Uses node pool, resulting in fixed instance types, less cost optimisation | Schedules node based on requirement, selects right size instance types, highly cost effective |
| Scheduling speeds | Slow | Fast |
| Installation | Easy | Easy |
| Maturity | More mature | Less mature |
| Maintenance | Easy | Easy |
Cluster Autoscaler is a native Kubernetes feature that allows you to automatically adjust the size of your cluster based on demand. It works by monitoring the usage of nodes in your cluster and adding or removing nodes as needed. This approach is limited by the node pool configuration, and image pull happens when nodes come up, which can slow down the scheduling process.
Compared to cluster autoscaler, Karpenter is faster in scheduling pods on new nodes as image pull happens before the node comes up. Karpenter also allows explicitly limiting instance types that are not desired, making it more cost-effective than cluster autoscaler.
While cluster autoscaler is more mature, Karpenter is easier to install and maintain. For cloud experts who prioritise speed and cost efficiency, Karpenter is a better choice.
Setting up karpenter
The following steps take care of enabling karpenter on an AWS account -
- Create and bootstrap the node role which karpenter nodes will use
$ export CLUSTER_NAME=<cluster_name>

$ export AWS_REGION=""

$ echo '{
    "Version": "2012-10-17",
    "Statement": [
        {
            "Effect": "Allow",
            "Principal": {
                "Service": "ec2.amazonaws.com"
            },
            "Action": "sts:AssumeRole"
        }
    ]
}' > node-trust-policy.json

$ aws iam create-role --role-name karpenter-node-role-${CLUSTER_NAME} \
    --assume-role-policy-document file://node-trust-policy.json

$ aws iam attach-role-policy --role-name karpenter-node-role-${CLUSTER_NAME} \
    --policy-arn arn:aws:iam::aws:policy/AmazonEKSWorkerNodePolicy

$ aws iam attach-role-policy --role-name karpenter-node-role-${CLUSTER_NAME} \
    --policy-arn arn:aws:iam::aws:policy/AmazonEKS_CNI_Policy

$ aws iam attach-role-policy --role-name karpenter-node-role-${CLUSTER_NAME} \
    --policy-arn arn:aws:iam::aws:policy/AmazonEC2ContainerRegistryReadOnly

$ aws iam attach-role-policy --role-name karpenter-node-role-${CLUSTER_NAME} \
    --policy-arn arn:aws:iam::aws:policy/AmazonSSMManagedInstanceCore

$ aws iam create-instance-profile \
    --instance-profile-name karpenter-instance-profile-${CLUSTER_NAME}

$ aws iam add-role-to-instance-profile \
    --instance-profile-name karpenter-instance-profile-${CLUSTER_NAME} \
--role-name karpenter-node-role-${CLUSTER_NAME}- Create service account for the karpenter controller
$ CLUSTER_ENDPOINT="$(aws eks describe-cluster \
    --name ${CLUSTER_NAME} --query "cluster.endpoint" \
    --output text)"
$ OIDC_ENDPOINT="$(aws eks describe-cluster --name ${CLUSTER_NAME} \
    --query "cluster.identity.oidc.issuer" --output text)"
$ AWS_ACCOUNT_ID=$(aws sts get-caller-identity --query 'Account' \
    --output text)

$ echo "{
    \"Version\": \"2012-10-17\",
    \"Statement\": [
        {
            \"Effect\": \"Allow\",
            \"Principal\": {
                \"Federated\": \"arn:aws:iam::${AWS_ACCOUNT_ID}:oidc-provider/${OIDC_ENDPOINT#*//}\"
            },
            \"Action\": \"sts:AssumeRoleWithWebIdentity\",
            \"Condition\": {
                \"StringEquals\": {
                    \"${OIDC_ENDPOINT#*//}:aud\": \"sts.amazonaws.com\",
                    \"${OIDC_ENDPOINT#*//}:sub\": \"system:serviceaccount:karpenter:karpenter\"
                }
            }
        }
    ]
}" > controller-trust-policy.json

$ aws iam create-role --role-name karpenter-controller-role-${CLUSTER_NAME} \
    --assume-role-policy-document file://controller-trust-policy.json

$ echo '{
    "Statement": [
        {
            "Action": [
                "ssm:GetParameter",
                "iam:PassRole",
                "ec2:DescribeImages",
                "ec2:RunInstances",
                "ec2:DescribeSubnets",
                "ec2:DescribeSecurityGroups",
                "ec2:DescribeLaunchTemplates",
                "ec2:DescribeInstances",
                "ec2:DescribeInstanceTypes",
                "ec2:DescribeInstanceTypeOfferings",
                "ec2:DescribeAvailabilityZones",
                "ec2:DeleteLaunchTemplate",
                "ec2:CreateTags",
                "ec2:CreateLaunchTemplate",
                "ec2:CreateFleet",
                "ec2:DescribeSpotPriceHistory",
                "pricing:GetProducts"
            ],
            "Effect": "Allow",
            "Resource": "*",
            "Sid": "Karpenter"
        },
        {
            "Action": "ec2:TerminateInstances",
            "Condition": {
                "StringLike": {
                    "ec2:ResourceTag/Name": "*karpenter*"
                }
            },
            "Effect": "Allow",
            "Resource": "*",
            "Sid": "ConditionalEC2Termination"
        }
    ],
    "Version": "2012-10-17"
}' > controller-policy.json

$ aws iam put-role-policy --role-name karpenter-controller-role-${CLUSTER_NAME} \
    --policy-name karpenter-controller-policy-${CLUSTER_NAME} \
--policy-document file://controller-policy.json- We need to tag all the subnets where karpenter nodes should be created -
# This will give you all the subnet ids available. Choose the subnets that karpenter should create nodes in
$ aws eks describe-cluster --name $CLUSTER_NAME --query "cluster.resourcesVpcConfig.subnetIds"

# Execute the following two commands for each of the subnets
$ aws ec2 create-tags --tags "Key=kubernetes.io/cluster/${CLUSTER_NAME},Value=shared" --resources <subnet_id>

$ aws ec2 create-tags --tags "Key=subnet,Value=private" --resources <subnet_id>- We also need to tag the security group where the karpenter nodes are to be created -
$ SECURITY_GROUP_ID=$(aws eks describe-cluster --name $CLUSTER_NAME --query "cluster.resourcesVpcConfig.clusterSecurityGroupId" --output text)

$ aws ec2 create-tags --tags "Key=karpenter.sh/discovery,Value=${CLUSTER_NAME}" --resources ${SECURITY_GROUP_ID}- Update the aws-auth configmap for the karpenter nodes to access the control plane -
$ kubectl edit configmap aws-auth -n kube-system- Add this section under mapRoles -
- groups:
  - system:bootstrappers
  - system:nodes
  rolearn: arn:aws:iam::${AWS_ACCOUNT_ID}:role/karpenter-node-role-${CLUSTER_NAME}
username: system:node:{{EC2PrivateDNSName}}- We might need to enable spot instance creation. Execute the following for it. If it returns an error, that means spot instances were already enabled -
$ aws iam create-service-linked-role --aws-service-name spot.amazonaws.comThis will prepare the infra for karpenter installation. We can install karpenter now.
Installing karpenter
- Once all the configuration for karpenter is set up we can go ahead with the installation of the karpenter application and it's configuration for this we will go to the integration tab in the left panel of the Truefoundry dashboard and click on the three dots on the cluster card where we want to install karpenter
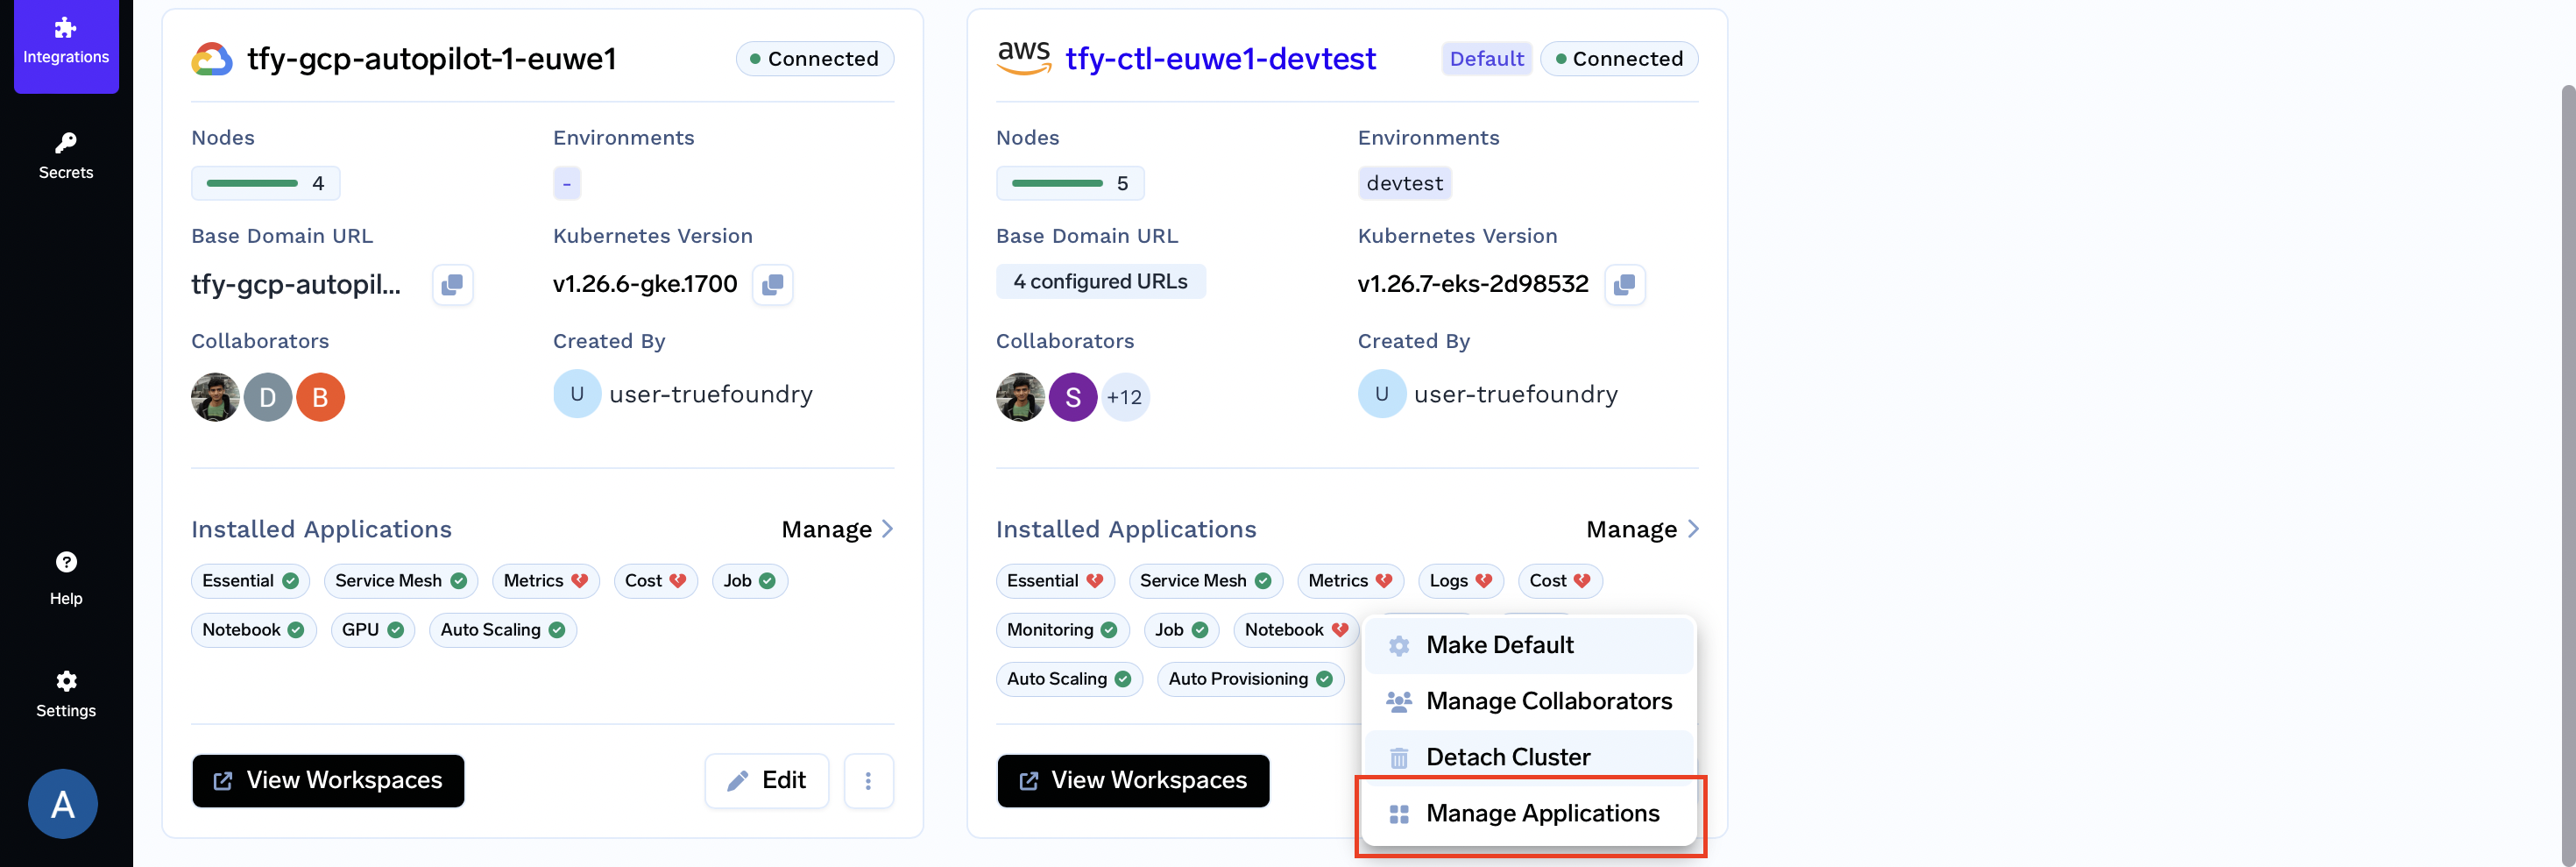
-
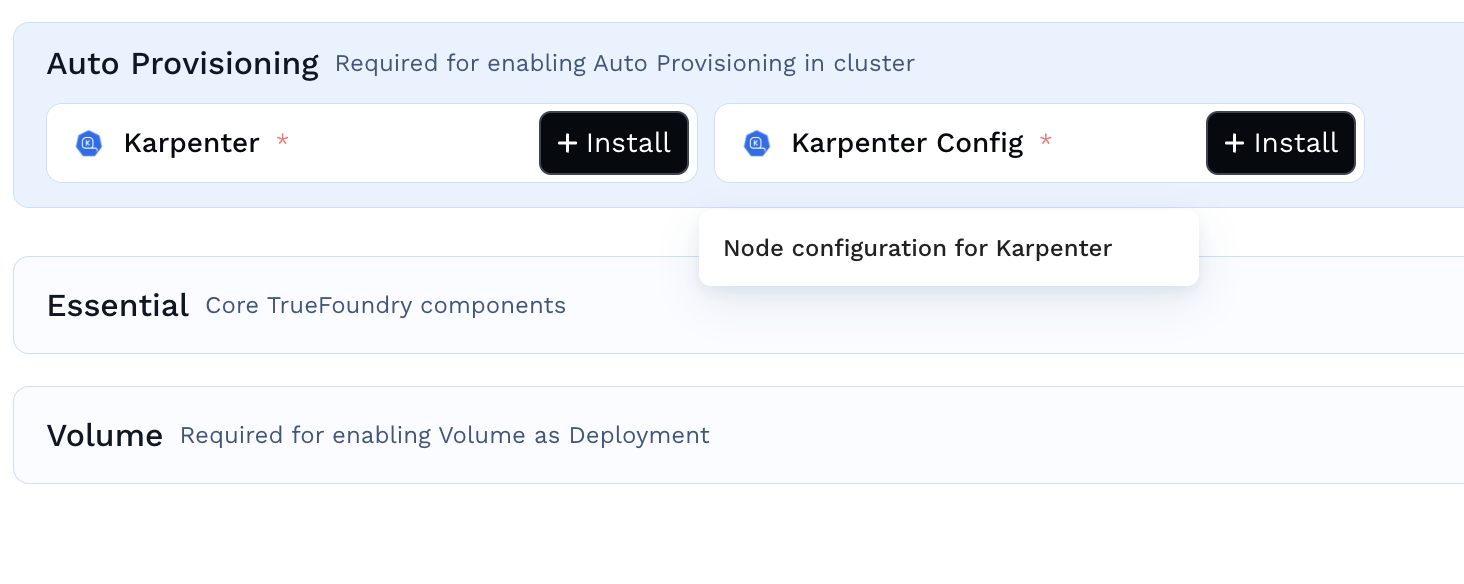
Click on +Install to install the karpenter application.
-
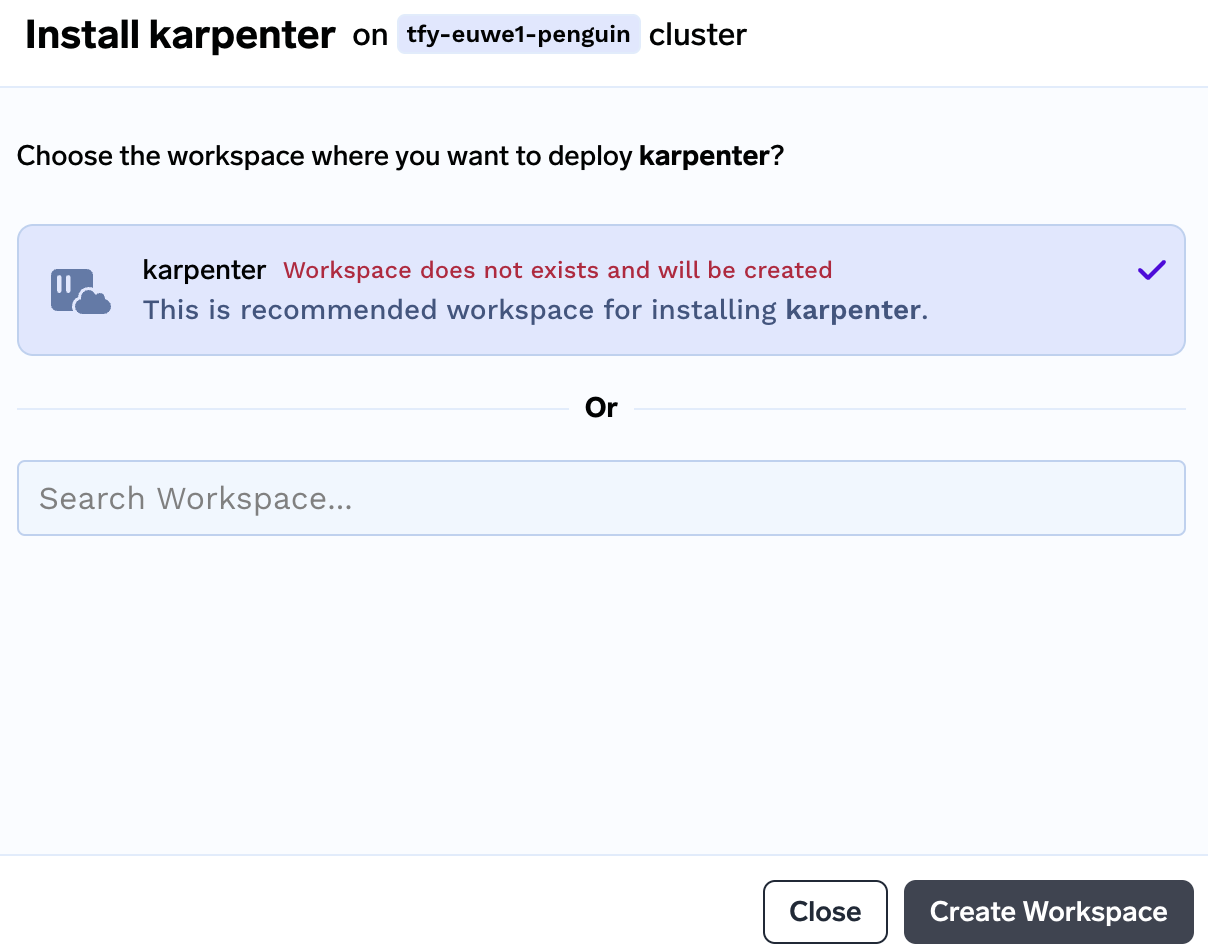
Create the workspace
karpenterby clicking on submitting. You can leave the default values as it is.
-
The next screen will ask to submit the workspace and then it will ask to input the karpenter application details.

-
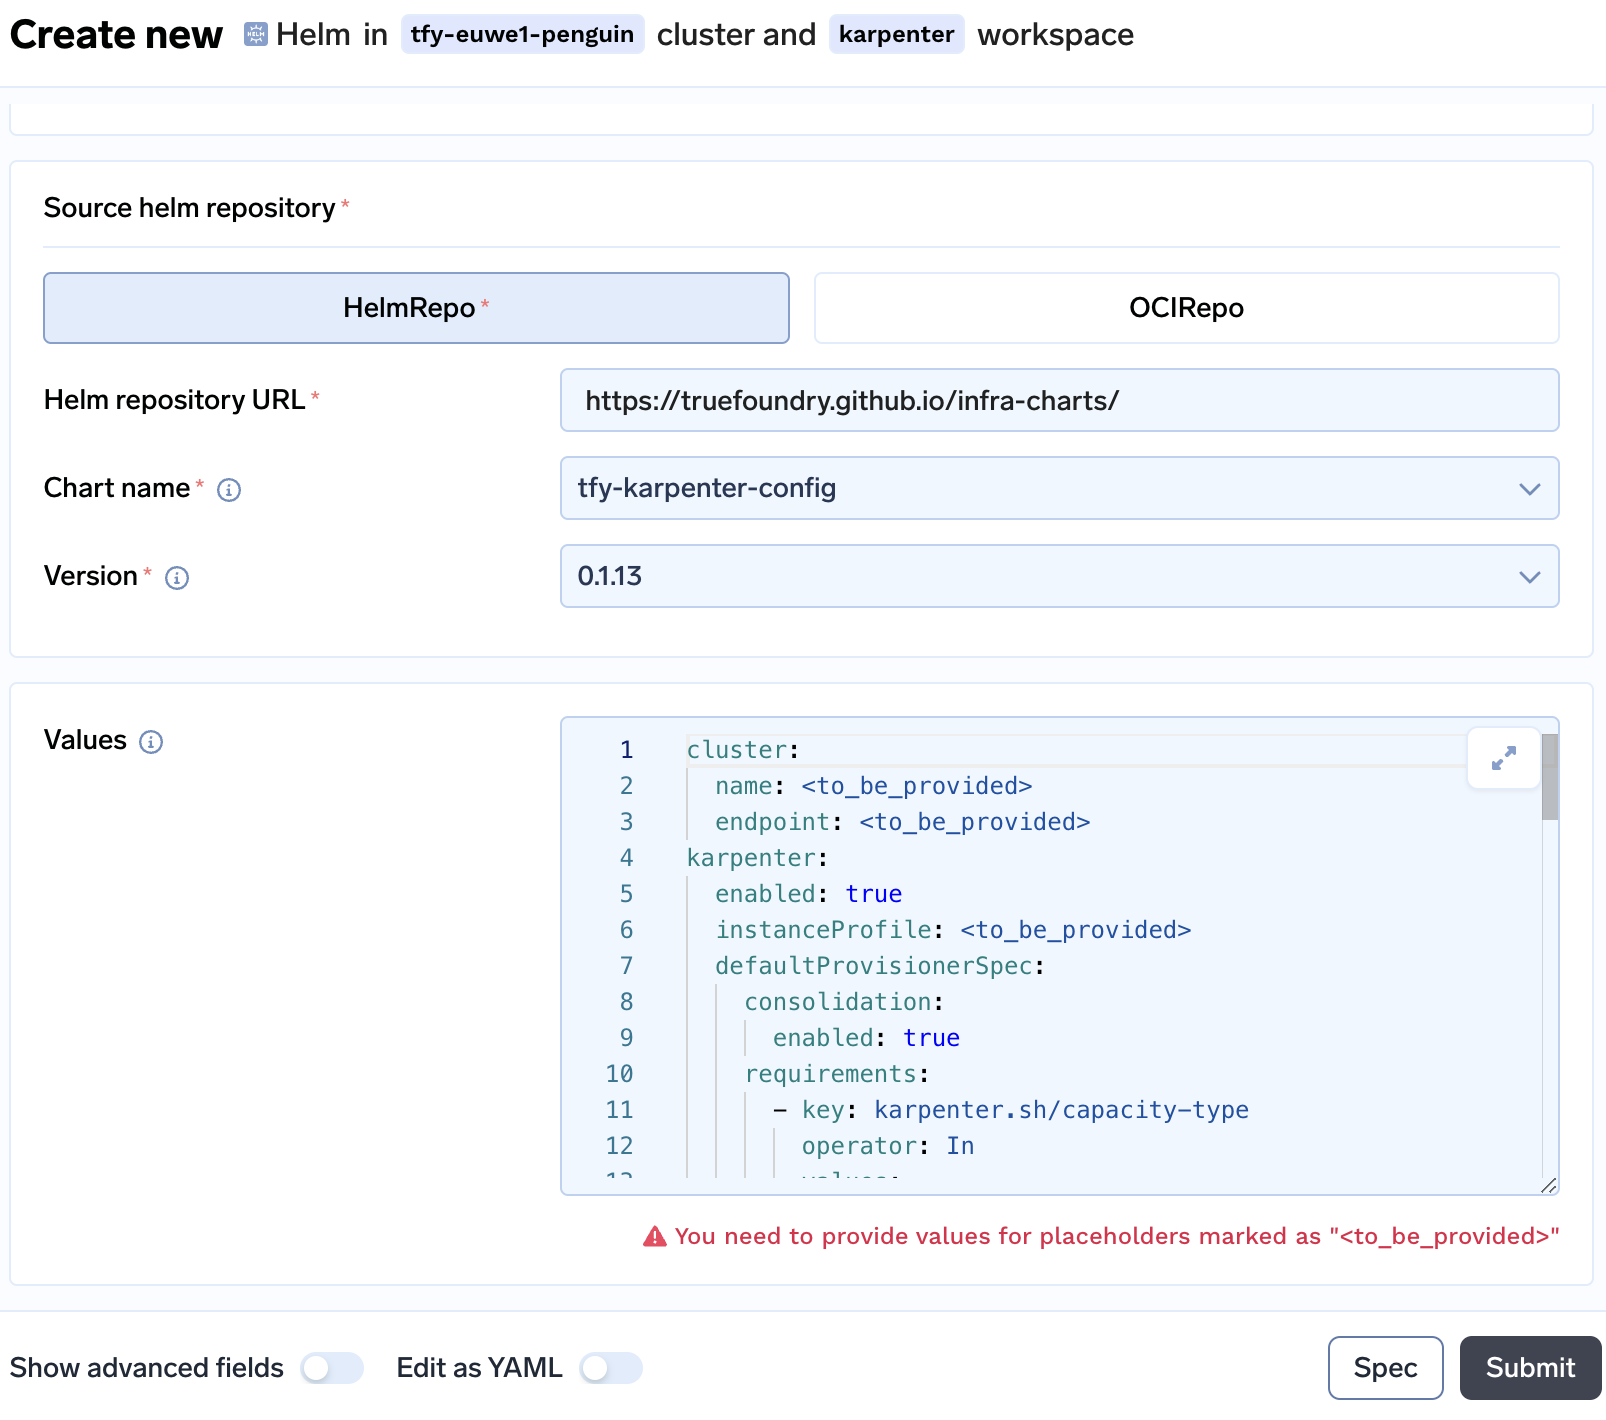
Following lines are to be added. These values are generated while executing the above commands.
- Added the controller ARN at line 4
- Enter the cluster name at line 7
- Enter the clusterEndpoint at line 8
- Enter the instance profile name at line 9.
-
Example of the final values
karpenter:
  serviceAccount:
    annotations:
      eks.amazonaws.com/role-arn: arn:aws:iam::ACCOUNT_ID:role/karpenter-controller-role-CLUSTER_NAME
  settings:
    aws:
      clusterName: CLUSTER_NAME
      clusterEndpoint: https://xxxxxxxxxxx.gr7.REGION.eks.amazonaws.com
      defaultInstanceProfile: karpenter-instance-profile-CLUSTER_NAME
  controller:
    resources:
      requests:
        cpu: 50m
        memory: 100Mi
      limits:
        cpu: 200m
        memory: 256Mi
Installing karpenter config
- Once the karpenter is installed we need to install
karpenter-configapplication, so that karpenter can create the nodes accordingly. - Go to Integrations tab from the left panel and click on the three dots on your cluster.
- Click on Manage Applications and then click on installing
Karpenter Config

- Click on
Continueto accept the destination workspace askarpenter. On the next screen you will see installation ofkarpenter-configwhere you need to provide the values.
- Replace the following values
- Add the cluster name at line 2 and cluster endpoint at line 3
- Enter the instance profile at line 6
- After scrolling down you need to enter the zones where the node subnets are running at line no 17. An example of this is given below if
eu-west-1aandeu-west-1bare the two zones where the nodes will launched.- key: topology.kubernetes.io/zone operator: In values: - eu-west-1a - eu-west-1b - Same you need to do for
gpuProvisionergpuProvisionerSpec: enabled: true capacityTypes: - spot - on-demand zones: - eu-west-1a - eu-west-1b
- Click on
Submit
Now we have installed karpenter.
Updated 4 months ago