Deploy a LLM (Llama 2 7B Chat) with vLLM
Advanced Guide
This guide is generally meant for advanced usage and involves more steps but also provides more configuration flexibility. For quick start, we recommend Deploying using the Model Catalogue
vLLM enables high throughput LLM inference using a variety of techniques like PagedAttention, FlashAttention, Continuous Batching Tensor Parallelism, and custom kernels.
In this guide, we will deploy NousResearch/Llama-2-7b-chat-hf
Compatibility
Model ArchitecturesvLLM supports a lot of Hugging Face models, including architectures like GPT-2, GPT-NeoX, Falcon, and more. You can read more here
Hardware
- vLLM can be deployed on some Nvidia GPU's with CUDA 11.2 or higher. For optimal performance, we recommend using Ampere or newer GPUs.
- vLLM also supports running on multiple GPUs in parallel, which can significantly improve throughput.
- Please note that vLLM is still under active development, so there may be some compatibility issues with certain models or hardware configurations. If you encounter any problems, please contact us.
Deploying using UI
On the Deployments Page, click New Deployment on the top right and select a workspace
New Deployment on the top right and select a workspace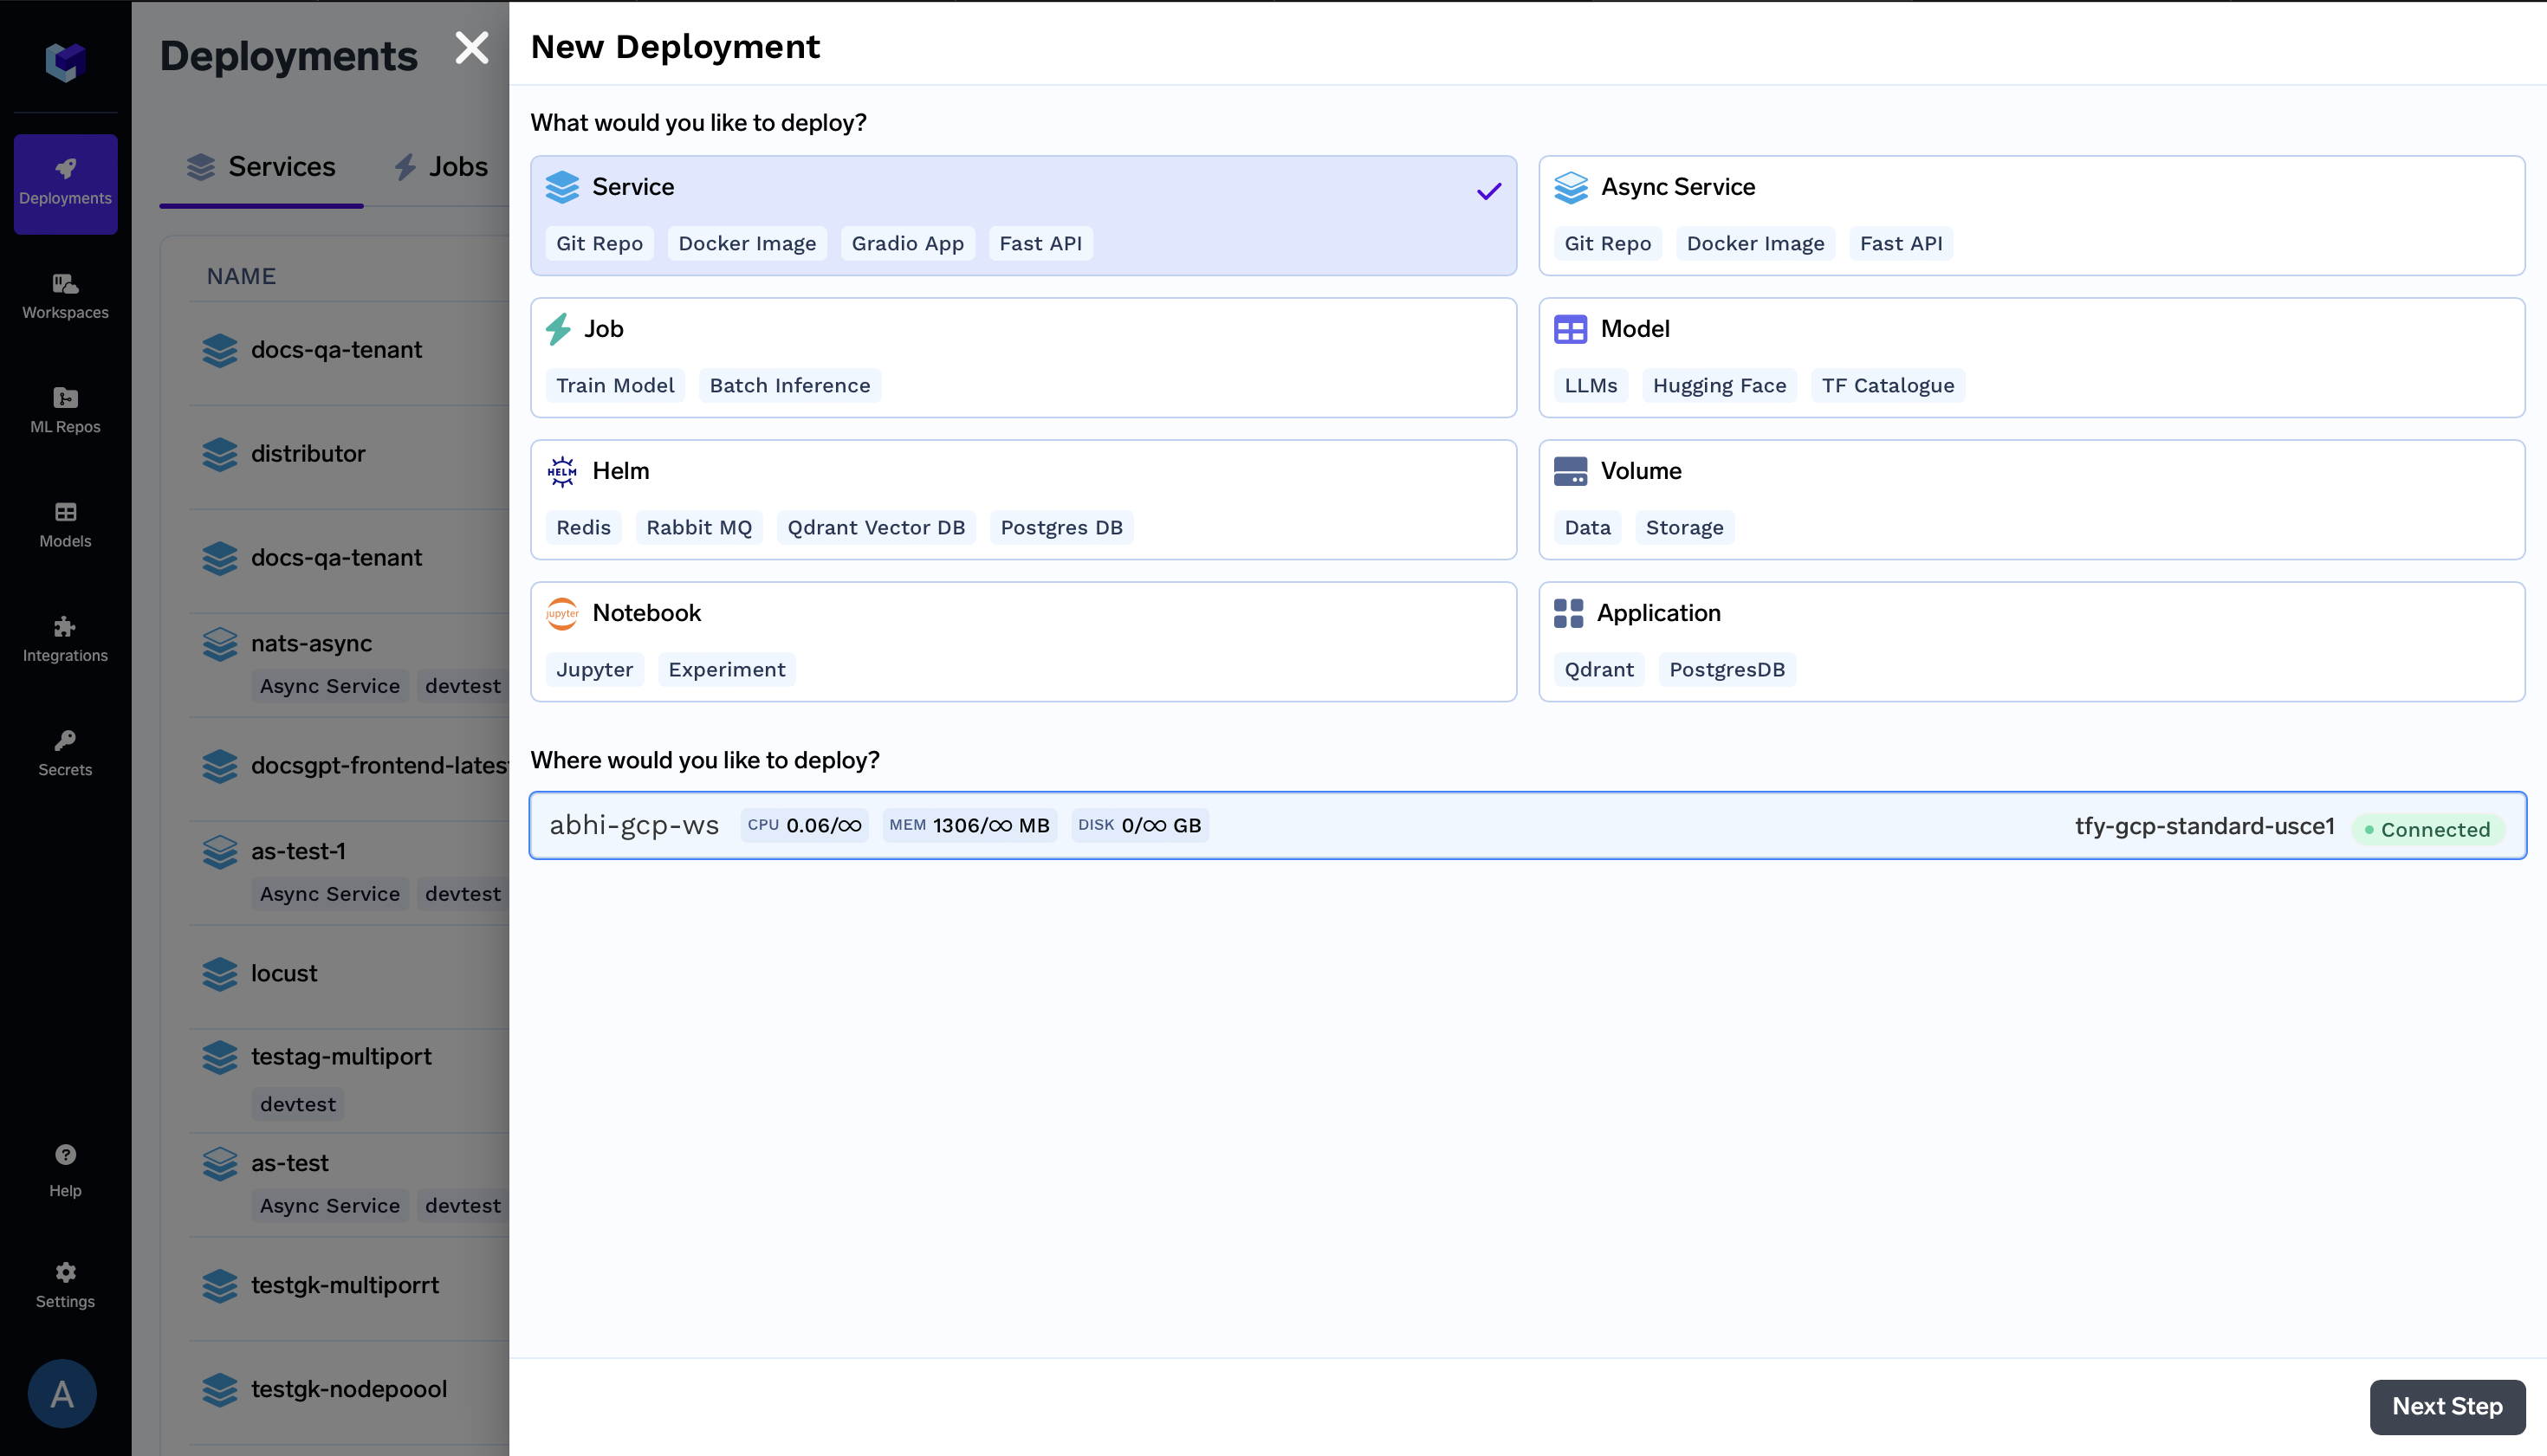
Configure Name, Build Config and Port
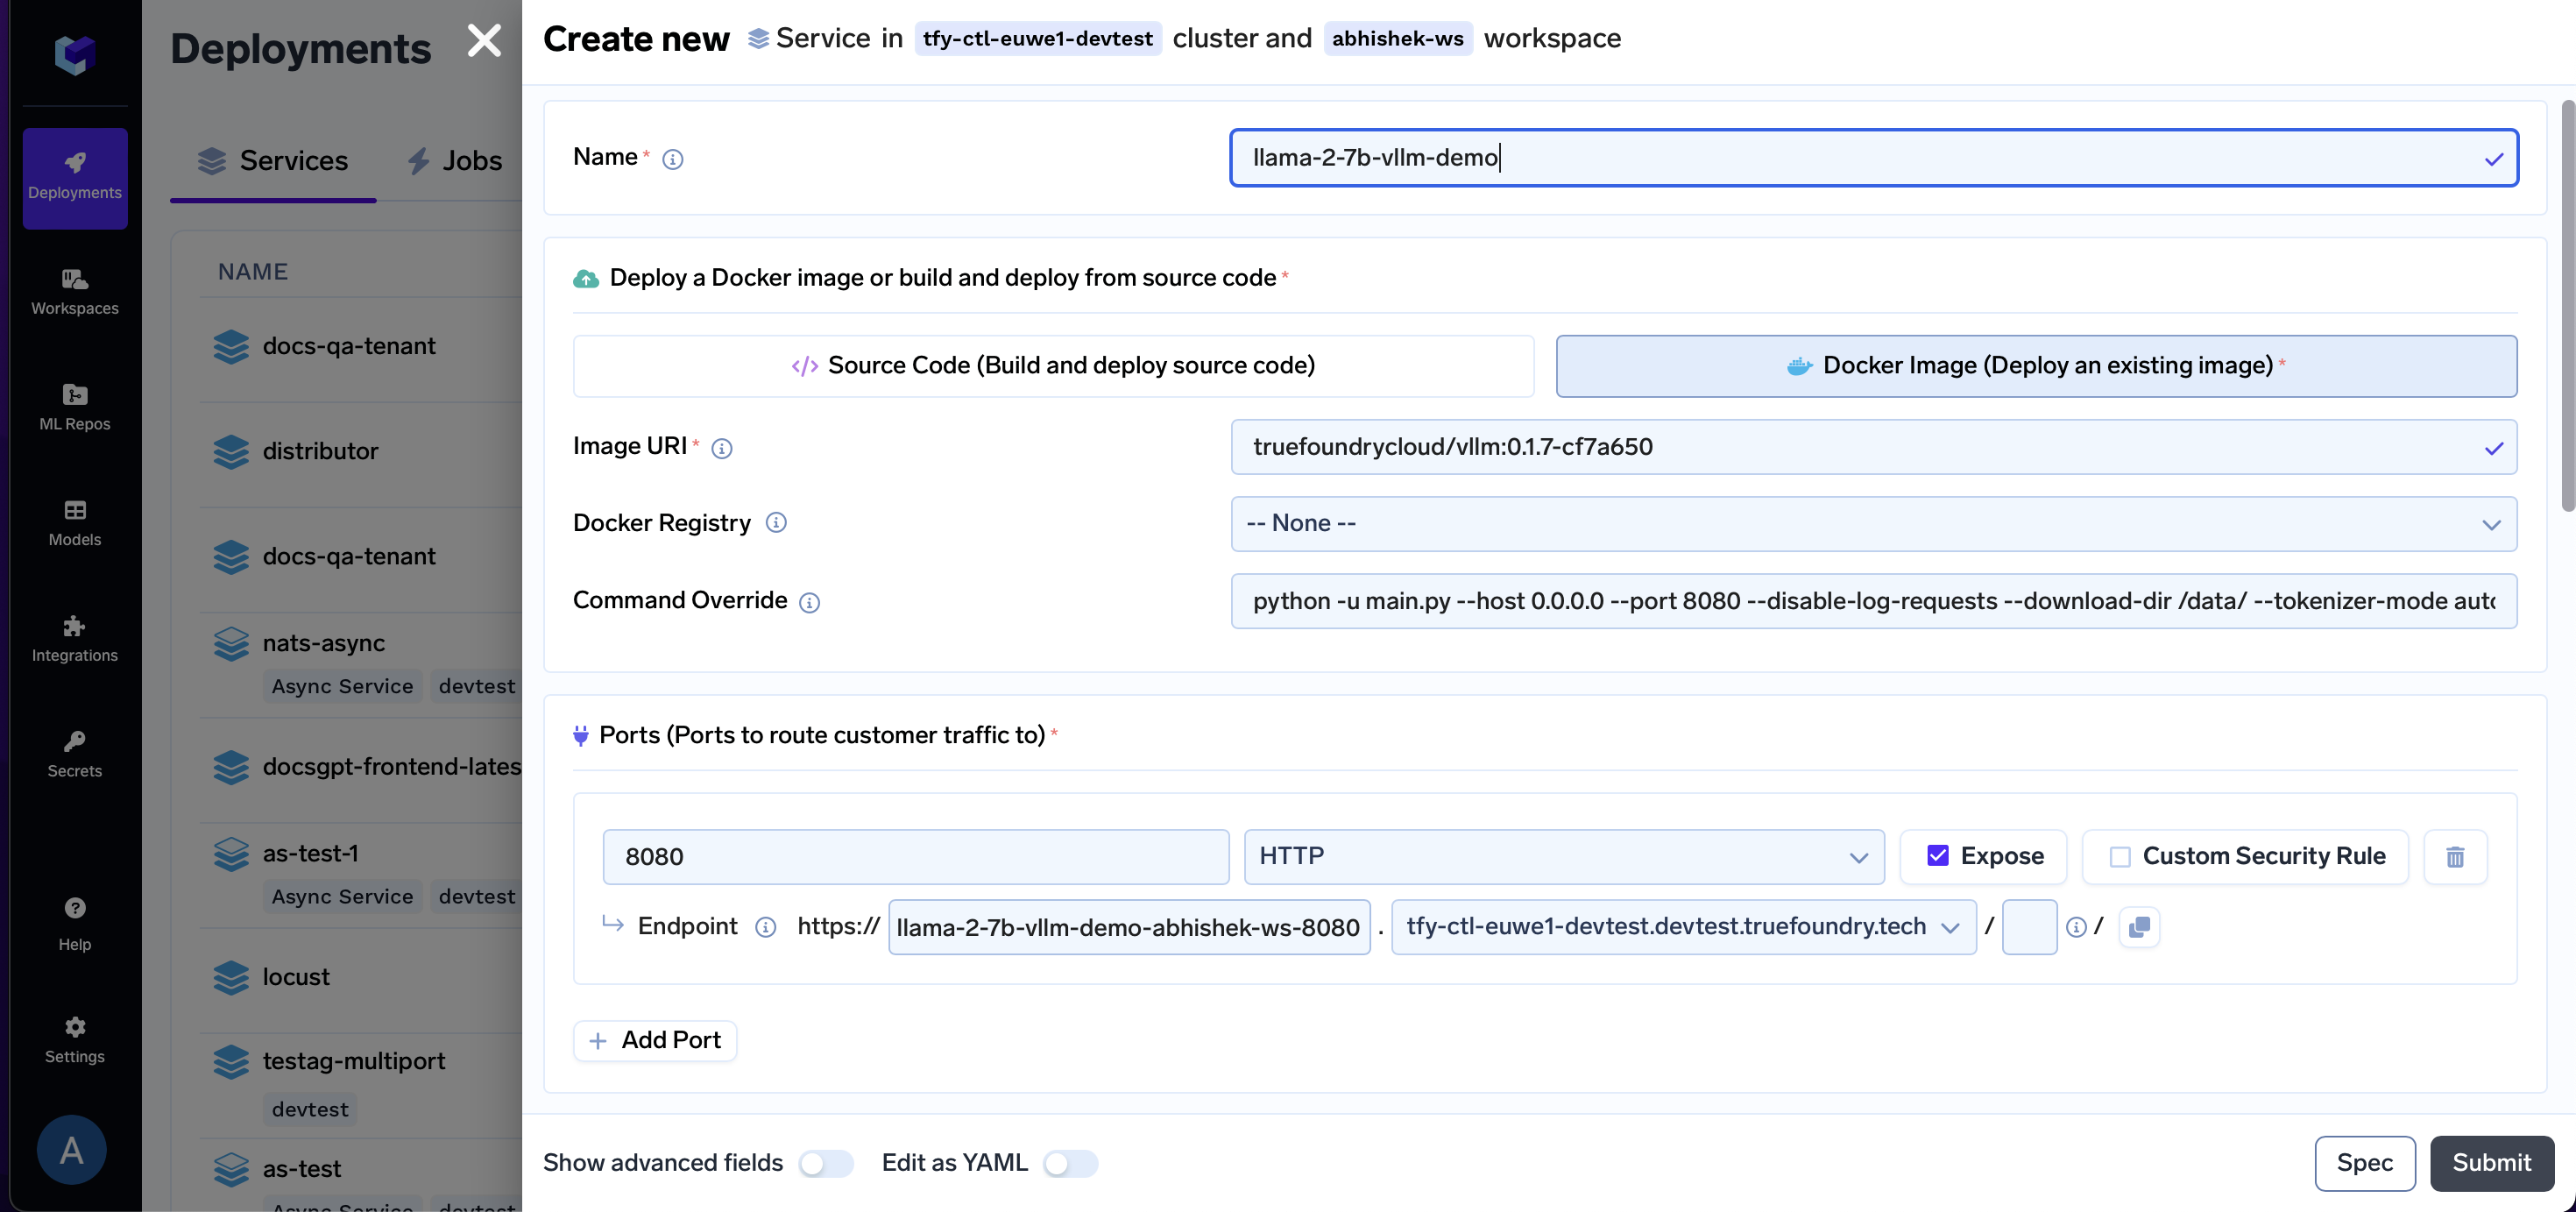
- Add a Name
- Select Docker Image
- Enter Image URI as
public.ecr.aws/truefoundrycloud/vllm:0.2.1.post1-2 - Make sure the Docker Registry is
--None-- - Enter Command as
python -u main.py --host 0.0.0.0 --port 8080 --disable-log-requests --download-dir /data/ --tokenizer-mode auto --model $(MODEL_ID) --tokenizer $(MODEL_ID) --trust-remote-code --dtype auto --tensor-parallel-size -1 --max-model-len $(MAX_MODEL_LEN) - Enter Port as
8080 - Before moving forward, enable the
Show advanced fieldstoggle
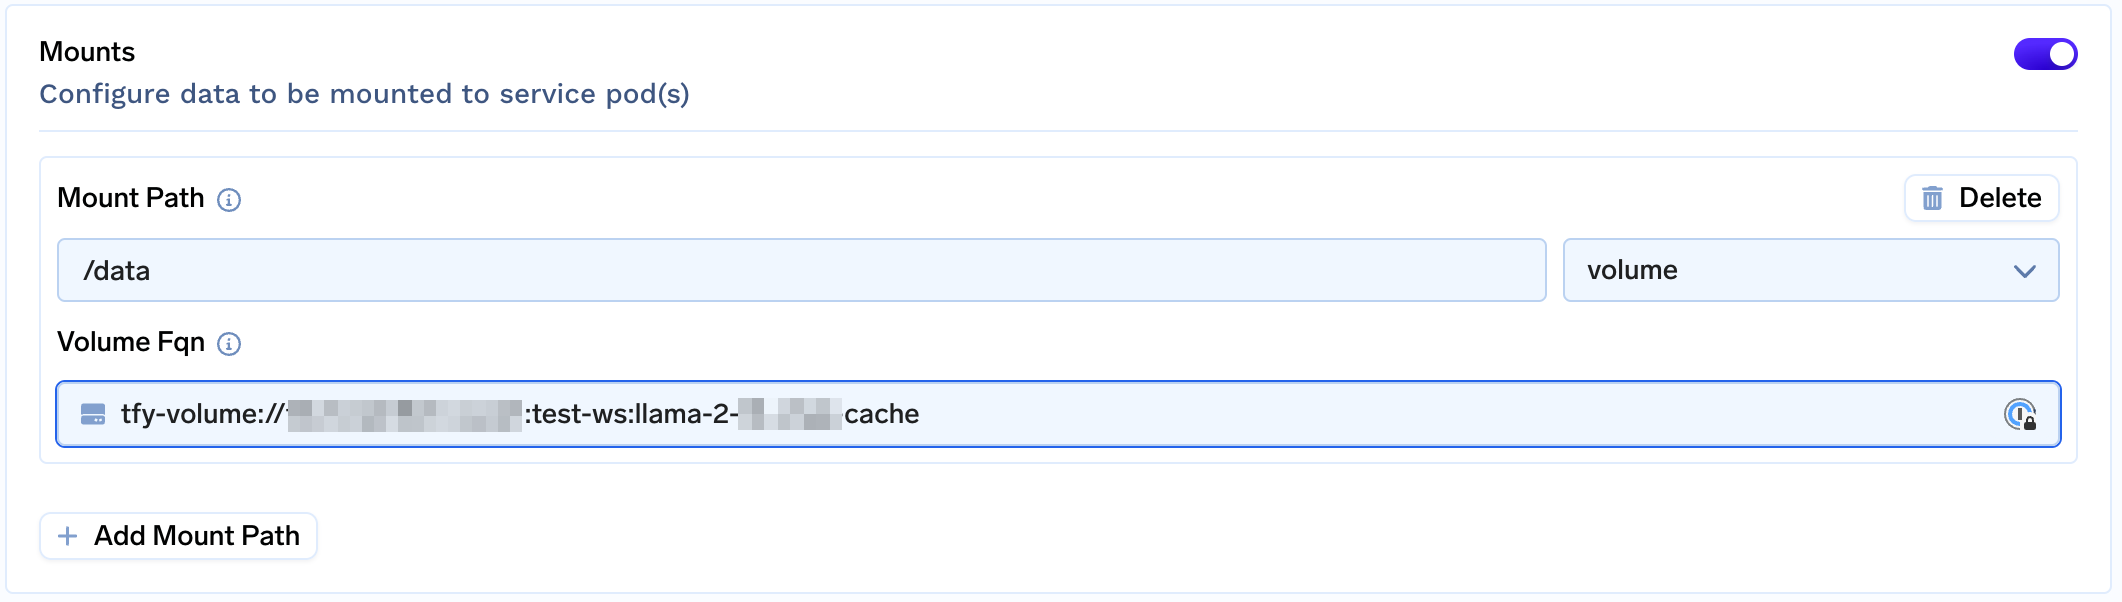
Add a volume
Create a Volume and Attach Volume to /data to cache weights (You're caching the model to prevent it from being repeatedly downloaded when the pod restarts.)
Decide which GPU to Use
Before we configure other options, it is essential to decide which GPU and how many GPU cards you want to use. The choice depends on the number of parameters in your model, precision (16-bit, 8-bit, 4-bit) and how large of a batch you want to run. In addition to this, each token to be processed/generated needs GPU memory to hold attention KV Cache. This means to fit more tokens across multiple requests more GPU memory is needed.
In this example for Llama 2 7B, we are going to run at 16-bit precision. This means that just to load the model we need 14 GB (7 x 1e9 x 2 bytes) GPU memory. While it can fit within 1 x T4 GPU (16 GB), for higher throughput it would be advisable to choose one of 1 x A10 GPU (24 GB) / 1 x L4 GPU (24 GB) / 1 x A100 (40 GB) / 1 x A100 GPU (80 GB).
Similarly for Llama 2 13B ... 👇
It would be advisable to choose one of 2 x A10 GPU (24 GB) / 2 x L4 GPU (24 GB) / 1 x A100 (40 GB) / 1 x A100 GPU (80 GB).
See Adding GPUs to Applications page for a list of gpus and their details.
Scroll Down to the Resources section and select a GPU and GPU Count. In this case, we select A100_40GB with count 1.
For Azure cluster, you would have to create a nodepool and select it via Nodepool selector
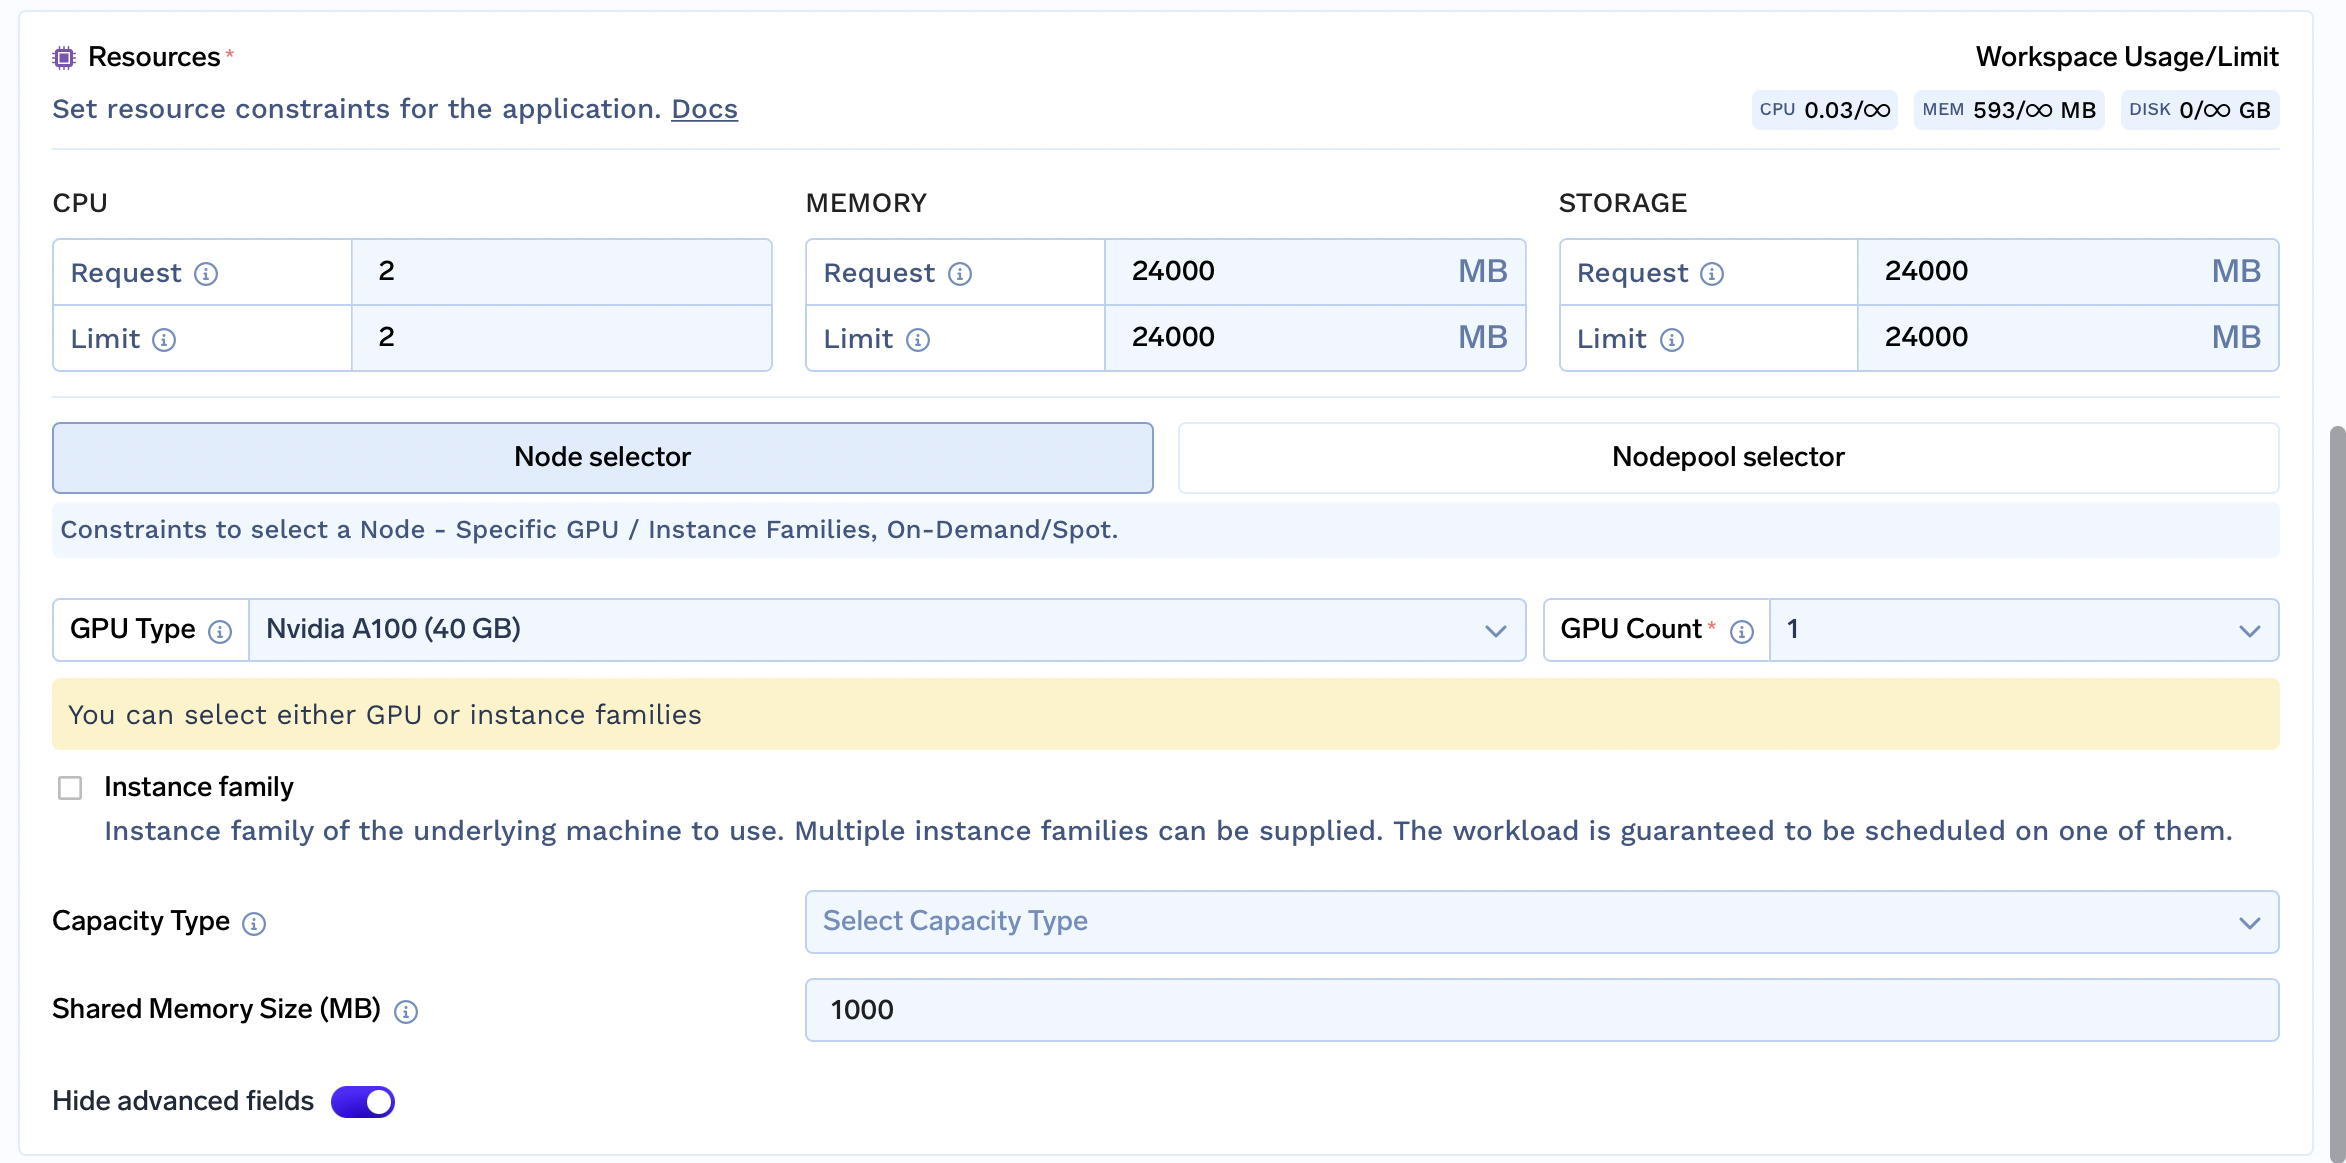
For other resources:
- CPU - Generally this can be kept around
2or higher. - Memory - A rule of thumb is for vLLM memory requirement is (2 x 1000 x Number of Parameters in Billions) + 10000 (10G added to account for shared memory). In this case, we can choose
25000MB - Storage - A rule of thumb is for vLLM memory requirement is (2 x 1000 x Number of Parameters in Billions) + 10000 (10G added to account for shared memory). In this case, we can choose
25000MB - Shared Memory - This should be kept
10000MB or higher
Fill in the environment variables
Next, we need to configure all model-specific fields in the Environment Variables section
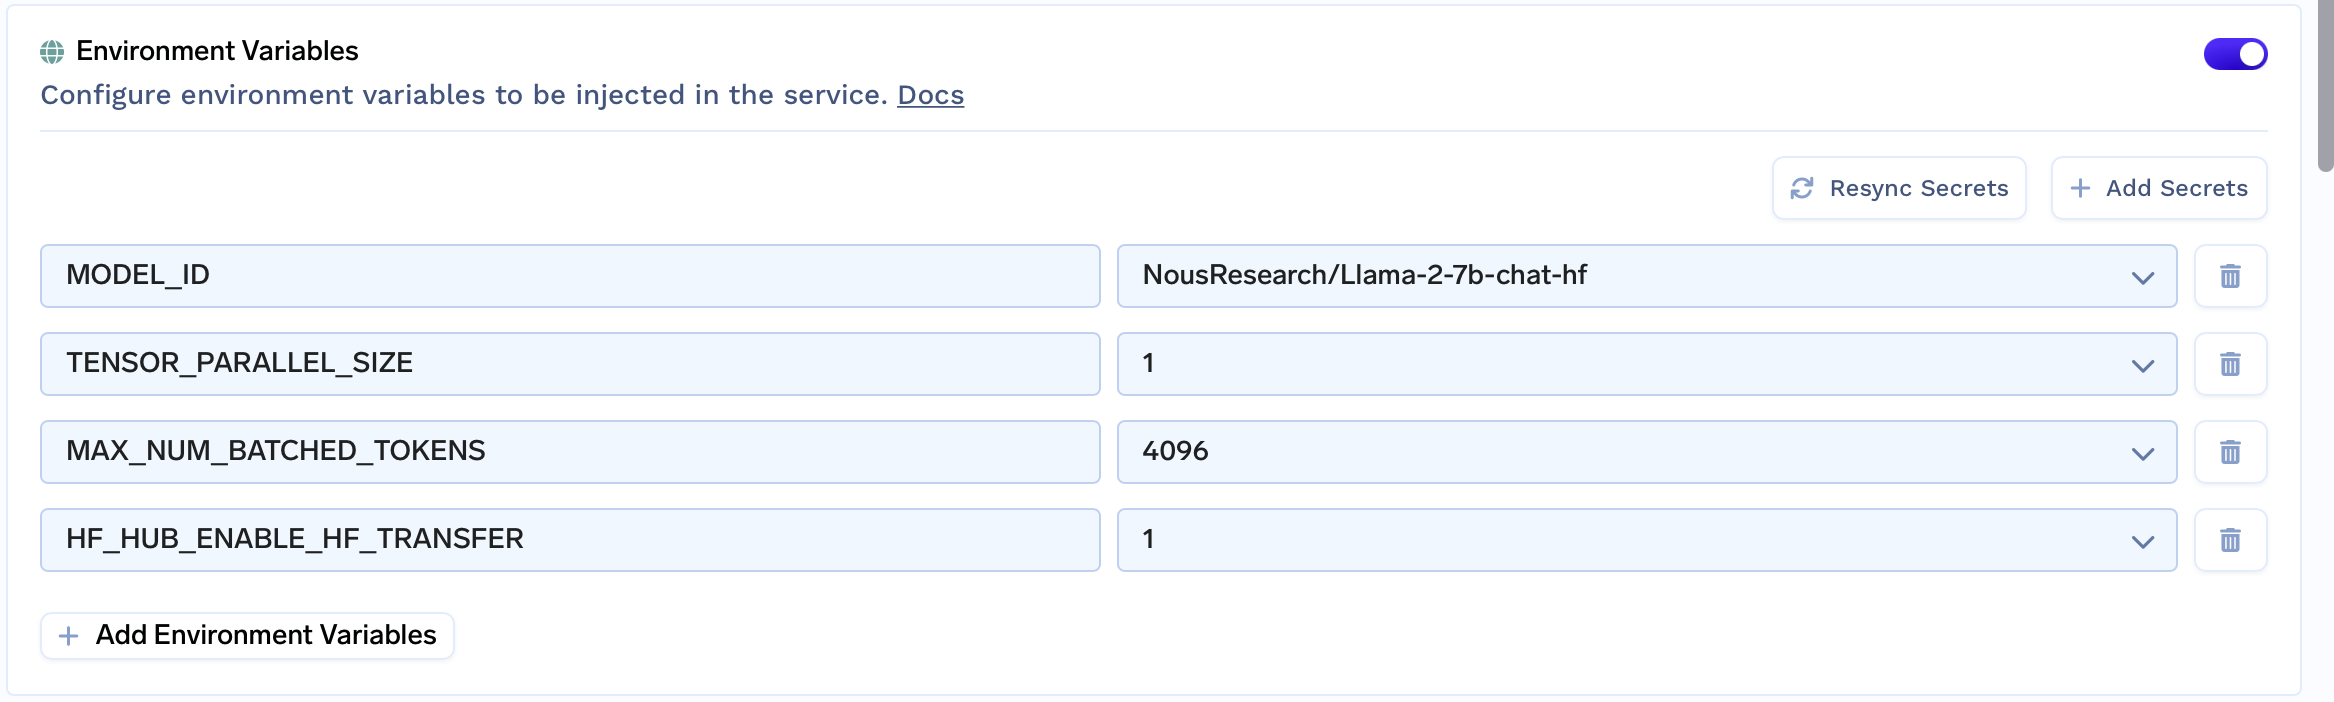
Here is a brief explanation
| Key | Description | Example Value |
|---|---|---|
MODEL_ID | Name of the model on Huggingface Hub | NousResearch/Llama-2-7b-chat-hf |
MAX_MODEL_LEN | Max number of total tokens (input + output) for a single sequence | 4096 |
HF_HUB_ENABLE_HF_TRANSFER | Optional, enables fast download | 1 |
Miscellaneous
Optionally, in the advanced options, you might want to
-
Create a Volume and Attach Volume to
/datato cache weights
-
Configure AutoScaling and Rollout Strategy
Submit and Done!
Making requests via streaming client
In the code snippet below replace <YOUR_APPLICATION_ENDPOINT> with the endpoint of your application.
# pip install sseclient-py==1.7.2 requests==2.31.0 urllib3==1.26.16

import json
import requests
import sseclient

URL = "<YOUR_APPLICATION_ENDPOINT>/generate"
headers = {
    "Content-Type": "application/json",
    "Accept": "text/event-stream"
}
payload = {
    "prompt": "My name is Olivier and I",
    "max_tokens": 100,
    "return_full_text": False,
    "temperature": 0.5,
    "top_k": 10,
    "top_p": 0.95,
    "stream": True,
}

session = requests.Session()
with session.post(URL, json=payload, headers=headers, stream=True) as response:
    client = sseclient.SSEClient(response)
    for event in client.events():
        data = json.loads(event.data)
        if data:
            if data.get("text"):
                print(data["text"][0], end="", flush=True)
            elif data.get("details"):
                print("\n\n=== Details ===\n")
                print(data["details"])
const url = "<YOUR_APPLICATION_ENDPOINT>/generate";
function parseStreamObject(streamObject) {
try {
// Remove the "data:" prefix if it exists
const jsonData = streamObject.replace(/^data:/, "");
const parsedObject = JSON.parse(jsonData);
if (parsedObject.text || parsedObject.details) {
return parsedObject;
} else {
return null; // In case text is not present
}
} catch (error) {
console.error("Error parsing stream object:", error);
return null;
}
}
async function main() {
const data = {
prompt: "My name is Olivier and I",
max_tokens: 100,
return_full_text: false,
temperature: 0.5,
top_k: 10,
top_p: 0.95,
stream: true,
};
const response = await fetch(url, {
method: "POST",
headers: {
Accept: "text/event-stream",
"Content-Type": "application/json",
},
body: JSON.stringify(data),
});
if (!response.ok) {
throw new Error(`HTTP error! status: ${response.status}`);
}
const reader = response.body.pipeThrough(new TextDecoderStream()).getReader();
while (true) {
const { done, value } = await reader.read();
if (done) {
break;
}
parsedValue = parseStreamObject(value)
if (parsedValue.text) {
process.stdout.write(parsedValue.text[0]);
}
else if (parsedValue.details) {
process.stdout.write("\n\n=== Details ===\n")
process.stdout.write(JSON.stringify(parsedValue.details))
}
}
}
main();Updated 3 months ago