via UI
What you'll learn
- How to Deploy your Machine Learning Service using the Truefoundry User Interface.
- How to Enable Autoscaling to ensure optimal service scalability.
Upon completion of this guide, you will have successfully deployed a machine learning service to tackle the MNIST problem. Your service's deployment dashboard will resemble the following:

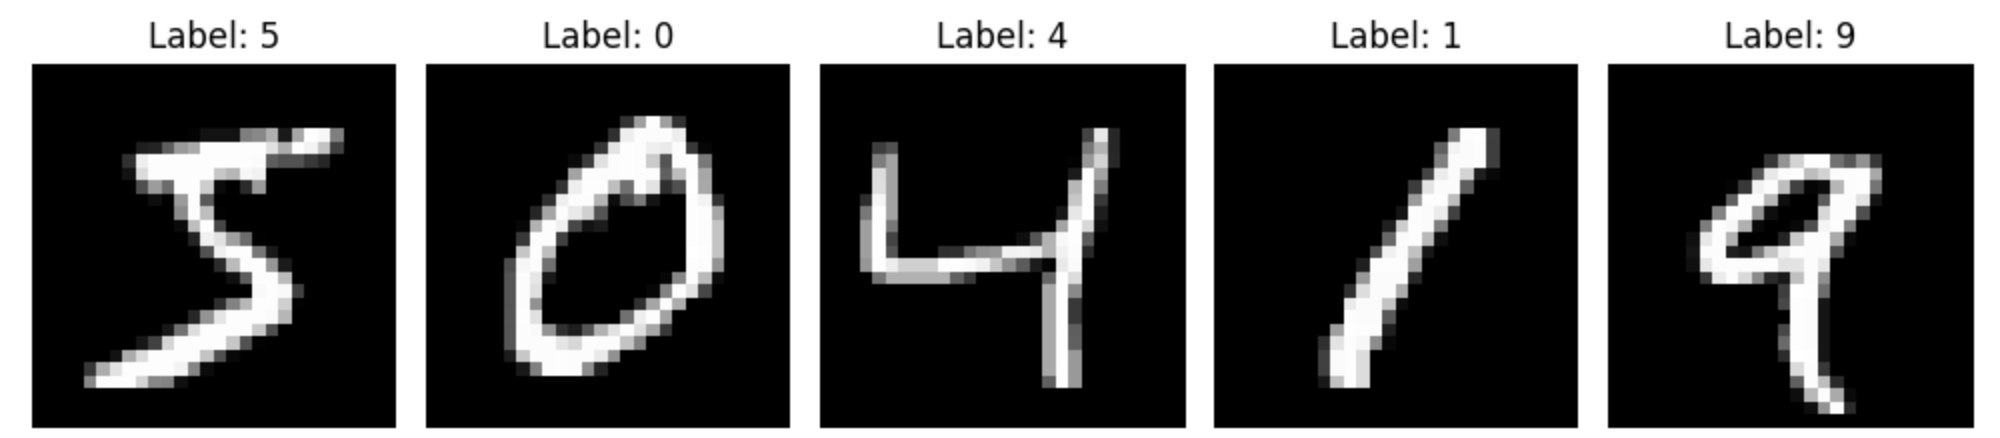
Problem Statement: MNIST Challenge
The MNIST Challenge involves recognizing handwritten digits from images. In this guide, we will use the MNIST dataset, which consists of a large number of labeled handwritten digit images. Our goal is to train a machine learning model that can accurately classify these digits.
Deploying your Machine Learning Service
Step 1: Initiating Deployment via UI
- On the left panel of the TrueFoundry user interface, locate and click on the "Deployments" tab. From here, navigate to the "Services" tab located in the top bar.
- Click on the "New Deployment" button, and a form will appear with various deployment options. Click on the "Service" button to select service deployment (will be pre-selected)
- In the same form there will be a field "Where would you like to deploy?" option. Click on the "Search Workspace" bar, and select the desired workspace for your deployment.
Note:
If you don't have any workspace right now, you can create a new workspace by clicking the Create New Workspace link and following along this Documentation or contact your cluster admin in case of some issues
- Once selected click on the "Next Step" button to continue with the deployment.
Code Structure
Before we proceed, let's take a quick look at the structure of the code you'll be deploying:
.
|_ app.py: Contains the Gradio Service code used to serve your model.
|_ requirements.txt: Dependency file.
|_ gen_example_images.py: Code to generate example images that you can use to test your Gradio service.
|_ train.py: Contains the Training code used to train the model we are deploying.
The app.py file houses the code that enables you to deploy and interact with your trained model using Gradio. Here's a brief overview of its components:
- Prediction Function:
- The predict function is responsible for making predictions using the trained model.
- Preprocess the input image and prepare it for model inference.
- Load the trained model and perform predictions to identify the digit in the image.
- Gradio Interface Setup:
- Create a Gradio interface that takes an input image and produces a predicted label.
- Provide examples of images ("0.jpg" and "1.jpg") for users to easily test the interface.
import gradio as gr
import tensorflow as tf
import numpy as np
from PIL import Image

def predict(img_arr):
	# Preprocess the image before passing it to the model
  img_arr = tf.expand_dims(img_arr, 0)
  img_arr = img_arr[:, :, :, 0]  # Keep only the first channel (grayscale)

	# Load the trained model
  loaded_model = tf.keras.models.load_model('mnist_model.h5')

	# Make predictions
  predictions = loaded_model.predict(img_arr)
  predicted_label = tf.argmax(predictions[0]).numpy()

  return str(predicted_label)

# Setup the gradio interface
gr.Interface(fn=predict,
             inputs="image",
             outputs="label",
             examples=[["0.jpg"], ["1.jpg"]]
).launch(server_name="0.0.0.0", server_port=8080)
Step 2: Configure Deployment
Now, let's dive into the configuration options for your deployment form. Each of these options plays a crucial role in shaping how your service is deployed and executed.
We will not only explain these options to you but also provide clear instructions on what to fill in each field to ensure a seamless deployment process.
Name:
The Name field allows you to assign a unique identifier to the service within your workspace.
Name:
mnist-service
Build Source (Deploy a Docker Image or Build and Deploy Source Code):
The Build Source option lets you specify whether you want to deploy a pre-built Docker image or build a Docker image from your source code and Deploy it.
Choose "Source Code (Build and deploy source code)"
Repo URL:
https://github.com/truefoundry/getting-started-examples
Build Specification (Build Using Dockerfile or Using Buildpack):
The Build Specification helps determine the method you want to use for building your service. You can choose to build using a Dockerfile, providing custom configuration for your environment, or you can opt for a Buildpack, which automates the build process based on your application's requirements.
Choose "Python Code (I don't have Dockerfile)"
Path to build context:
./mnist-service/Command:
python app.py
Ports (Ports to route customer traffic to):
Configure the ports that will route customer traffic to your deployed application. Specify the port number and endpoint in the fields provided.
In the "Port" field, enter
8080as specified in the Gradio App.The "Endpoint" field will be prefilled automatically based on your configured domain.
Congratulations! You have now successfully configured your deployment for the mnist-service application.
Step 3: Submit the form
Now that all the deployment options are filled, you can proceed by clicking the "Create" button. This will initiate your deployment process. After clicking "Create," your Service Dashboard will resemble the following:

While your deployment is in progress, you can hover over the spinner icon to check the status of the deployment. After a brief moment, the deployment should become active, and your Service Dashboard will transform to appear as follows:

Interacting with the Application
With the deployment now active, you can proceed to click on your specific service. Doing so will open up the dashboard dedicated to your service, where you'll have access to various details.
Here you will be able to see the Endpoint of your service at the top right corner. You can click on the Endpoint to open your application.

Now you can click on one of the Images from the two options and see what predictions your model gives:
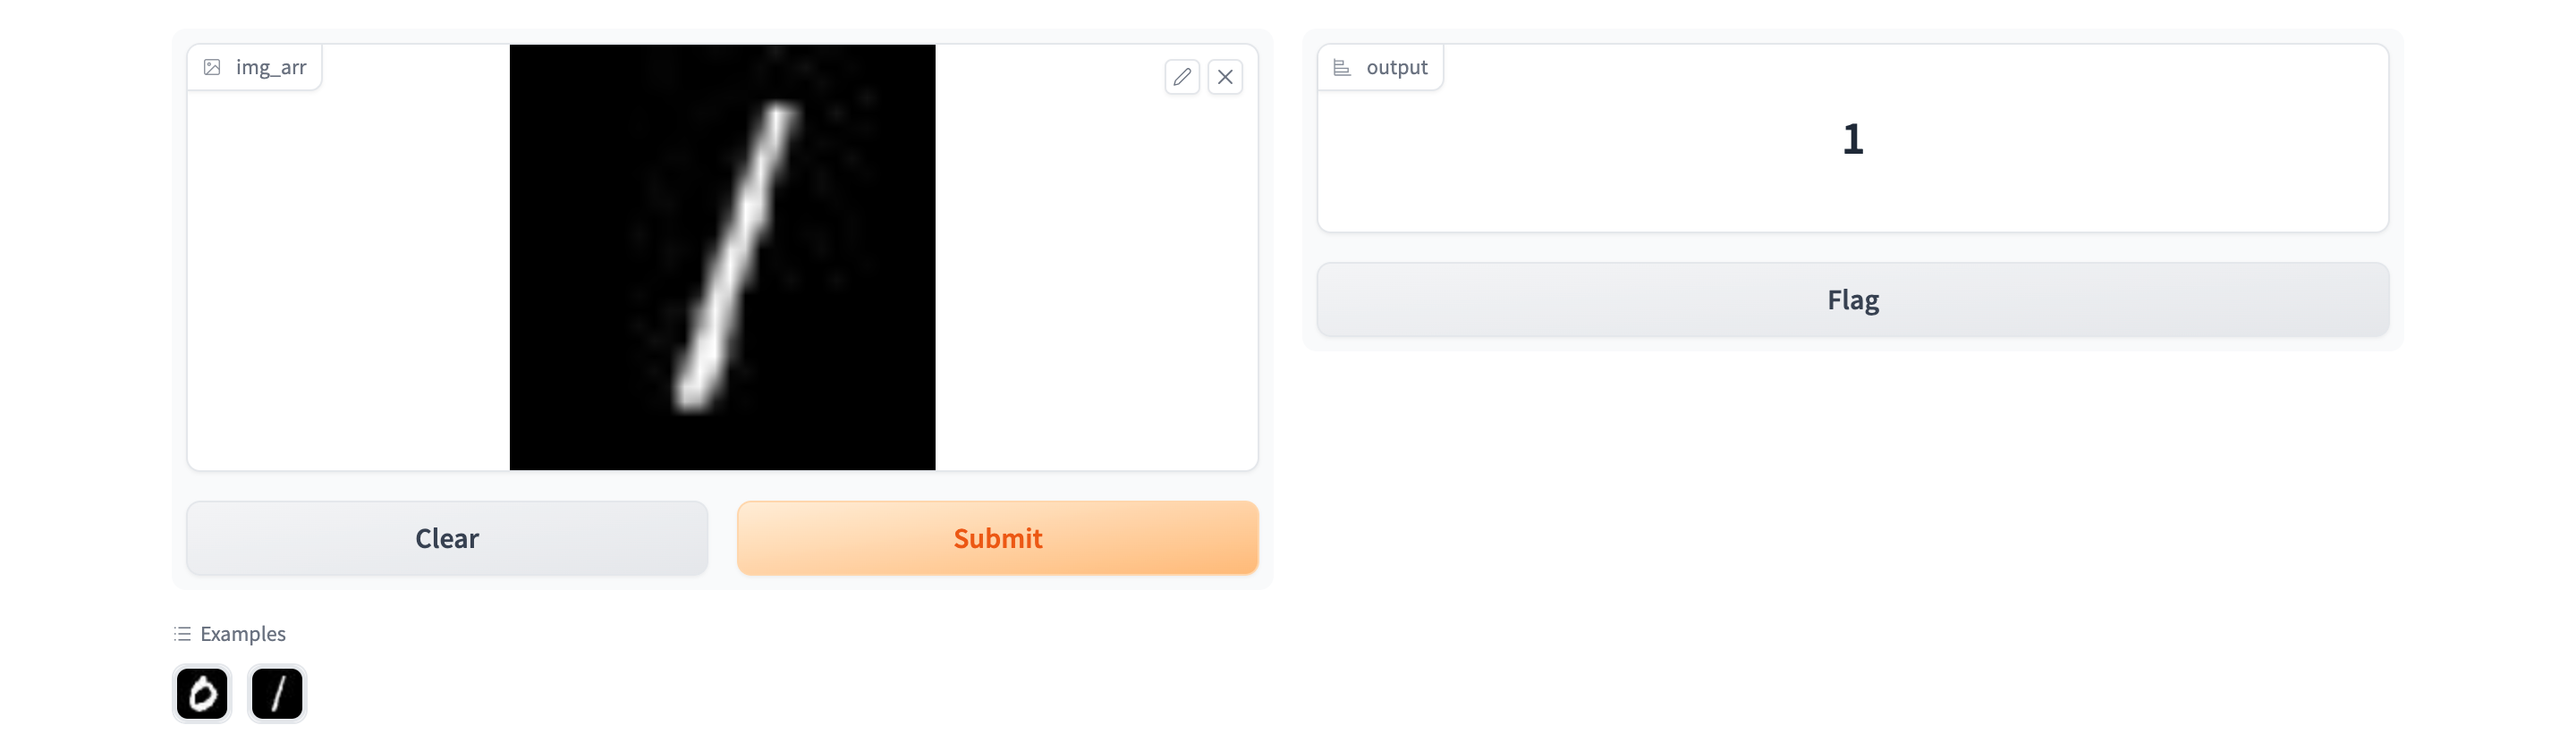
Congratulations! You have successfully deployed the model using Truefoundry.
Enabling Autoscaling for your Service
In this section, we'll explore enabling autoscaling for your service, a feature that allows your application to dynamically adjust its resources based on real-time demand and predefined metrics. Autoscaling optimizes performance, responsiveness, and resource efficiency.
Scaling with Replicas and Pods
In Kubernetes and containerized environments, replicas and pods are essential concepts for managing application availability and scalability.
When deploying applications in a Kubernetes cluster, you specify the number of replicas for your service. Each replica is an identical instance of your application within a pod. A pod is the smallest deployable unit in Kubernetes, comprising one or more closely connected containers that share network and storage.
By setting the replica count, you control how many pod instances run concurrently, directly affecting your application's traffic handling capacity.
Handling Demand
More replicas allocate more pods to manage incoming traffic, distributing the workload and improving responsiveness during spikes. Scaling by adjusting replicas aligns your application's capacity with varying traffic.
Setting the number of replicas
To configure the number of replicas your service should have via the UI, follow these steps:
- In the Deployment Form locate the Show advanced fields toggle button at the very bottom.

- Now you will be able to the Replicas Section

- Enter the desired number of replicas for your application.
Next, we'll explore how autoscaling improves performance by dynamically adjusting replicas based on real-time metrics and demand.
Autoscaling Overview
Autoscaling involves dynamically adjusting computing resources based on real-time demand and predefined metrics. This optimization ensures that your service efficiently utilizes resources while responding to varying traffic loads.
Autoscaling Configuration
Autoscaling configuration involves setting minimum and maximum replica counts as well as defining metrics that trigger autoscaling actions. Here are the available settings for autoscaling:
- Minimum Replicas: The minimum number of replicas to keep available.
- Maximum Replicas: The maximum number of replicas to keep available.
- Cooldown Period: The period to wait after the last active trigger before scaling resources back to 0.
Configuring Autoscaling via UI
To configure autoscaling parameters for your service via the UI, follow these steps:
- In the Deployment Form, find the "Show advanced fields" toggle button at the bottom.

- Once activated, the Replicas Section will become visible.
- Enable Autoscaling by checking the corresponding checkbox.
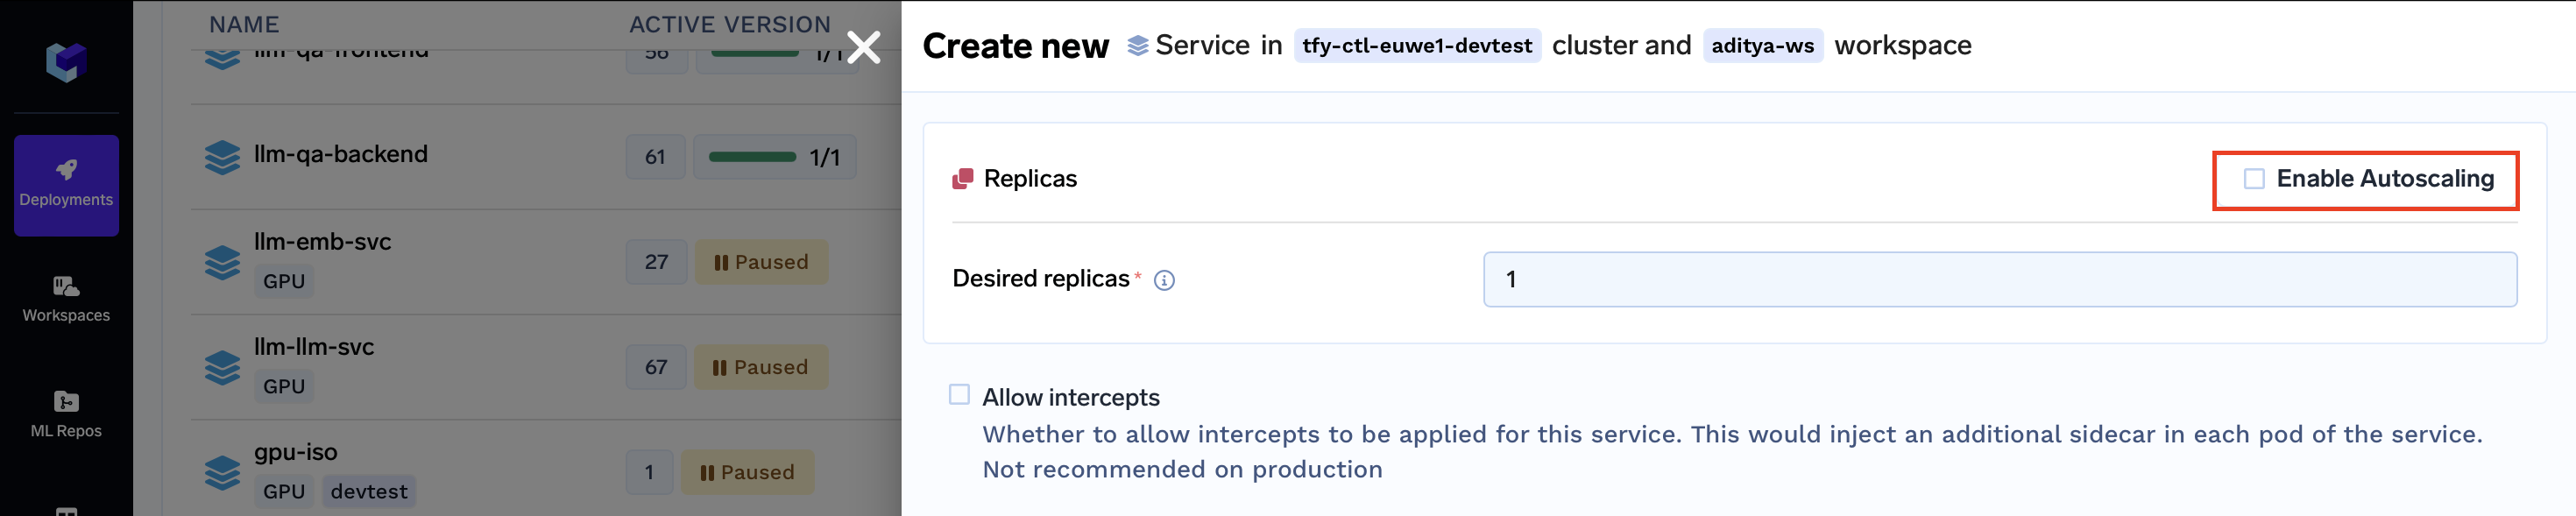
- Enter the desired values for both the minimum and maximum replica counts.
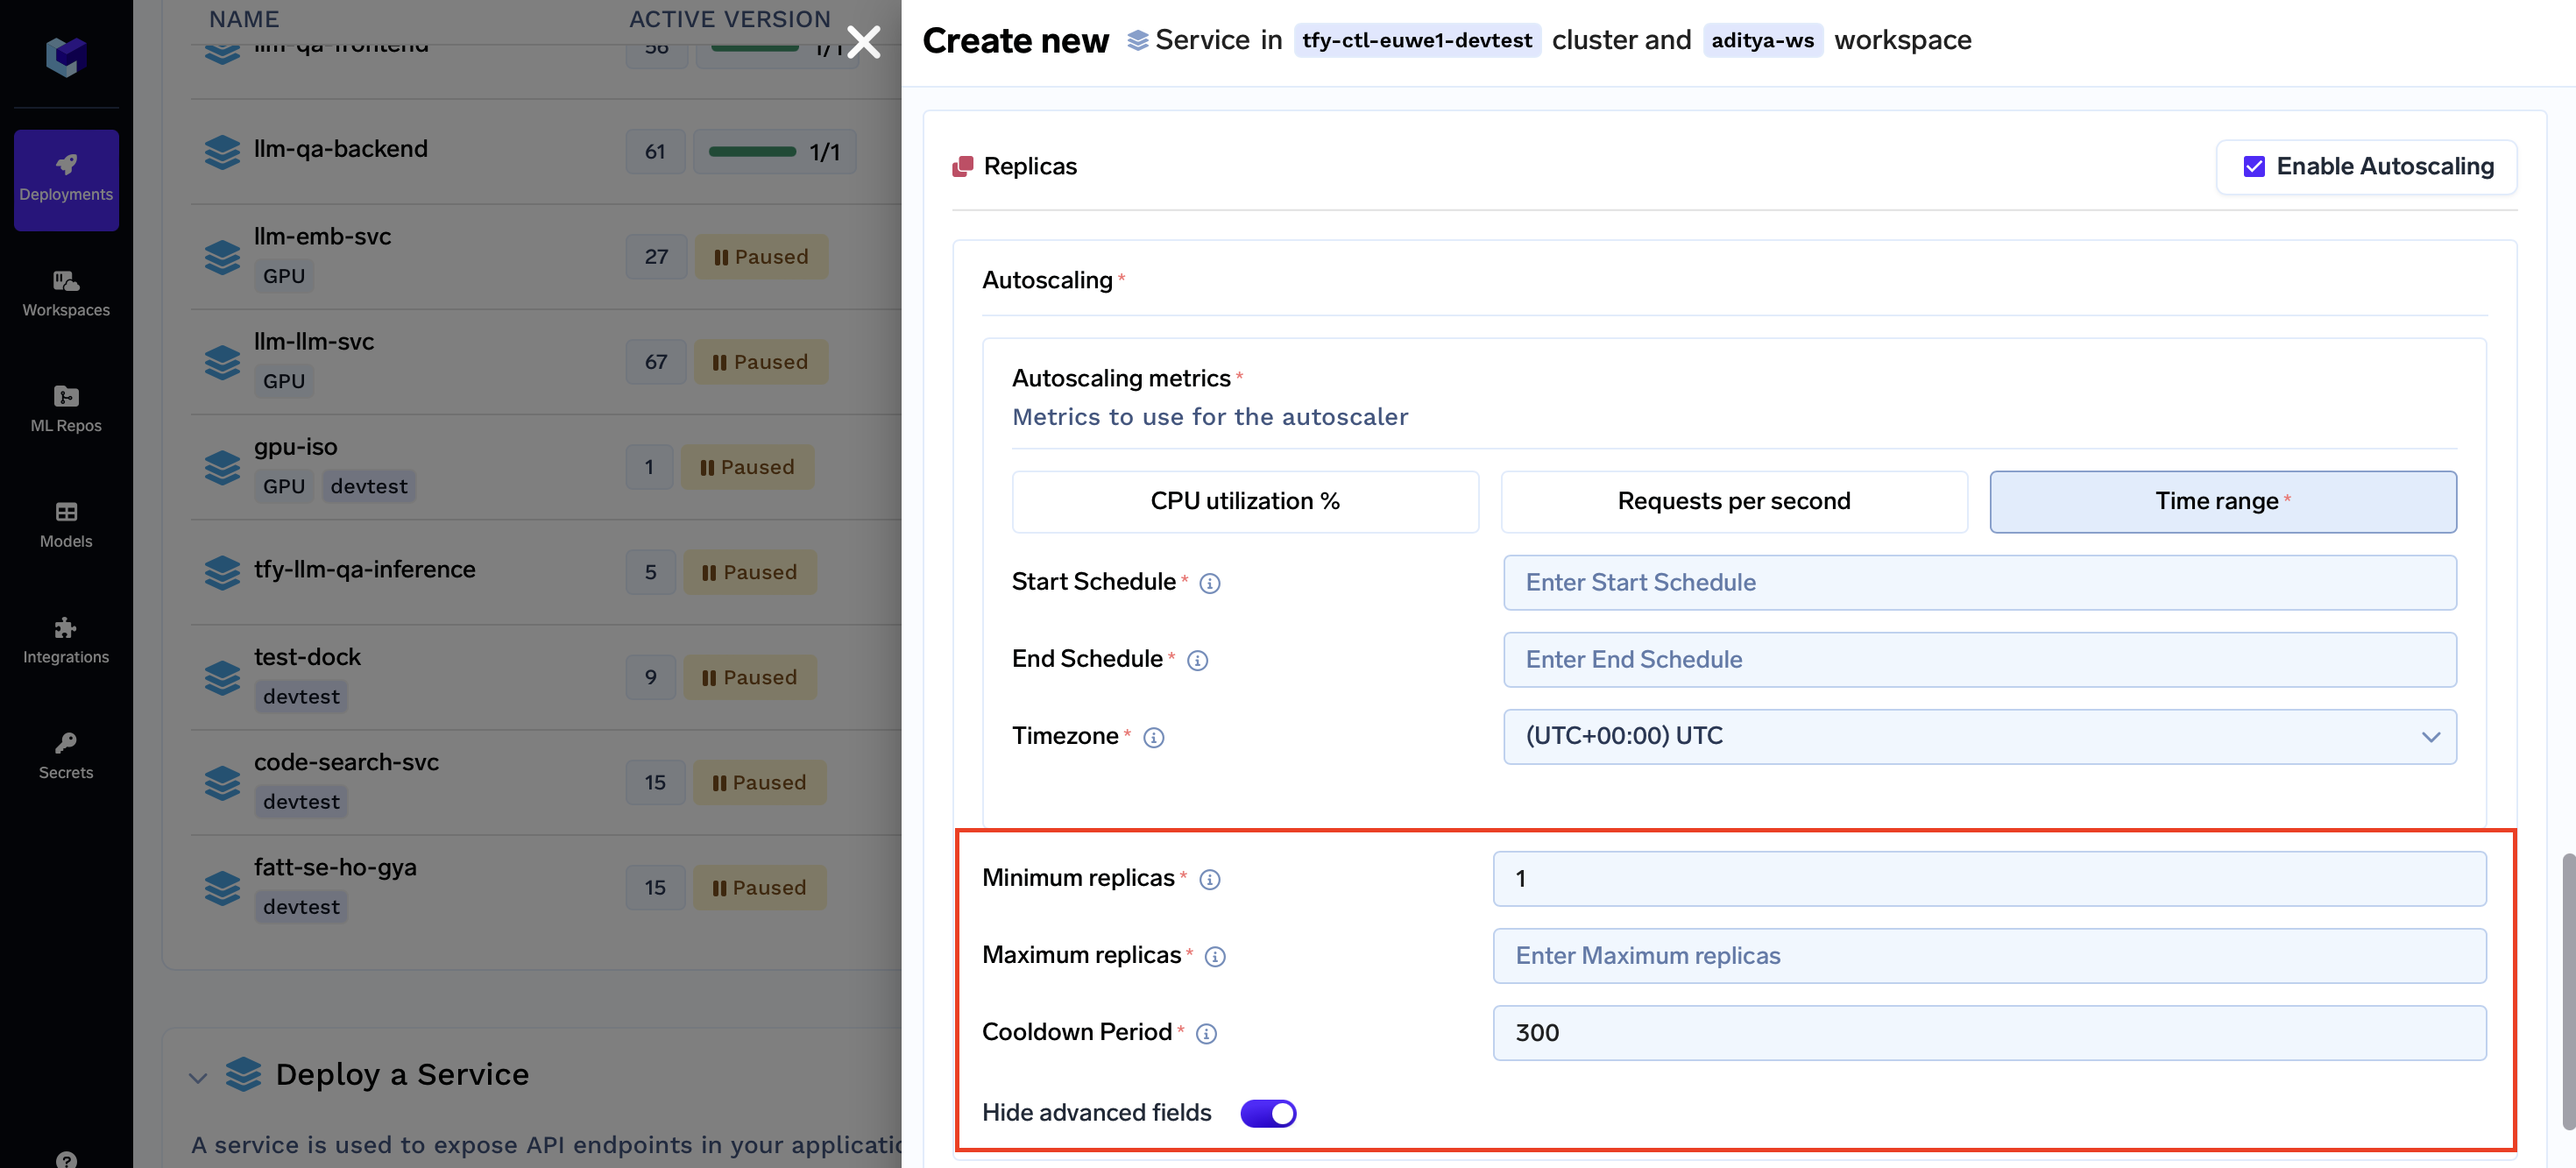
- Click the "Show advanced fields" toggle again.
- Fill in the cooldown period according to your needs.
Autoscaling Metrics
Autoscaling metrics guide the system in dynamically adjusting resource allocation based on real-time conditions. They ensure your service can adapt to changing demands while maintaining optimal performance. We support the following three types of autoscaling metrics:
-
RPSMetric (Requests Per Second Metric): Monitors the rate of incoming requests measured in requests per second. Suitable for applications with varying request loads over time.
-
CPUUtilizationMetric (CPU Utilization Metric): Monitors the percentage of CPU resources in use. Ideal for applications where performance correlates with CPU usage.
-
TimeRange: Allows scheduling autoscaling actions based on specific time periods. Useful for applications with predictable traffic patterns.
Additional Capabilities of Services
Let's explore additional functionalities that Services provide, extending beyond deployment strategies:
- Rollouts Management: Maintain precise control over how new versions of your application are released to users, ensuring seamless transitions and minimal disruption.
- Endpoint Authentication: Bolster the security of your endpoints by integrating authentication mechanisms, effectively limiting access and safeguarding sensitive data.
- Health Check Monitoring: Monitor your services' health through comprehensive health checks, guaranteeing their operational readiness to handle incoming requests.
- Efficient Communication with gRPC: Leverage the power of gRPC, a high-performance communication protocol, to establish efficient and reliable connections between microservices.
- TensorFlow Serving with gRPC: Harness the capabilities of TensorFlow Serving in conjunction with gRPC to facilitate machine learning model deployment and communication.
- Intercept Management: Implement interceptors to exert fine-grained control over network communication, enhancing security measures and facilitating robust logging.
- Scaling Deep Dive: Gain in-depth insights into the nuances of scaling your services, optimizing resource allocation strategies to seamlessly adapt to varying demands
Updated 11 months ago