SSL and DNS setup in Azure
How to setup DNS and terminate the traffic via TLS.
In this section we will see how we can setup DNS using Azure DNS and terminate the ingress traffic using SSL from the certificate generated by cert-manager and Let's encrypt.
If you are using a different DNS provider then almost same changes will reflect in the DNS provider and cert-manager settings. To perform all the below tasks cert-manager and tfy-istio-ingress must be installed already.
Pre-requisites
-
Authentication to azure using azure cli via
az login -
Export few variables
export CLUSTER_NAME="" export RESOURCE_GROUP="" export AZURE_SUBSCRIPTION_ID="" export SERVICE_ACCOUNT_NAME=cert-manager export SERVICE_ACCOUNT_NAMESPACE=cert-manager export MAIL_ID="" export OIDC_ISSUER_URL=$(az aks show \ --resource-group $RESOURCE_GROUP \ --name $CLUSTER_NAME \ --query "oidcIssuerProfile.issuerUrl" -o tsv) export LOAD_BALANCERIP=$(kubectl get svc \ -n istio-system tfy-istio-ingress \ -ojsonpath='{.status.loadBalancer.ingress[0].ip}') echo "OIDC_ISSUER_URL: ${OIDC_ISSUER_URL}" echo "LOAD_BALANCERIP: ${LOAD_BALANCERIP}" -
Enable workload identity feature in your cluster using the below command. If you have used ocli or azure cli then it is enabled by default.
az aks update \
    --name ${CLUSTER_NAME} \
    --resource-group ${RESOURCE_GROUP} \
    --enable-oidc-issuer \
    --enable-workload-identity # ℹ️ This option is currently only available when using the aks-preview extension.
-
Create a user-assigned identity - If you have used ocli or azure cli then an identity is created by default.
- For ocli the identity name is the same name as your cluster and you can find it using the output command of the ocli.
- For azure cli the identity name is
USER_ASSIGNED_IDENTITYvariable
We need to get the principal ID of the identity which can be capture via the below command
# identity name export IDENTITY_NAME="" # getting principal ID of the identity PRINCIPAL_ID=$(az identity create \ --name "${IDENTITY_NAME}" \ --resource-group "${RESOURCE_GROUP}" \ --query principalId -otsv) # getting Client ID of the identity IDENTITY_CLIENT_ID=$(az identity show \ --name "${IDENTITY_NAME}" \ --resource-group "${RESOURCE_GROUP}" \ --query 'clientId' -otsv) echo "PRINCIPAL_ID: ${PRINCIPAL_ID}" echo "IDENTITY_CLIENT_ID: ${IDENTITY_CLIENT_ID}" -
Make sure
cert-manageris installed in the cluster. You can check it from the Deployments page under Helm tab. Moreover cert-manager is to be edited with the following details if not done. You can leave other argument (tolerations) as it is.installCRDs: true extraArgs: - --issuer-ambient-credentials podLabels: azure.workload.identity/use: "true" serviceAccount: labels: azure.workload.identity/use: "true"
Setting up DNS
Setting up DNS zone
If you already have a DNS zone you can skip this step otherwise you can follow the below steps to create one in your resource group
-
Authenticate to Azure cli
-
Assign the following variable
# export DNS_HOSTED_ZONE="ml.example.com" export DNS_HOSTED_ZONE="" # create the DNS record az network dns zone create \ --name ${DNS_HOSTED_ZONE} \ --resource-group ${RESOURCE_GROUP} \ --query nameServers -
The above command will output list of the name servers that must be pointed in your main DNS resolver as NS record. This is done so that any traffic coming to
example.truefoundry.com(in this case) will come to the hosted zone in Azure DNS.
If you already have a DNS zone created or you created a new DNS zone then run the below command to capture the DNS zone ID. Make sure to change the resource group if your DNS zone is in different resource group then your cluster
# resource group where you DNS zone is hosted,
# change this to your resource group if its not the same as your cluster
DNS_ZONE_RESOURCE_GROUP="${RESOURCE_GROUP}"

# creating the DNS_ZONE
DNS_ZONE_ID=$(az network dns zone show \
--name ${DNS_HOSTED_ZONE} \
--resource-group ${DNS_ZONE_RESOURCE_GROUP} \
--query id -otsv)

# assigning permissions of the DNS zone to the identity
az role assignment create \
--assignee $PRINCIPAL_ID \
--role "DNS Zone Contributor" \
--scope $DNS_ZONE_ID

# assign the federated credentials from the identity to the cert-manager
az identity federated-credential create \
      --name "cert-manager" \
      --identity-name "${IDENTITY_NAME}" \
      --issuer "${OIDC_ISSUER_URL}" \
      --resource-group "${RESOURCE_GROUP}" \
      --subject "system:serviceaccount:${SERVICE_ACCOUNT_NAMESPACE}:${SERVICE_ACCOUNT_NAME}"
Creating a certificate
Creating Issuer in cert-manager
Issuer in cert-managerWe will create a issuer in cert-manager which will issue certificate for us. You can replace example with your preferred name
kubectl apply -f - <<EOF
apiVersion: cert-manager.io/v1
kind: Issuer
metadata:
  name: example-issuer
  namespace: istio-system
spec:
  acme:
    email: $MAIL_ID
    server: https://acme-v02.api.letsencrypt.org/directory
    privateKeySecretRef:
      name: example-privkey
    solvers:
    - dns01:
        azureDNS:
          hostedZoneName: $DNS_ZONE_NAME
          resourceGroupName: $DNS_ZONE_RESOURCE_GROUP
          subscriptionID: $AZURE_SUBSCRIPTION_ID
          environment: AzurePublicCloud
          managedIdentity:
            clientID: $IDENTITY_CLIENT_ID
EOF
Creating Certificate in cert-manager
Certificate in cert-managerYou can replace *.example.truefoundry.com with your domain for which you created the dns zone. Make sure to replace the issuerRef.Name to the same as above. You can also change the spec.secretName to change the name of the secret which will contain the certificate.
kubectl apply -f - <<EOF
apiVersion: cert-manager.io/v1
kind: Certificate
metadata:
  name: example-cert
  namespace: istio-system
spec:
  secretName: example-tls
  duration: 2160h # 90d
  renewBefore: 360h # 15d
  issuerRef:
    # Issuer name from the previous step
    name: example-issuer
  dnsNames:
  - "example.truefoundry.com"
  - "*.example.truefoundry.com"
EOF
Wait for the certificate to be in the READY state by running command
$ kubectl get cert -n istio-system
NAME           READY   SECRET        AGE
example-cert   True    example-tls   4m29
The certificate is in the secret which is example-tls in the above output and in the certificate as well. We need to pass this secret to the load balancer.
Attaching the certificate to load-balancer
Go to Deployments page under Helm tab and check for tfy-istio-ingress. In this we need to pass the secretName from the certificate create in the previous step.
You can click on Edit and make the below edits.
tfyGateway:
  name: tfy-wildcard
  spec:
    servers:
      - tls:
          httpsRedirect: true
        port:
          name: http-tfy-wildcard
          number: 80
          protocol: HTTP
        hosts:
          - "*.example.truefoundry.com"
          - "example.truefoundry.com"
      - port:
          name: https-tfy-wildcard
          number: 443
          protocol: HTTPS
        hosts:
          - "*.example.truefoundry.com"
          - "example.truefoundry.com"
        tls:
          mode: SIMPLE
          credentialName: example-tls
    selector:
      istio: tfy-istio-ingress
We are adding a section with the name of tls in tfyGateway.spec.servers[1] which contains the secret name under credentialName. We also add the domain names which we want our load balancers to serve.
Creating the DNS record and adding it to the platform
Now we need to make sure *.example.truefoundry.com is pointed to our load balnacer and our applications in truefoundry platform can use this wildcard domain to host its services.
Creating the DNS record
az network dns record-set a add-record \
--ipv4-address $LOAD_BALANCERIP \
--record-set-name "*" \
--resource-group ${RESOURCE_GROUP} \
--zone-name ${DNS_HOSTED_ZONE}
Adding the DNS to the platform
Once the secret is added we need to enable the base domain URL from the cluster settings.
- Go to Integrations tab and click on Edit section of the cluster.
- Add the base domain URL
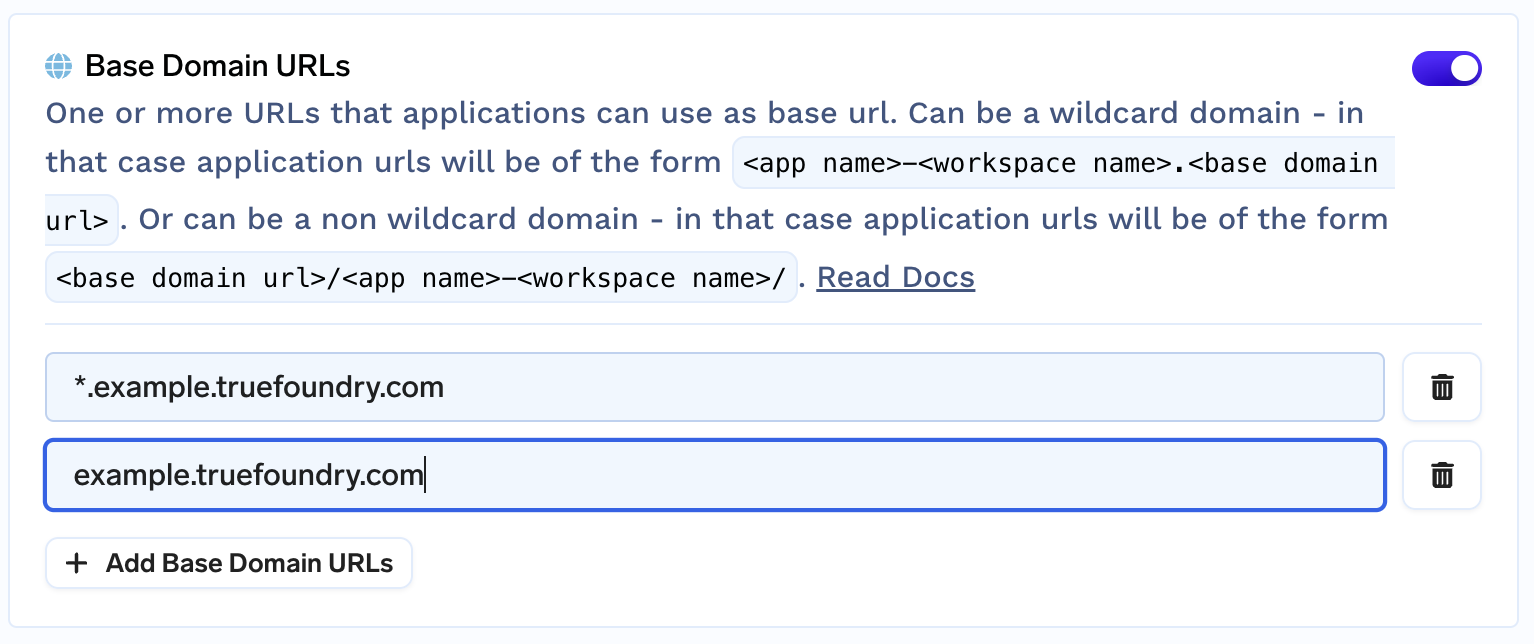
Add base domain URL in the cluster
- Now these domain URLs can be used to expose your endpoints in the deployments section.
- Go to deployments section and create a new service (let is be
nginx) - Expose it at port 80.
- Create the service and access the URL. The format will be
https://nginx-<workspace-name>-80.example.truefoundry.com/
- Go to deployments section and create a new service (let is be
Updated 8 months ago