TorchServe is no longer actively maintained. We recommend using AWS Multi-Model Server or LitServe instead.
TorchServe is a flexible and easy-to-use tool for serving and scaling PyTorch models in production with flexibility to write custom handlers and configure dynamic batching. In this example, we will deploy a simple MNIST model using MMS. You can find the code for this example here.
Live DemoYou can view this example deployed here.
The key files are:
  • mnist.py: The pytorch model definition.
  • model/mnist_cnn.pt: The trained pytorch model checkpoint.
  • mnist_handler.py: Contains the main handler that runs the inference.
  • requirements.txt: Contains the dependencies.
  • config.properties: Contains the configuration for the model server.

How to write the inference function in TorchServe

TorchServe Handler
...

class MNISTDigitClassifier(ImageClassifier):
    """
    MNISTDigitClassifier handler class. This handler extends class ImageClassifier from image_classifier.py, a
    default handler. This handler takes an image and returns the number in that image.

    Here method postprocess() has been overridden while others are reused from parent class.
    """

    image_processing = transforms.Compose([transforms.ToTensor(), transforms.Normalize((0.1307,), (0.3081,))])

    def __init__(self):
        super(MNISTDigitClassifier, self).__init__()
        self.profiler_args = {
            "activities": [ProfilerActivity.CPU],
            "record_shapes": True,
        }

    def postprocess(self, data):
        """The post process of MNIST converts the predicted output response to a label.

        Args:
            data (list): The predicted output from the Inference with probabilities is passed
            to the post-process function
        Returns:
            list : A list of dictionaries with predictions and explanations is returned
        """
        return data.argmax(1).tolist()
TorchServe requires a single function handle that takes in data and context as inputs and returns the inference output. In this case we are inheriting from the ImageClassifier class which is a default handler for image classification models. It already comes with the implementation for the entire pipeline. We just modify the postprocess method to return the predicted class. Please see TorchServe Custom Service docs for more details on how to write a custom handler.

Exporting the model in MAR (model archive) format

TorchServe neatly packages the model definition, handler and checkpoint into a single file called .mar file
torch-model-archiver --model-name mnist --version 1.0 --model-file mnist.py --serialized-file model/mnist_cnn.pt --handler mnist_handler.py --export-path ./model_store/
This will give us a mnist.mar file.
model_store/
└── mnist.mar

Running the server locally

  1. Install the dependencies
Shell
pip install -r requirements.txt
  1. Package the model in MAR format
Shell
torch-model-archiver --model-name mnist --version 1.0 --model-file mnist.py --serialized-file model/mnist_cnn.pt --handler mnist_handler.py --export-path ./model_store/
  1. Run the server
Shell
export MODEL_DIR="$(pwd)/model_store"
torchserve --foreground--model-store $MODEL_DIR --models all --ts-config config.properties --disable-token-auth --enable-model-api
  1. Test the server
Shell
curl -X POST -H "Content-Type: application/json" --data @./example.json http://0.0.0.0:8080/v2/models/mnist/infer
The output should look like this:
{
  "id": "d3b15cad-50a2-4eaf-80ce-8b0a428bd298",
  "model_name": "mnist",
  "model_version": "1.0",
  "outputs": [
    {
      "name": "input-0",
      "datatype": "INT64",
      "data": [
        1
      ],
      "shape": [
        1
      ]
    }
  ]
}

Deploying the model with TrueFoundry

To deploy the model, we need to package both the model file and the code. To do this, we can follow the steps below:
1

Log the MAR Model To Model Registry

Log the mnist.mar file to the model registry. You can follow the guide here to log the model to the registry.

Make sure to log only the mnist.mar file.
Log Model to Model Registry
2

Push the code to a Git repository or directly deploy from local machine

Once you have tested your code locally, we highly recommend pushing the code a Git repository. This allows you to version control the code and also makes the deployment process much easier. However, if you don’t have access to a Git repository, or the Git repositories are not integrated with Truefoundry, you can directly deploy from local laptop.You can follow the guide here to deploy your code.Configure the source code and build settings as follows:Configure Build SettingsThe command looks like this which references the MODEL_DIR environment variable where the model will be downloaded to.
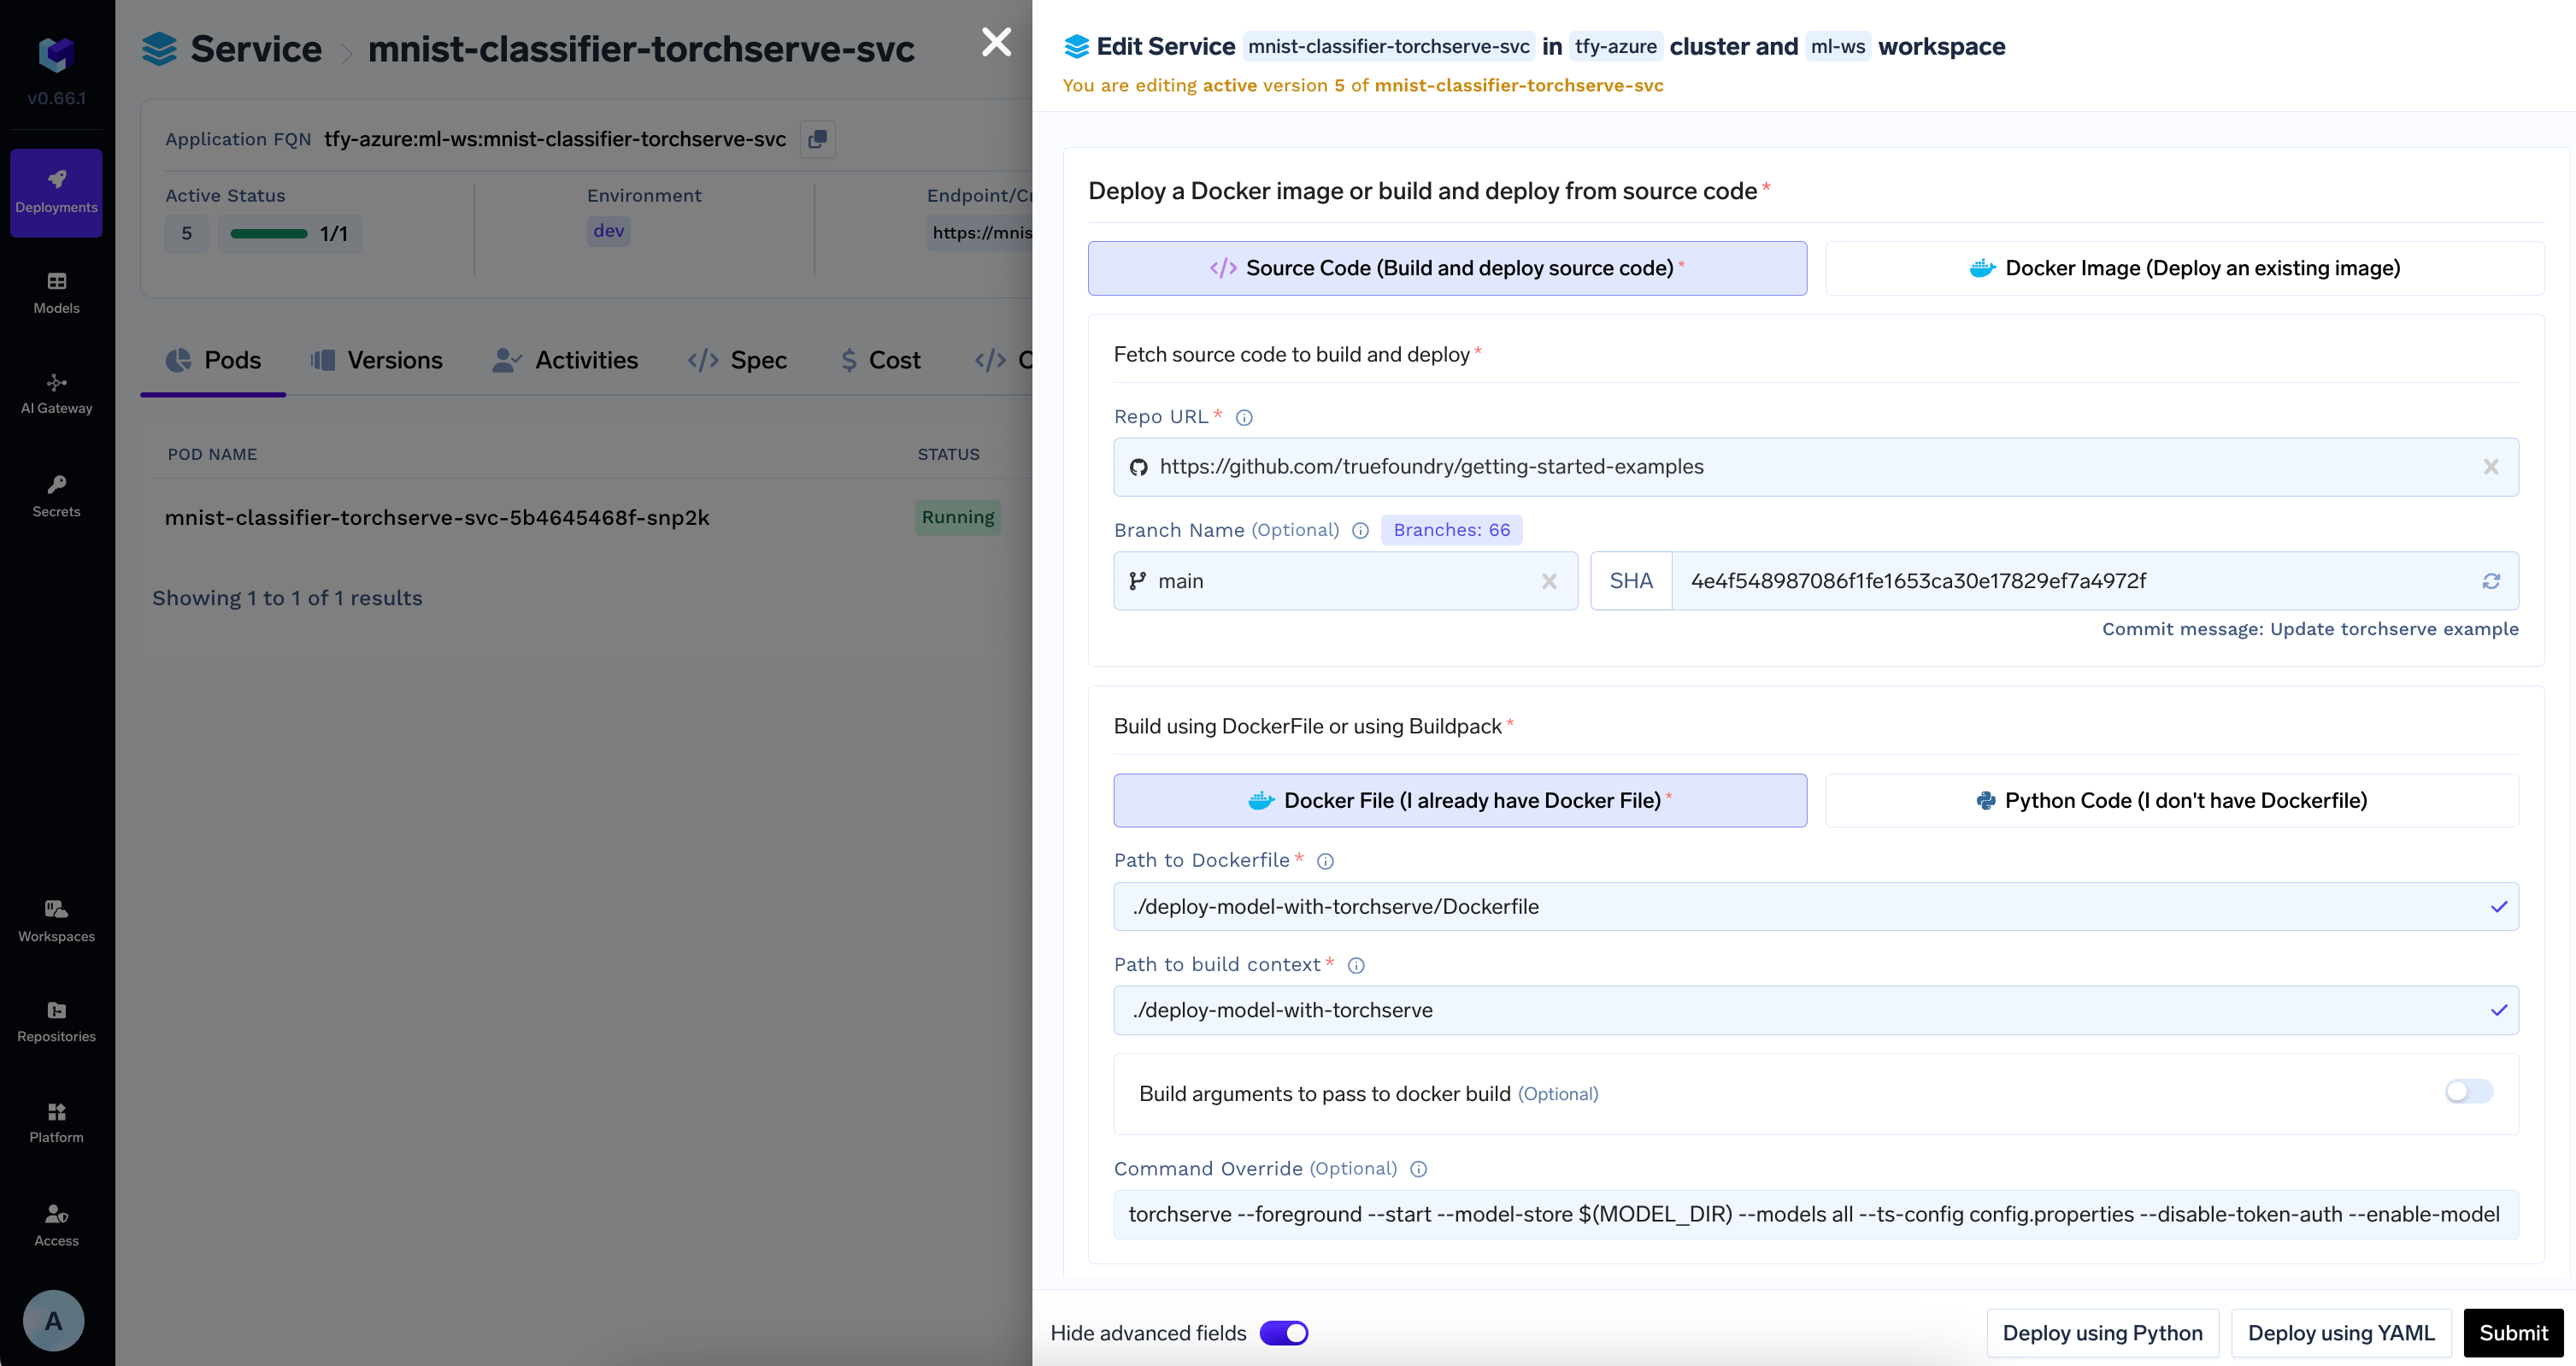
torchserve --foreground --start --model-store $(MODEL_DIR) --models all --ts-config config.properties --disable-token-auth --enable-model-api
3

Download Model from Model Registry in the deployment configuration

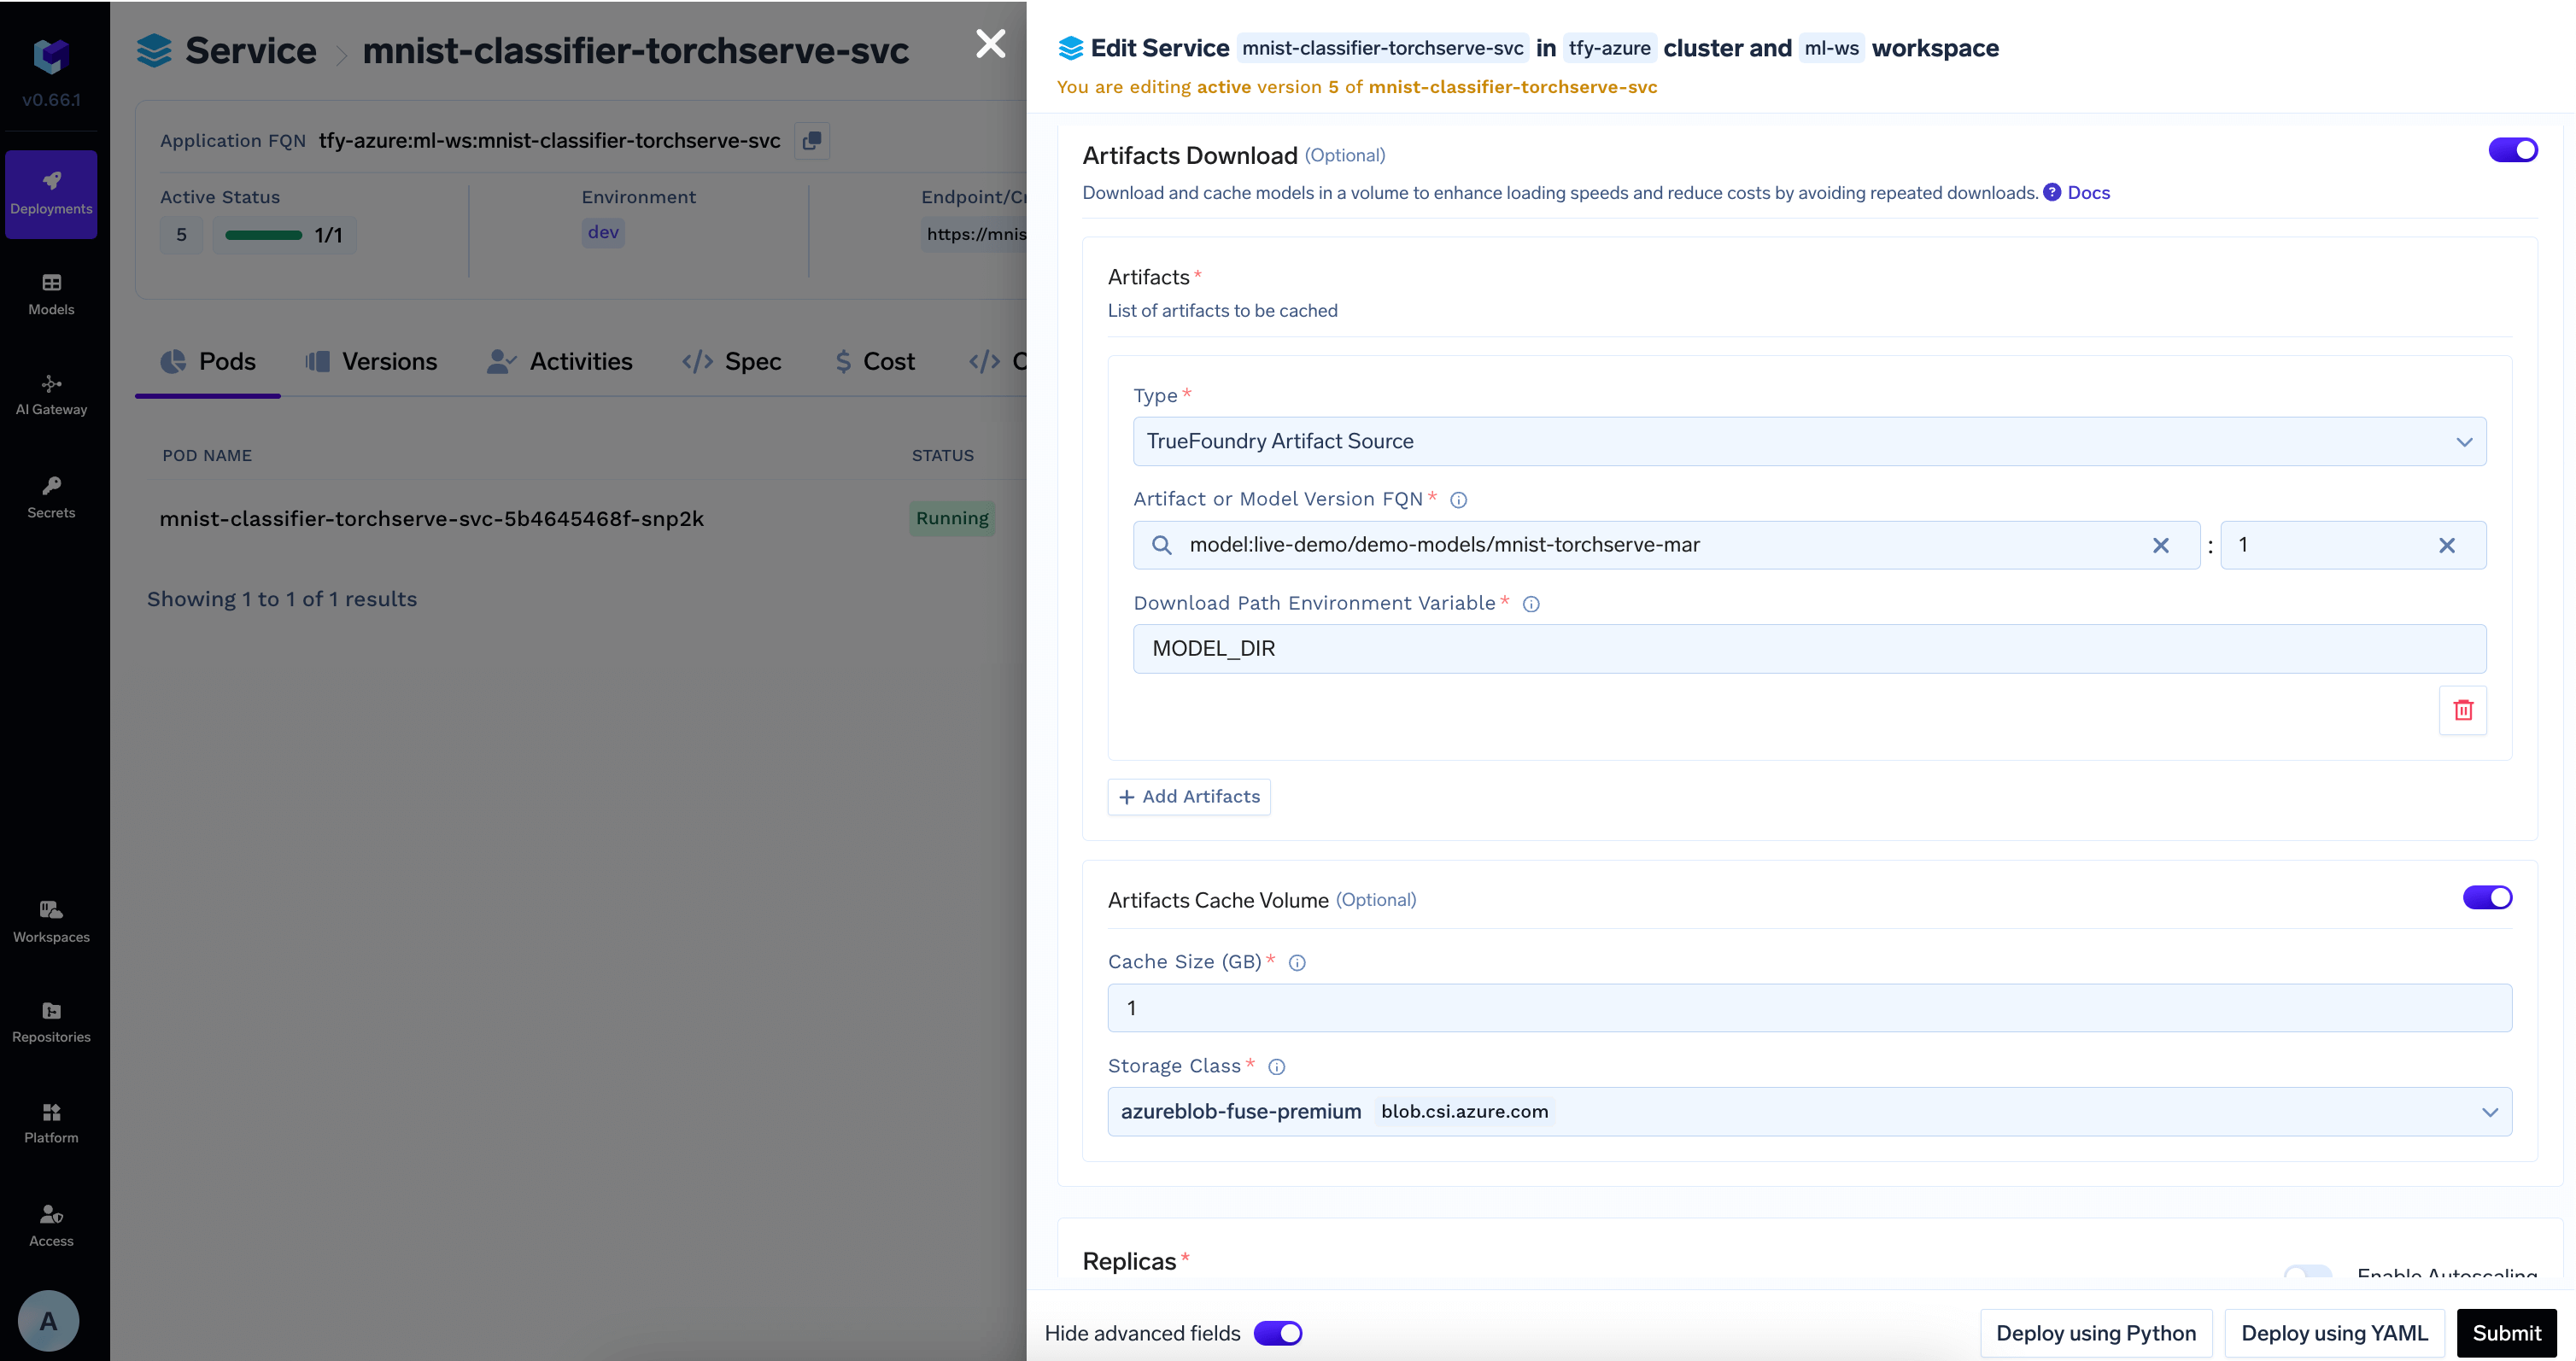
TrueFoundry can automatically download the model at the path specified in the MODEL_DIR environment variable to the deployed service.Add the model id and revision from HuggingFace Hub in Artifacts Download sectionDownload Model from Model Registry
4

View the deployment, logs and metrics

Once the deployment goes through, you can view the deployment, the pods, logs, metrics and events to debug any issues.