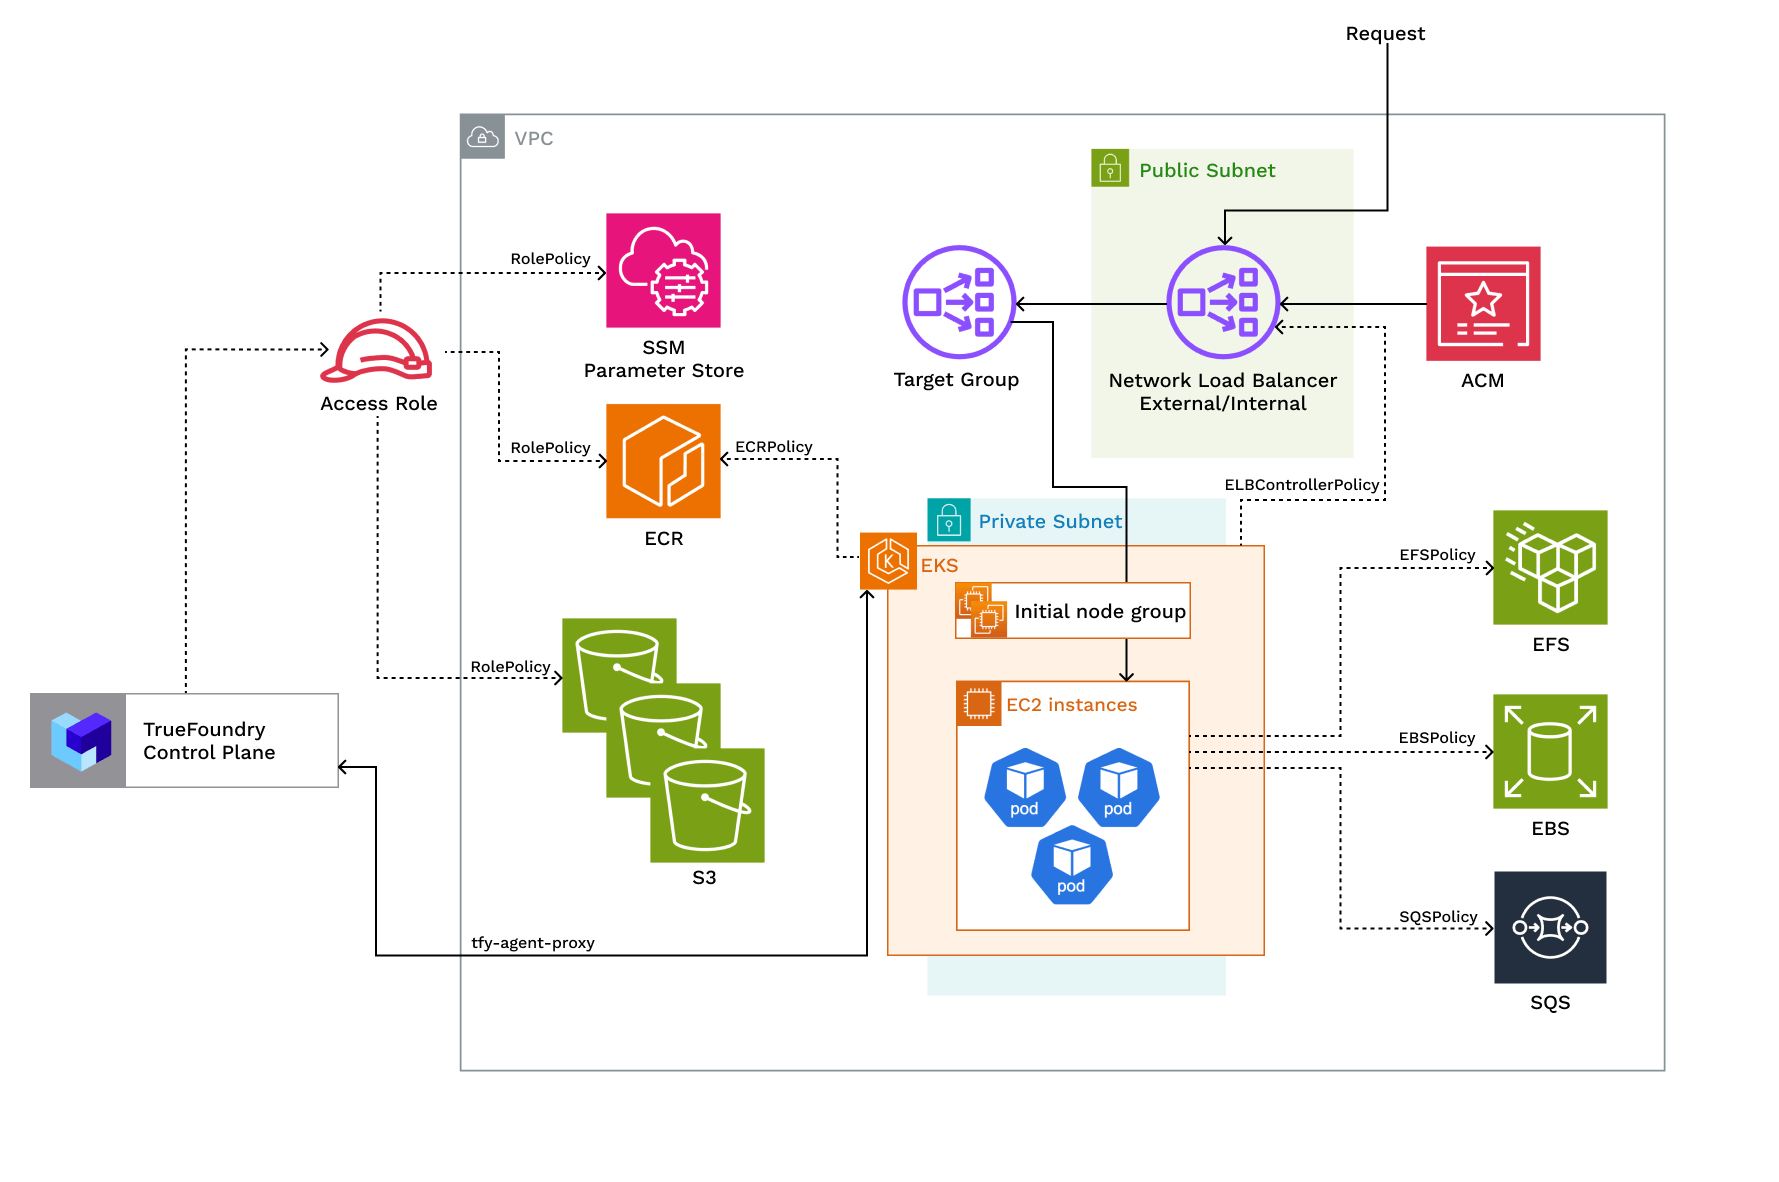
Access Policies Overview
Access Policies Overview
| Policy | Description |
|---|---|
| ELBControllerPolicy | Role assumed by load balancer controller to provision ELB when a service of type LoadBalancer is created |
| KarpenterPolicy and SQSPolicy | Role assumed by Karpenter to dynamically provision nodes and handle spot node termination |
| EFSPolicy | Role assumed by EFS CSI to provision and attach EFS volumes |
| EBSPolicy | Role assumed by EBS CSI to provision and attach EBS volumes |
| RolePolicy with policies for:- ECR, S3, SSM, EKS Use the trust relationship. | Role assumed by TrueFoundry to allow access to ECR, S3, and SSM services. If you are using TrueFoundry’s control plane the role will be assumed by arn:aws:iam::416964291864:role/tfy-ctl-euwe1-production-truefoundry-deps otherwise it will be your control plane’s IAM role |
| ClusterRole with policies: - AmazonEKSClusterPolicy - AmazonEKSVPCResourceControllerPolicy - EncryptionPolicy | Role that provides Kubernetes permissions to manage the cluster lifecycle, networking, and encryption |
| NodeRole with policies: AmazonEC2ContainerRegistryReadOnlyPolicy, AmazonEKS_CNI_Policy, AmazonEKSWorkerNodePolicy, AmazonSSMManagedInstanceCorePolicy | Role assumed by EKS nodes to work with AWS resources for ECR access, IP assignment, and cluster registration |
Requirements:
The requirements to setup compute plane in each of the scenarios is as follows:- Billing and STS must be enabled for the AWS account.
- Please make sure you have enough quotas for GPU/Inferentia instances on the account depending on your usecase. You can check and increase quotas at AWS EC2 service quotas
- Please make sure you have created a certifcate for your domain in AWS Certificate Manager (ACM) and have the ARN of the certificate ready. This is required to setup TLS for the load balancer.
- You need to have enough permissions on the AWS account to create the resources needed for the compute plane. Check this for more details. We usually recommend admin permission on the AWS account, but if you need the exact set of fine-grained permissions, you can check the list of permissions below:
json
- New VPC and New EKS Cluster
- Existing VPC and New EKS Cluster
- Existing EKS Cluster
- The new VPC should will have a CIDR range of /20 or larger, at least 2 availability zones and private subnets with CIDR
/24or larger. This is to ensure capacity for ~250 instances and 4096 pods. - If you are using custom networking, you need to have CGNAT IP address in each AZ. CGNAT space and route tables will be setup in the VPC.
- A NAT gateway will be provisioned to provide internet access to the private subnets.
- We should have egress access to
public.ecr.aws,quay.io,ghcr.io,tfy.jfrog.io,docker.io/natsio,nvcr.io,registry.k8s.ioso that we can download the docker images for argocd, nats, gpu operator, argo rollouts, argo workflows, istio, keda, etc.
Setting up compute plane
TrueFoundry compute plane infrastructure is provisioned using terraform. You can download the terraform code for your exact account by filling up your account details and downloading a script that can be executed on your local machine.1
Choose to create a new cluster or attach an existing cluster
Go to the platform section in the left panel and click on 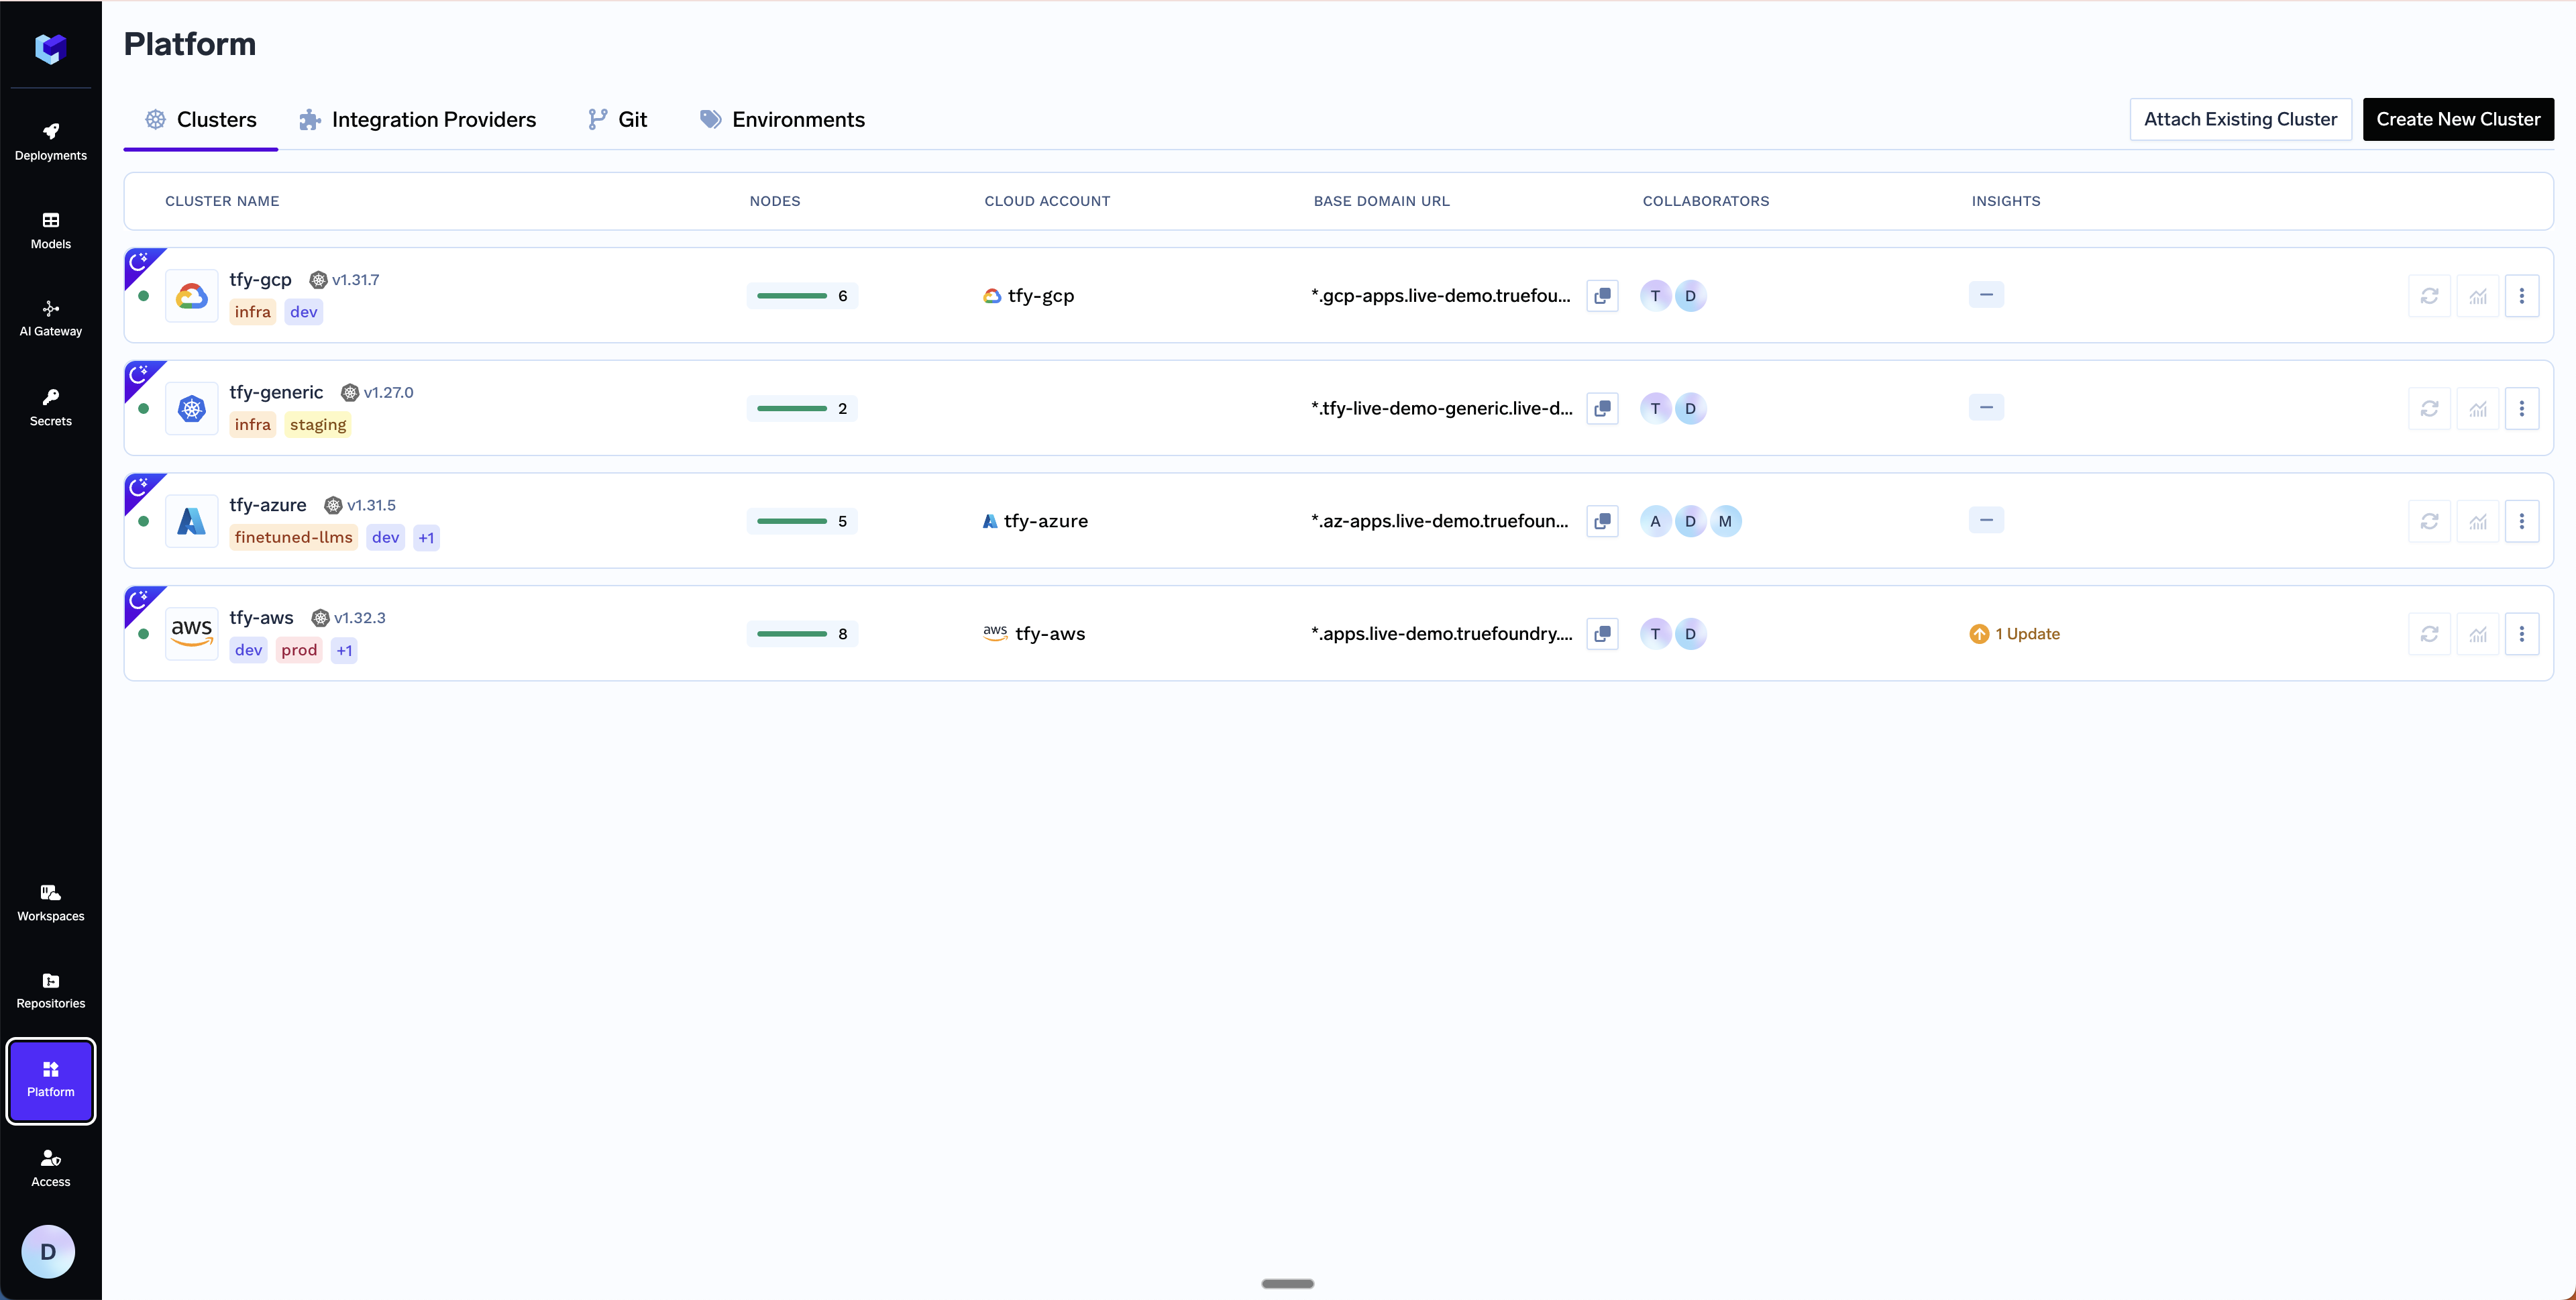
Clusters. You can click on Create New Cluster or Attach Existing Cluster depending on your use case. Read the requirements and if everything is satisfied, click on Continue.2
Get Domain and Certificate ARN
We will need a domain and certificate ARN to point to the load balancer that we will be creating in the next step. Let’s say you have a domain like
*.services.example.com - we will be creating a DNS record with this later in Step 6. We recommend using AWS Certificate Manager (ACM) to create the certificate since it’s easier to manage and renew the certificates automatically. To generate a certificate ARN, please follow the steps below. If you are not using AWS Certificate Manager, you can skip this step and continue to the next step.Create the certificate in AWS Certificate Manager
Create the certificate in AWS Certificate Manager
- Navigate to AWS Certificate Manager in the AWS console
- Request a public certificate
- Specify your domain (e.g.,
*.services.example.com) - Choose DNS validation (recommended)
- Add the CNAME records provided by ACM to your DNS provider. Follow the official AWS guide for DNS validation. For detailed steps on adding CNAME records, see AWS documentation on DNS validation
- Wait for the certificate to change to “Active” status (this may take 30 minutes or longer)
- Copy the certificate ARN for the next step (format will be like:
arn:aws:acm:region:account:certificate/certificate-id)
3
Fill up the form to generate the terraform code
A form will be presented with the details for the new cluster to be created. Fill in with your cluster details. Click Enter the domain and the certificate ARN that we got in previous step in the form as shown below.
Submit when done- Create New Cluster
- Attach Existing Cluster
The key fields to fill up here are:
Cluster Name- A name for your cluster.Region- The region where you want to create the cluster.Network Configuration- Choose betweenNew VPCorExisting VPCdepending on your use case.Authentication- This is how you are authenticated to AWS on your local machine. It’s used to configure Terraform to authenticate with AWS.S3 Bucket for Terraform State- Terraform state will be stored in this bucket. It can be a preexisting bucket or a new bucket name. The new bucket will automatically be created by our script.Load Balancer Configuration- This is to configure the load balancer for your cluster. You can choose betweenPublicorPrivateLoad Balancer, it defaults toPublic. You can also add certificate ARNs and domain names for the load balancer but these are optional.Platform Features- This is to decide which features like BlobStorage, ClusterIntegration, ParameterStore, DockerRegistry and SecretsManager will be enabled for your cluster. To read more on how these integrations are used in the platform, please refer to the platform features page.
4
Copy the curl command and execute it on your local machine
You will be presented with a 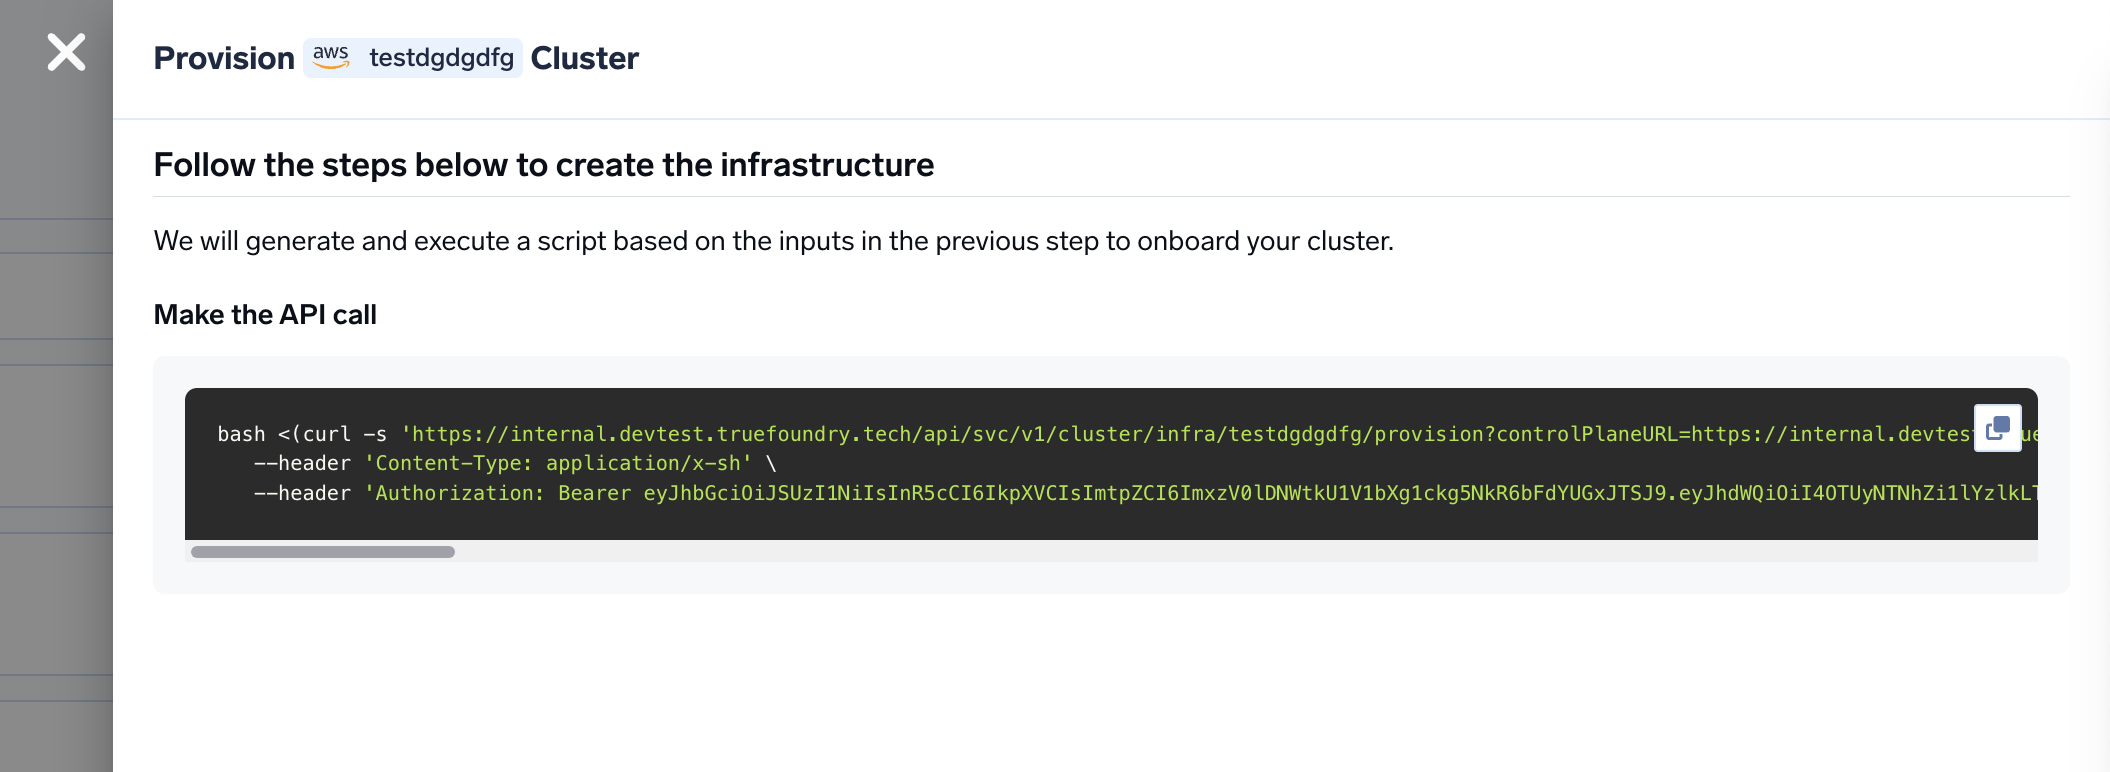
curl command to download and execute the script. The script will take care of installing the pre-requisites, downloading terraform code and running it on your local machine to create the cluster. This will take around 40-50 minutes to complete.5
Verify the cluster is showing as connected in the platform
Once the script is executed, the cluster will be shown as connected in the platform.
6
Create DNS Record
We can get the load-balancer’s IP address by going to the platform section in the bottom left panel under the Clusters section. Under the preferred cluster, you’ll see the load balancer IP address under the 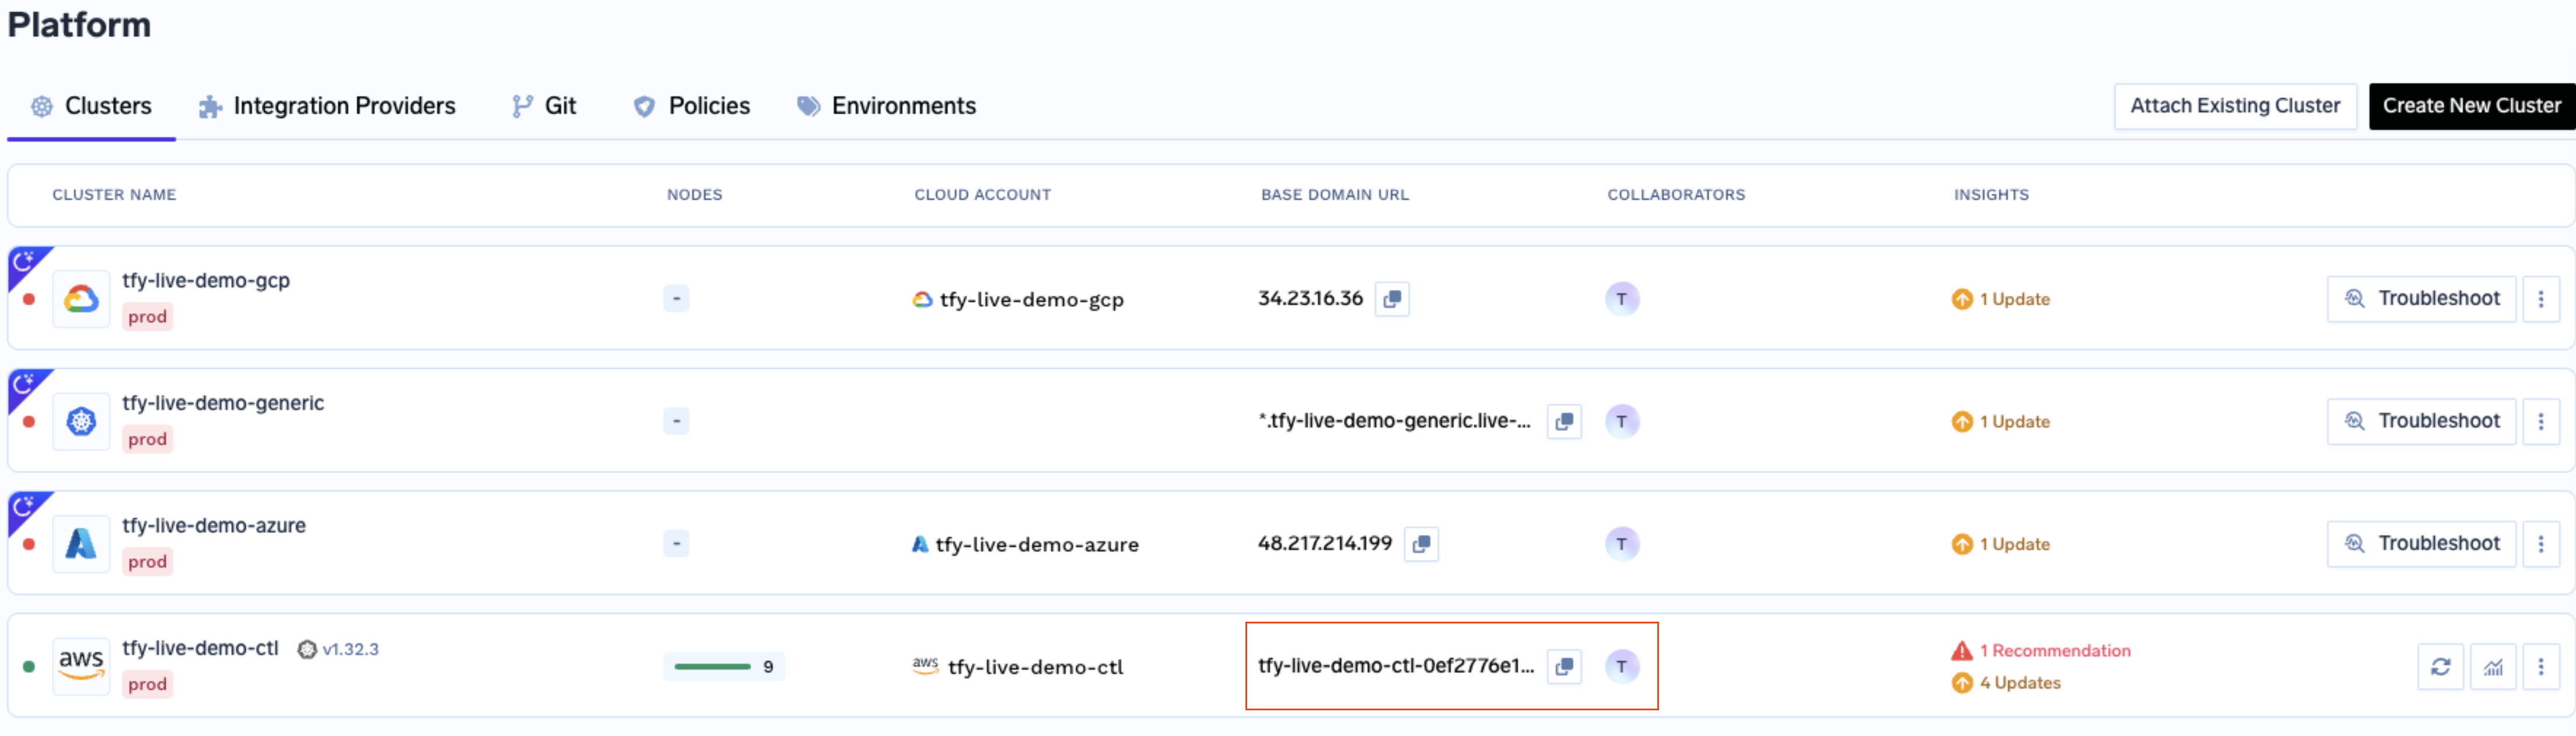
Base Domain URL section.| Record Type | Record Name | Record value |
|---|---|---|
| CNAME | *.tfy.example.com | LOADBALANCER_IP_ADDRESS |
7
Start deploying workloads to your cluster
You can start by going here
FAQ
Can I use cert-manager to add TLS to the load balancer and not use AWS Certificate Manager?
Can I use cert-manager to add TLS to the load balancer and not use AWS Certificate Manager?
Yes, you can use cert-manager to add TLS to the load balancer and not use AWS Certificate Manager. You can follow the instructions here to install cert-manager and add TLS to the load balancer.
Can I use my own certificate and key files to add TLS to the load balancer?
Can I use my own certificate and key files to add TLS to the load balancer?
Yes, please consult this guide to add your own certificate and key files to the load balancer.
How to review the Terraform code that is generated by the platform?
How to review the Terraform code that is generated by the platform?
In Step 4 in the guide above, when you run the curl command, the terraform code will be downloaded to your local machine. The script will ask you before executing the terraform code at which point you can stop the execution and review the terraform code generated by the platform.