Deploy a Dockerized Service
What you'll learn
- Creating a Gradio application to serve your model
- Dockerizing the Gradio application
- Deploying our dockerized application via
servicefoundry
This is a guide to deploy a scikit-learn model via Dockerfile and servicefoundry.
For this, we are going to create a Gradio application and dockerize it.
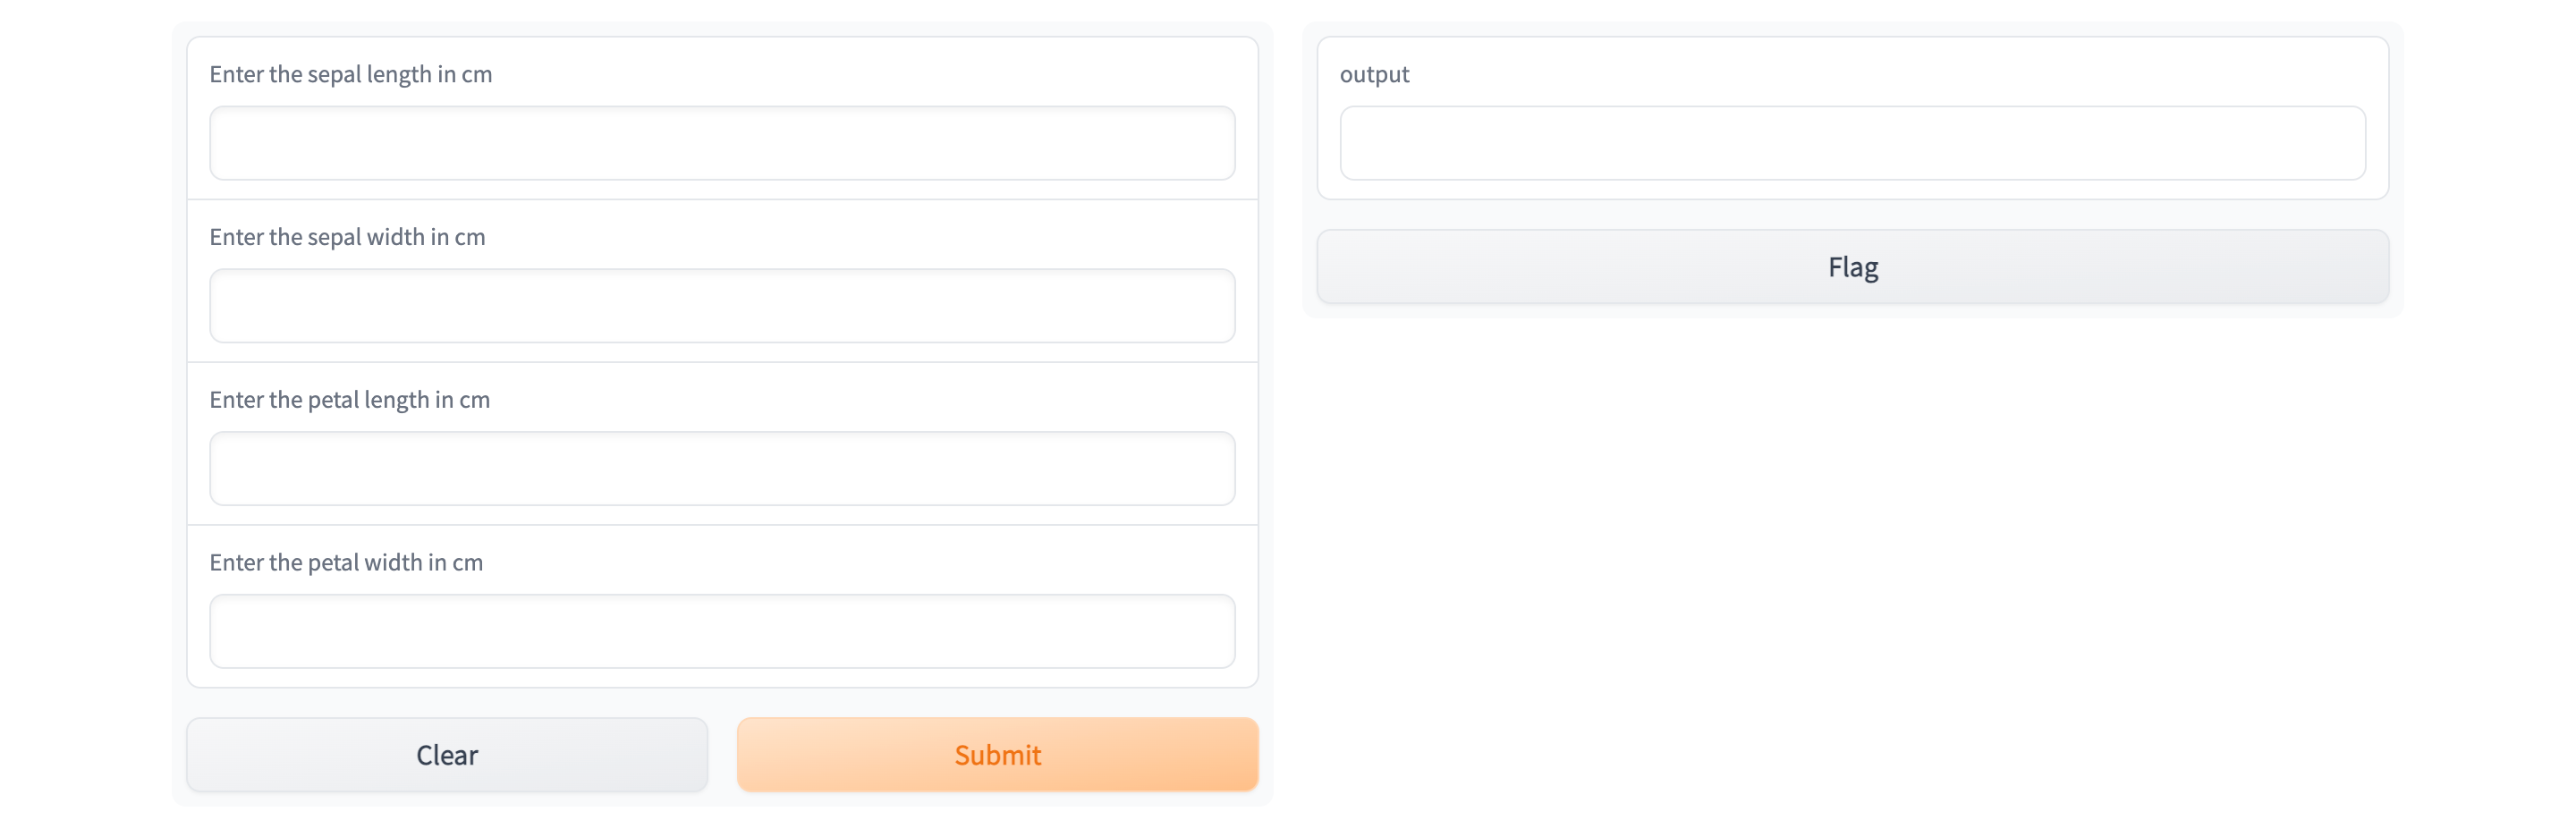
After you complete the guide, you will have a successfully deployed model. Your deployed Gradio application would look like the following:
Project structure
To complete this guide, you are going to create the following files:
app.py: contains our inference and Gradio app codeDockerfile: contains our docker image build instructionsiris_classifier.joblib: the pre-trained model filedeploy.py/deploy.yaml: contains our deployment code / deployment configuration. (Depending on whether you choose to use our python SDK or create a YAML file)requirements.txt: contains the dependencies.
Your final file structure is going to look like this:
.
├── app.py
├── iris_classifier.joblib
├── Dockerfile
├── deploy.py / deploy.yaml
└── requirements.txt
As you can see, all the following files are created in the same folder/directory.
Model details
For this guide we have already trained a model.
The given model has been trained on Iris dataset. Then it is stored as a joblib file in google drive.
Attributes :
sepal length in cm, sepal width in cm, petal length in cm, petal width in cm
Predicted Attribute :
class of iris plant (one of the following - Iris Setosa, Iris Versicolour, Iris Virginica)
Step 1: Fetching the model
Download the model from the following link.
Then move the model in your development directory.
Afterwards, your directory should look like this :
.
└── iris_classifier.joblib
Step 2: Implement the inference service code.
The first step is to create a web Interface and deploy the model.
For this, we are going to use Gradio for this. Gradio is a python library using which we can quickly create web interface on top of our model inference functions.
Create the app.py and requirements.txt files in the same directory where the model is stored.
.
├── iris_classifier.joblib
├── app.py
└── requirements.txt
app.py
app.pyimport os
import joblib
import pandas as pd
import gradio as gr
model = joblib.load("iris_classifier.joblib")
def model_inference(sepal_length: float, sepal_width: float, petal_length: float, petal_width: float) -> int:
data = dict(
sepal_length=sepal_length,
sepal_width=sepal_width,
petal_length=petal_length,
petal_width=petal_width,
)
prediction = int(model.predict(pd.DataFrame([data]))[0])
return prediction
sepal_length_input = gr.Number(label = "Enter the sepal length in cm")
sepal_width_input = gr.Number(label = "Enter the sepal width in cm")
petal_length_input = gr.Number(label = "Enter the petal length in cm")
petal_width_input = gr.Number(label = "Enter the petal width in cm")
inputs = [sepal_length_input, sepal_width_input, petal_length_input, petal_width_input]
output = gr.Number()
gr.Interface(
fn=model_inference,
inputs=inputs,
outputs=output,
).launch(server_name="0.0.0.0", server_port=8080)
Click on the Open Recipe below to understand the app.py:
requirements.txt
requirements.txtgradio==3.2
scikit-learn==1.0.2
joblib
pandas
Step 3: Dockerize the gradio application
Now we will create the Dockerfile for the gradio application.
.
├── iris_classifier.joblib
├── app.py
├── Dockerfile
└── requirements.txt
Dockerfile
DockerfileThe Dockerfile contains instructions to build the image.
FROM python:3.9
COPY ./requirements.txt /tmp/
RUN pip install -U pip && pip install -r /tmp/requirements.txt
COPY . ./app
WORKDIR app
ENTRYPOINT python app.py
Click on the Open Recipe below to understand the Dockerfile:
Step 4: Deploying the inference API
You can deploy services on TrueFoundry programmatically either using our Python SDK, or via a YAML file.
So now you can choose between creating a deploy.py file, which will use our Python SDK.
Or you can choose to create a deploy.yaml configuration file and then use the servicefoundry deploy command
Via python SDK
File Structure
.
├── iris_classifier.joblib
├── app.py
├── deploy.py
├── Dockerfile
└── requirements.txt
deploy.py
deploy.pyIn the code below, ensure to replace "YOUR_WORKSPACE_FQN" in the last line with your WORKSPACE_FQN
import argparse
import logging
from servicefoundry import Build, Service, DockerFileBuild, Resources, Port

logging.basicConfig(level=logging.INFO)

parser = argparse.ArgumentParser()
parser.add_argument("--workspace_fqn", required=True, type=str)
parser.add_argument("--host", required=True, type=str)
args = parser.parse_args()

image = Build(
    build_spec=DockerFileBuild()
)

service = Service(
    name="docker-gradio",
    image=image,
    ports=[
        Port(
            port=8080,
            host=args.host
        )
    ],
    resources=Resources(memory_limit=1500, memory_request=1000),
)
service.deploy(workspace_fqn=args.workspace_fqn)
Follow the recipe below to understand the deploy.py file :
Picking a value for
hostProviding a host value depends on the base domain urls configured in the cluster settings, you can learn how to find the base domain urls available to you here
For e.g. If your base domain url is
*.truefoundry.your-org.comthen a valid value can befastapi-your-workspace-8000.truefoundry.your-org.com.Alternatively if you have a non wildcard based domain url e.g.
truefoundry.your-org.com, then a valid value can betruefoundry.your-org.com/fastapi-your-workspace-8000
To deploy using Python API use:
python deploy.py --workspace_fqn <YOUR WORKSPACE FQN HERE> --host <YOUR HOST>
Run the above command from the same directory containing the
app.pyandrequirements.txtfiles.
Via yaml file
File Structure
.
├── iris_classifier.joblib
├── app.py
├── deploy.yaml
├── Dockerfile
└── requirements.txt
deploy.yaml
deploy.yamlname: docker-gradio
type: service
image:
type: build
build_source:
type: local
build_spec:
type: dockerfile
ports:
- port: 8080
host: <Provide a host value based on your configured domain>
resources:
memory_limit: 1500
memory_request: 1000
Follow the recipe below to understand the deploy.yaml code:
With YAML you can deploy the inference API service using the command below:
servicefoundry deploy --workspace-fqn YOUR_WORKSPACE_FQN --file deploy.yaml
Run the above command from the same directory containing the
app.pyandrequirements.txtfiles.
Interact with the service
After you run the command given above, you will get a link at the end of the output. The link will take you to your application's dashboard.
Once the build is complete you should get the endpoint for your service :-
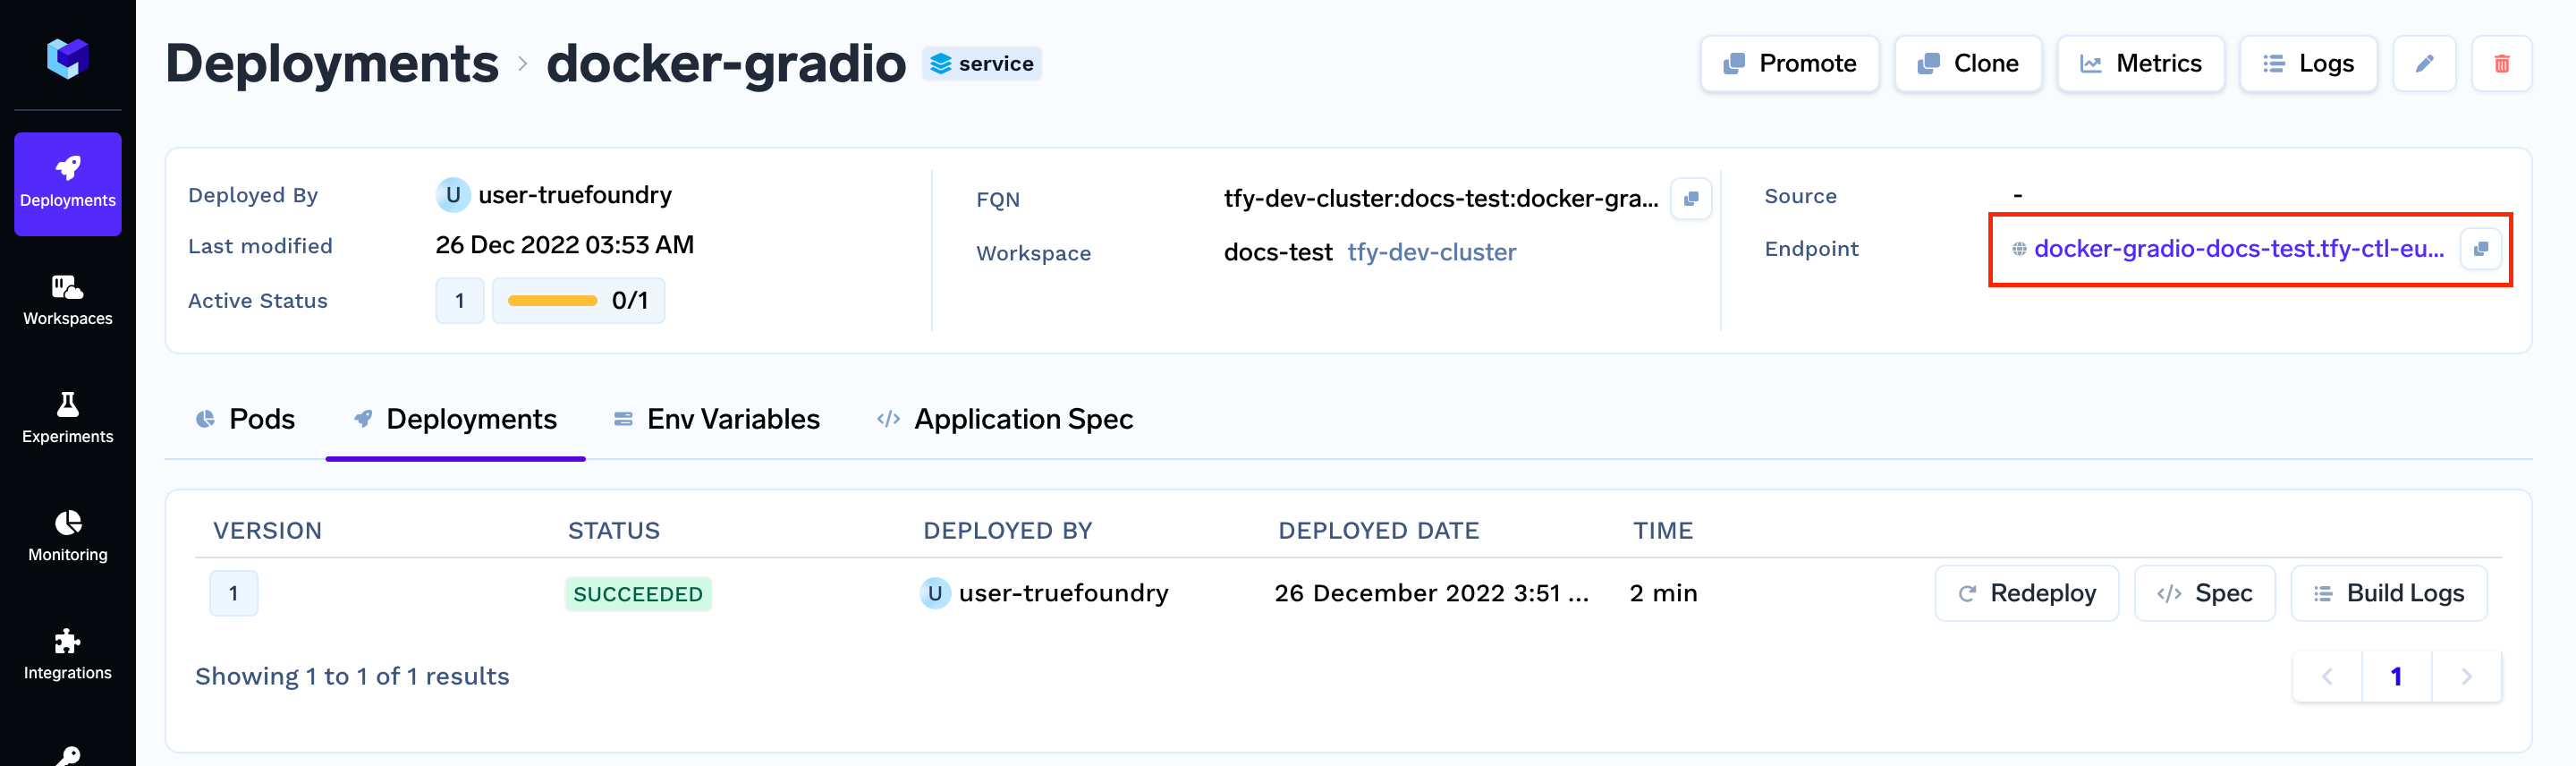
Click on the endpoint, and it will open you deployed Gradio service.
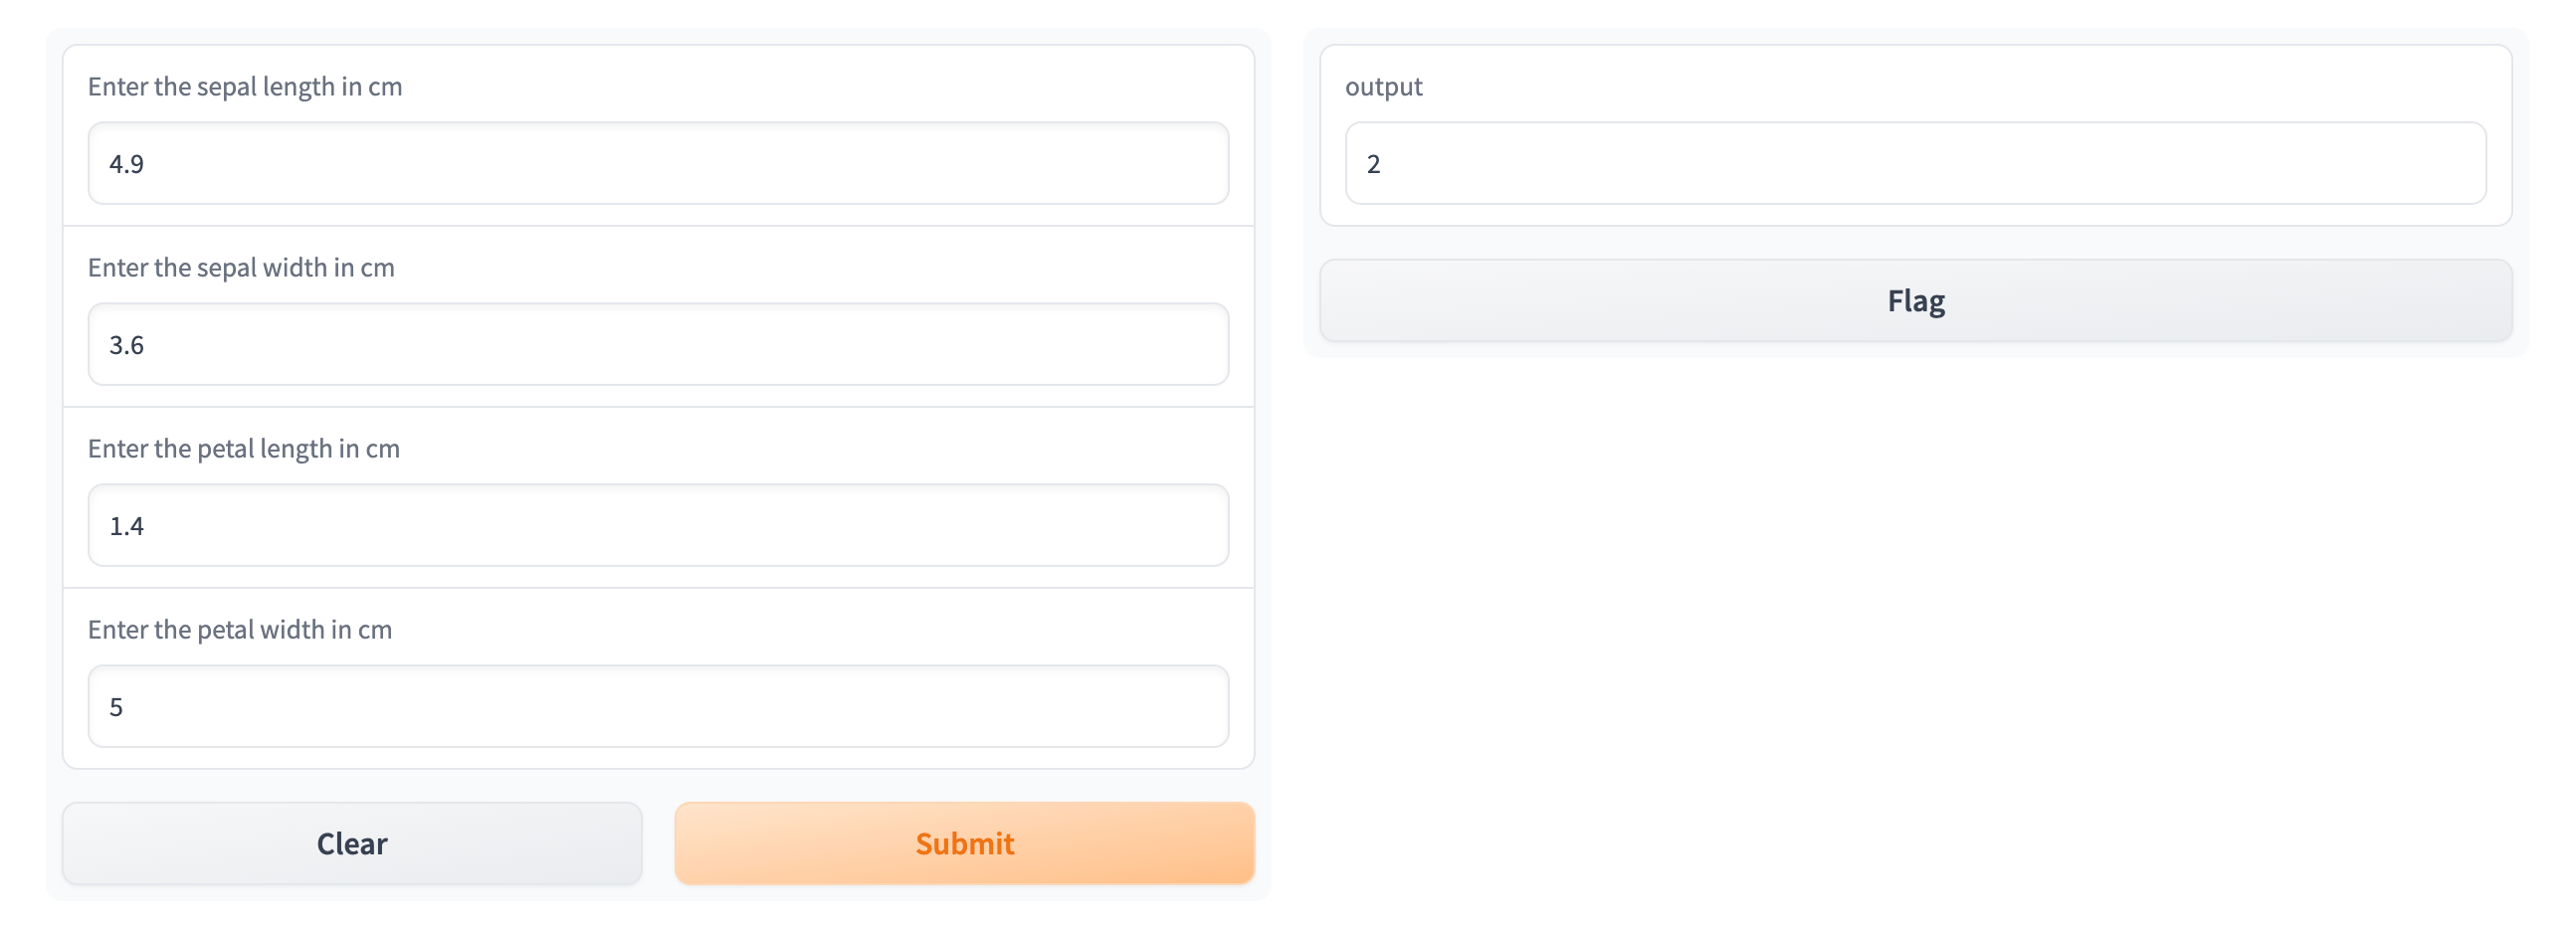
Now you can enter your data and get the output.
Next Steps
Updated 4 months ago